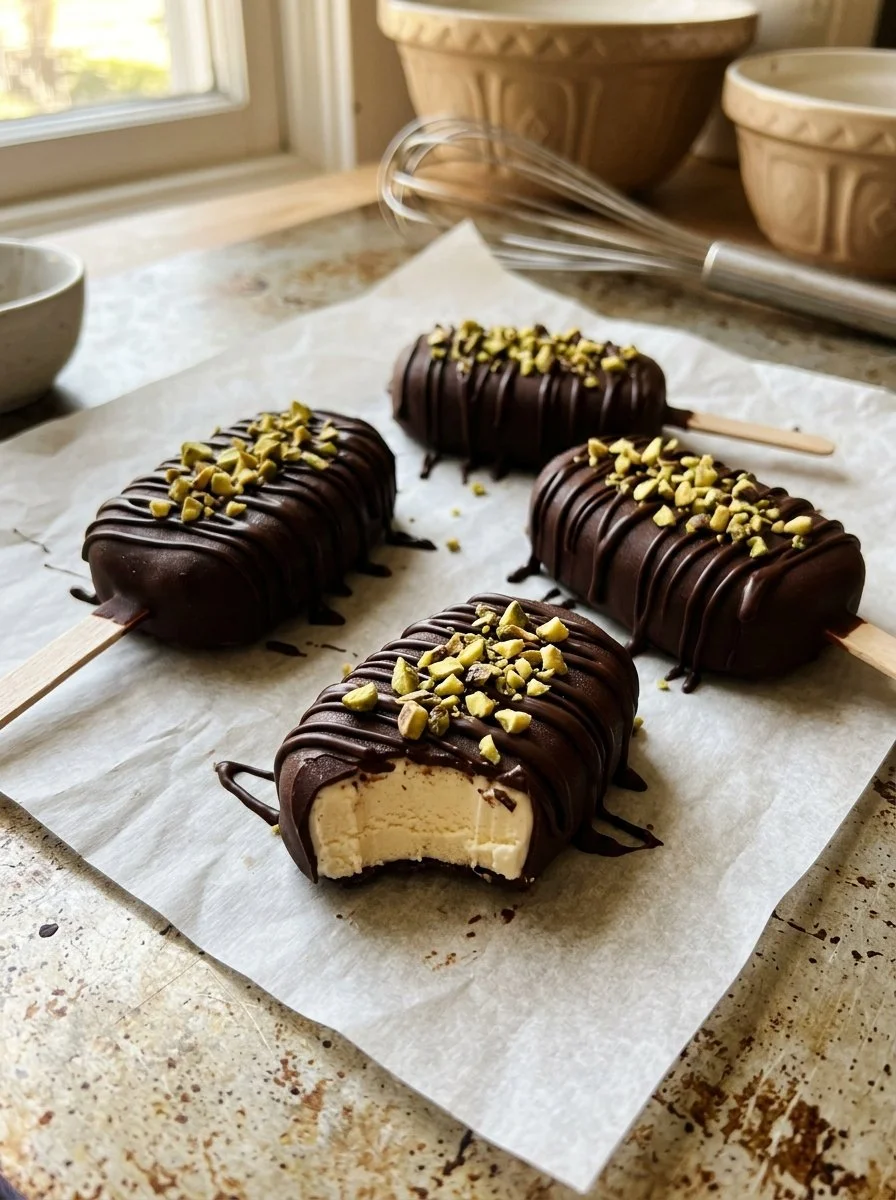
Irresistible Healthy Pistachio Ice Cream Bars (Dairy Free, Paleo)
Introduction
Summer always brings up fond memories of my childhood—long, lazy days filled with sunshine and, of course, ice cream! I can still hear the jingle of the ice cream truck echoing down the street, as kids scampered to trade their allowance for a creamy delight. As I’ve grown, I’ve become more conscious about what I eat, but I refuse to give up those cherished flavors. That’s where these Healthy Pistachio Ice Cream Bars (Dairy Free, Paleo) come into play.
Imagine biting into a luscious, creamy bar infused with the subtle nutty flavor of pistachios, only to be greeted by a silky dark chocolate coating. It’s like an extravagant dessert and a childhood treat rolled into one. What makes these bars extra special is that they cater to all sorts of dietary needs without skimping on taste or texture.
Unlike many store-bought options, these bars are made with wholesome ingredients—no processed sugars or dairy here! You’ll learn how to recreate these nostalgic flavors using natural components that align with a healthy lifestyle while focusing on that fantastic ice cream experience. So, grab your blender and join me in making memories, one delightful bite at a time!
What Are Healthy Pistachio Ice Cream Bars (Dairy Free, Paleo)?
The origins of these delightful ice cream bars can be traced back to my desire to recreate the childhood joy of summer treats, but with a twist that aligns with a modern healthy diet. The beauty of Healthy Pistachio Ice Cream Bars lies in their balance of creamy texture and the crunch of pistachios. Each bite is smooth yet subtly textured, with the perfect hint of sweetness from maple syrup.
What makes these bars unique is not just their delicious flavor but also their versatility. You can enjoy them as a refreshing dessert on a hot day, pack them for a picnic, or even sneak one in your lunch box for a mid-day pick-me-up. Plus, they combine the benefits of healthy fats and protein from nuts and coconut milk, making them your new favorite guilt-free indulgence!
Why You’ll Love This Recipe
Simple Ingredients: This recipe uses just a few wholesome ingredients you likely already have in your pantry. The beautiful thing about making your ice cream bars is you control what goes in, ensuring everything is natural and free from additives.
Budget-Friendly: If you’ve ever purchased premium dairy-free ice cream bars, you know they can be pricey. Making these bars at home saves you money while letting you enjoy an equally delightful treat.
Customization Galore: Want to swap out the pistachios for almonds or add a hint of mint flavor? Go right ahead! The base of this recipe is super flexible and allows for endless variations to suit your tastes.
Easy to Make: Don’t worry if you’re not a professional chef—this recipe is straightforward and perfect for all skill levels. If you can blend and freeze, you can make these bars.
Perfect for Gatherings: Whether it’s a summer BBQ or a cozy family night, these bars are always a hit! They’re perfect for sharing, and you’ll love the reactions you get when you reveal that these scrumptious desserts are healthy.
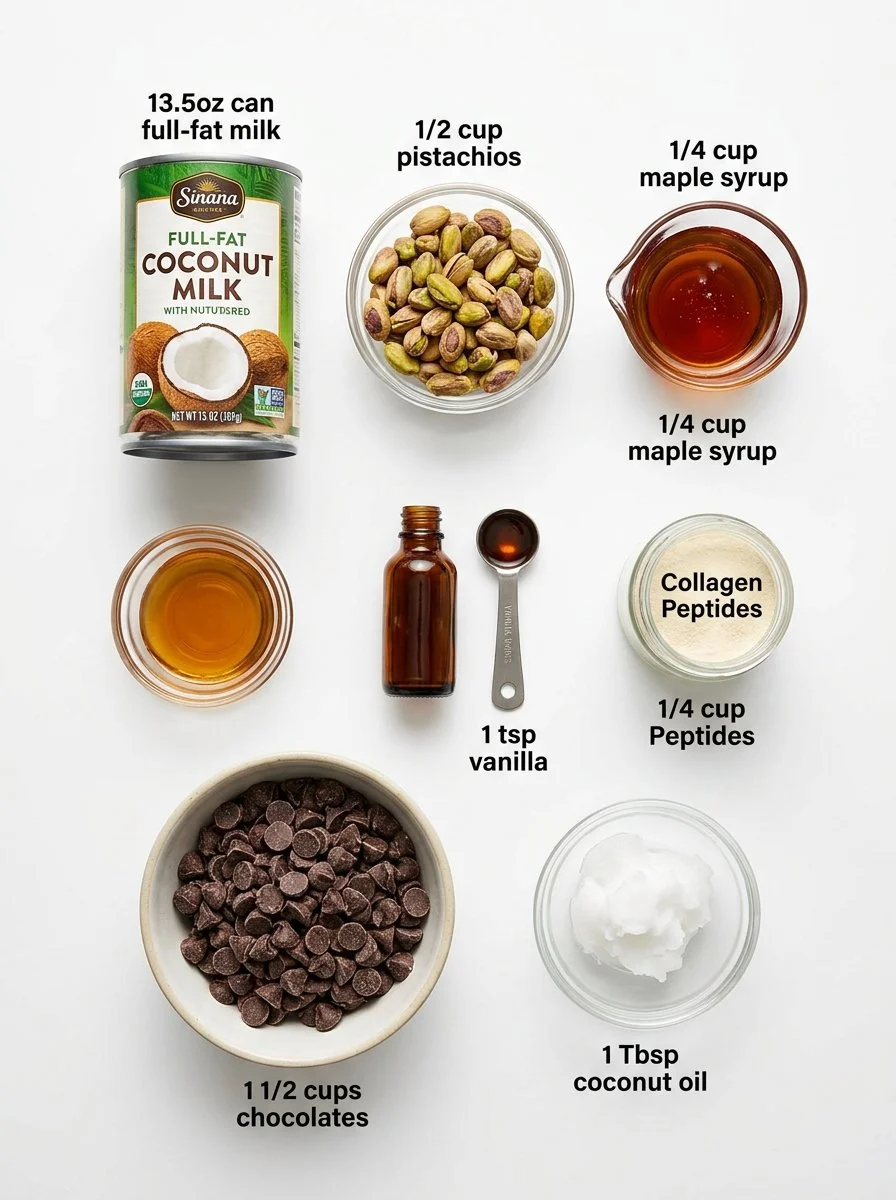
Ingredients

- 1 (13.5oz) can full-fat coconut milk: Opt for organic for a richer flavor.
- 1/2 cup shelled pistachios: Raw or roasted (unsalted) work well; they give a delightful crunch!
- 1/4 cup maple syrup: Use pure maple syrup for the best sweetness. Agave syrup can be a substitute, but it alters the flavor slightly.
- 1 tsp vanilla extract: Choose quality pure vanilla for a more intense flavor.
- 1/4 cup collagen peptides (optional): Perfect for adding protein without affecting the taste. Look for a grass-fed option for the best quality.
- 1 1/2 cups dark chocolate: Use at least 70% cocoa for a rich, indulgent coating.
- 1 Tbsp coconut oil: Refined coconut oil has a neutral flavor, but unrefined will bring a coconut taste to the party, which many people love!
Prep Notes: Make sure your coconut milk is at room temperature, as this helps it blend more easily.
Step-by-Step Instructions
Prep Your Molds: Place ice cream molds on a baking sheet and add sticks. This setup helps every bar remain upright during freezing.
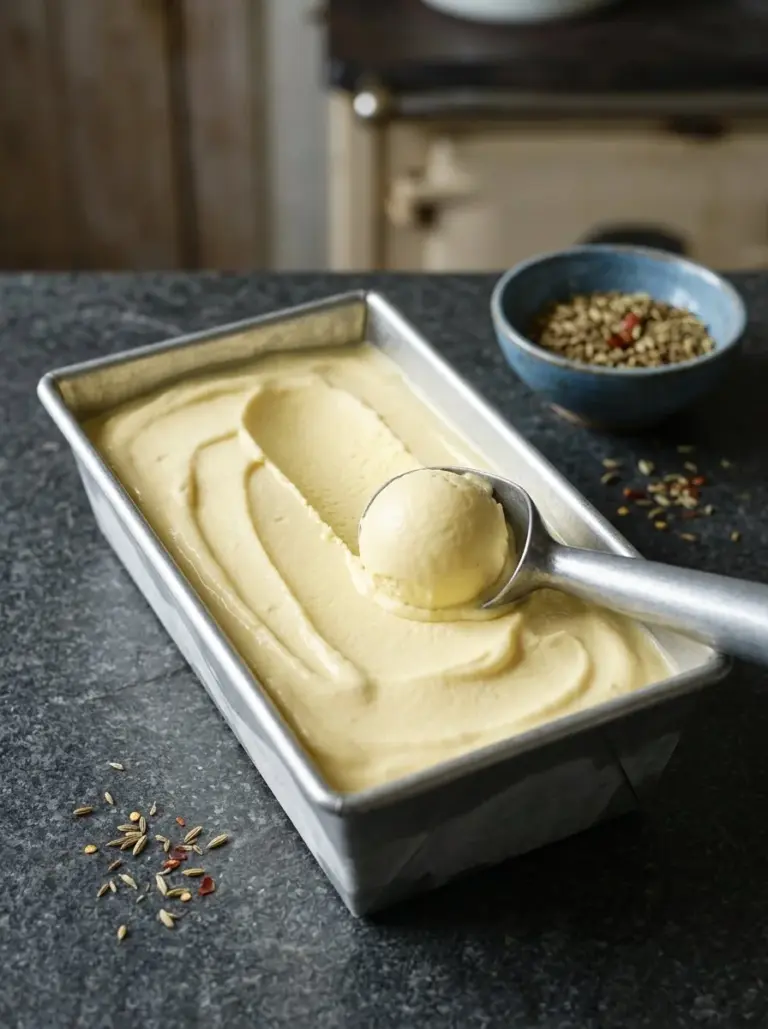
Blend the Filling: In a blender, combine coconut milk, pistachios, maple syrup, vanilla extract, and optional collagen peptides. Blend until smooth and creamy; about 1-2 minutes should do the trick. You can pause to scrape down the sides for a uniform mixture.
Pour Into Molds: Carefully transfer the mixture into the molds, leaving about 1/2 inch of space at the top to allow for expansion as they freeze.
Freeze: Freeze for at least 4 hours, or until they are solidified. You know they’re ready when you can easily insert a toothpick and it stands up straight.
Prepare the Chocolate Coating: In a microwave-safe bowl, melt dark chocolate along with coconut oil. Heat in 30-second increments, stirring in between until smooth and silky.
Dip the Bars: Once the bars are set, carefully remove them from the molds and dip each one into the melted chocolate. Make sure to coat each bar evenly for that luscious chocolatey exterior.
Set the Bars: Place the dipped bars on a parchment-lined baking sheet and freeze again until the chocolate hardens, about 30 minutes.
Storage: Keep the bars in an airtight container in the freezer for up to two months—if you can resist eating them all first!
Expert Tips & Troubleshooting
- Tip 1: If the chocolate hardens too quickly, add a touch more coconut oil to thin it out for easier dipping.
- Tip 2: Use silicone molds for easy removal of the bars. You can also line plastic molds with parchment paper for ease.
- Tip 3: Let your bars sit at room temperature for a few minutes before attempting to remove them from the mold. This gives them a little leeway, making them easier to extract without breaking.
- Tip 4: If you’re making these ahead of a gathering, freeze them a day ahead, ensuring you have tasty treats ready to impress your guests!
- Storage Recommendation: Store in an airtight container, separated by parchment paper if stacking. They’ll last about two months in the freezer without losing flavor.
Serving Suggestions
These delicious ice cream bars are wonderfully versatile! Serve them up with a side of fresh fruit like strawberries or a dollop of whipped coconut cream for an extra touch of sweetness. If you’re feeling fancy, drizzle some extra melted chocolate or a sprinkle of sea salt on top to elevate the presentation. These bars are perfect for summer gatherings, after-dinner treats, or even as a fun snack for kids after school!
Variations & Substitutions
- Flavor Combinations: Swap the pistachios for almonds or walnuts for a different nutty flavor that still keeps it healthy.
- Dairy-Free Adaptations: To keep this truly dairy-free, stick to 70% dark chocolate or find dairy-free varieties specifically.
- Seasonal Variations: Try adding in some lavender, a dash of cardamom, or even a few dollops of almond butter for a seasonal twist!
Nutrition & Storage Info
- Prep Time: 15 minutes
- Cook Time: 0 minutes (freezing time excluded)
- Total Time: 4+ hours (including freezing)
- Yield: Approximately 6 bars
- Estimated Calories: About 150 calories per bar
- Storage Instructions: Store in an airtight container in the freezer.
- Duration: Lasts for up to 2 months in the freezer.
FAQ Section
Can I use a different nut instead of pistachios?
Absolutely! Almonds or cashews work wonderfully too.Is there a vegan option?
Yes, our recipe is already vegan as it contains no animal products.Can I make these without collagen peptides?
Yes, simply omit them, and the recipe will still turn out delicious!How do I store these?
Place them in an airtight container in the freezer for optimal freshness.Why is the coconut milk at room temperature?
This helps achieve a smooth blend, leading to a creamier texture.How do I fix a runny chocolate coating?
Simply add a bit more coconut oil to create a thicker consistency when melting.Can I use almond milk instead of coconut milk?
You can, but it will alter the texture and creaminess of the bars.What if my bars don’t come out easily?
Allow them to sit at room temperature for a few minutes before trying to remove them.Can I double the recipe?
Sure! Just make sure you have enough molds and space in your freezer.How do I know when the bars are fully frozen?
They’ll feel solid, and a toothpick inserted will come out clean without any mixture sticking.
Conclusion
These Healthy Pistachio Ice Cream Bars (Dairy Free, Paleo) are not just a recipe; they are a way to create beautiful memories—one delicious bite at a time. I encourage you to try them out and share your creations with friends and family. You might find that they become a staple not only in your kitchen but in your heart. I would love to hear your thoughts on this recipe or any variations you try out, so please leave a comment below!
If you’re looking for more delicious and healthy dessert ideas, check out my recipe for Avocado Chocolate Mousse and Vegan Coconut Macaroons. Happy cooking!

Healthy Pistachio Ice Cream Bars
Ingredients
Method
- Place ice cream molds on a baking sheet and add sticks to help the bars remain upright during freezing.
- In a blender, combine coconut milk, pistachios, maple syrup, vanilla extract, and optional collagen peptides. Blend until smooth and creamy; about 1-2 minutes.
- Carefully transfer the mixture into the molds, leaving about 1/2 inch of space at the top to allow for expansion as they freeze.
- Freeze for at least 4 hours, or until they are solidified. They are ready when a toothpick can be inserted and stands up straight.
- In a microwave-safe bowl, melt dark chocolate along with coconut oil, heating in 30-second increments and stirring until smooth.
- Once the bars are set, carefully remove them from the molds and dip each one into the melted chocolate, coating evenly.
- Place the dipped bars on a parchment-lined baking sheet and freeze again until the chocolate hardens, about 30 minutes.