Table of Contents
Table of Contents
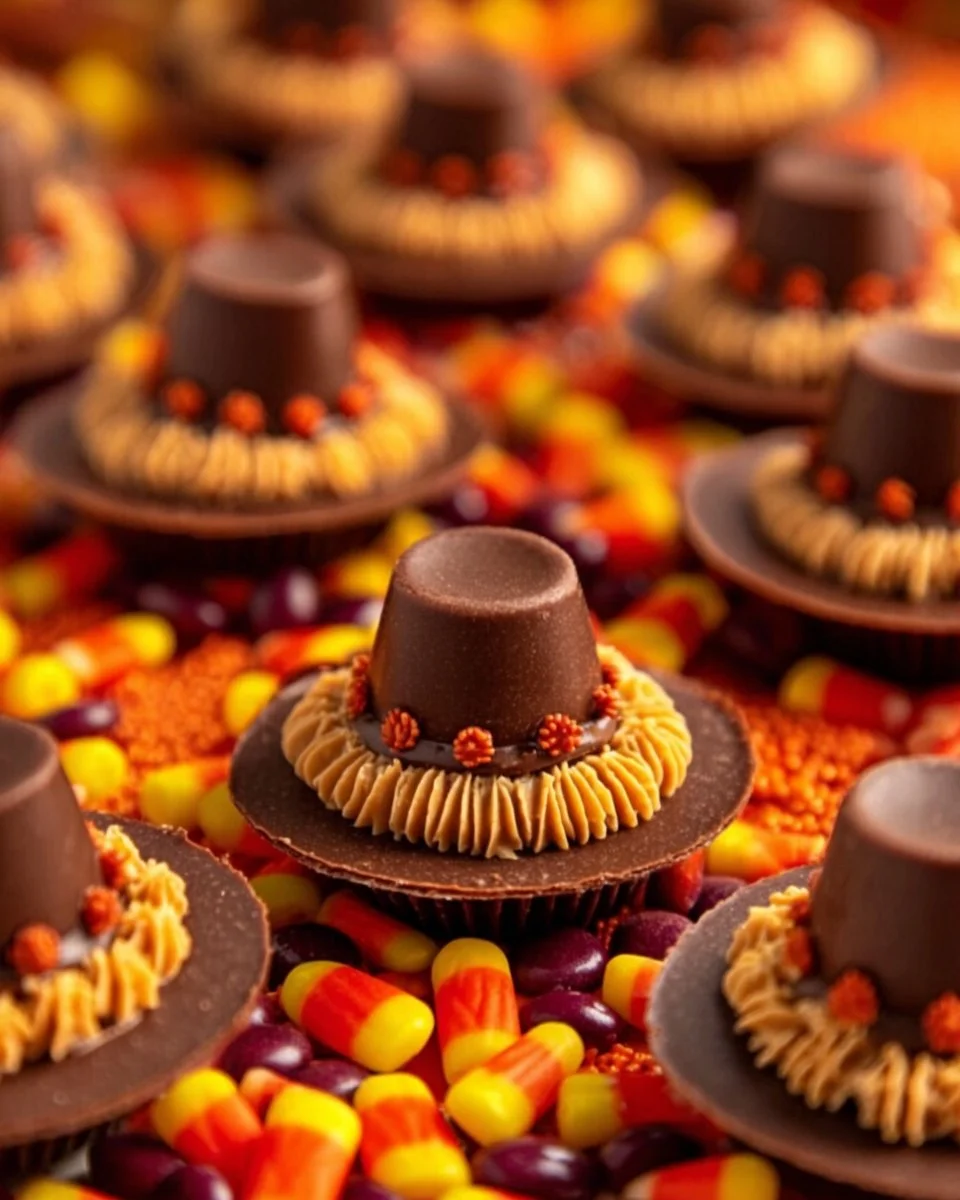
Every Thanksgiving, my family gathers around the table, sharing laughter and stories over a feast that could rival a banquet. Among the traditional dishes, it’s the delightful Pilgrim Hat Cookies that really steal the show. I can still picture my niece Emma’s eyes lighting up when she first laid eyes on these whimsical treats—miniature peanut butter cups perched atop fudge-striped cookies, adorned with colorful M&Ms like little buckles.
What makes these cookies so special, you ask? They’re not just delicious; they carry memories of baking together, a flour-covered kitchen, and the joyous chaos that accompanies holiday prep. What sets this recipe apart from others is its stunning simplicity combined with a competitive edge: no baking is required! Just a few minutes in the kitchen brings a delightful dessert to life, making it an easy recipe you’ll want to revisit time and again.
In this post, you’ll not only discover how to create these charming cookies, but I’ll also share tips and tricks that will elevate your baking game. Prepare to charm your loved ones with a treat that brings both nostalgia and fun to your holiday table!
What are Pilgrim Hat Cookies?
Pilgrim Hat Cookies have become a seasonal favorite, especially around Thanksgiving. These fun, no-bake treats are a playful twist on classic flavors, combining the richness of peanut butter with the sweetness of white chocolate. The cookie base—a Keebler fudge-striped delight—provides the perfect backdrop for these adorable edible hats.
When you take a bite, the crunch of the cookie meets the smoothness of the white chocolate and peanut butter filling, while the mini peanut butter cup adds a delightful chew. It’s a texture explosion that will have you reaching for seconds (or thirds).
These cookies are perfect for autumn gatherings, Thanksgiving dinners, and even Halloween parties. They not only taste great, but they also bring an element of fun to any dessert table, making them a favorite for both kids and adults alike.
Why You’ll Love This Recipe
- Quick & Easy: You won’t have to spend hours in the kitchen—or turn on the oven! This is an easy recipe that comes together in minutes. You’ll be done in under 30 minutes, leaving you plenty of time for other holiday preparations.
- Kid-Friendly Fun: This recipe is great for involving your little ones in the kitchen. Who can resist piping white chocolate or decorating with M&Ms? It’s a fun bonding activity that creates lasting holiday memories.
- Cost-Effective: Unlike many bakery treats or gourmet cookies that can break the bank, you can whip up a batch of these tasty little hats at a fraction of the cost, especially when buying ingredients in bulk.
- Customization Options: Want to mix things up? You can easily swap the cookies or toppings based on your family’s preferences. Use chocolate cookies or different types of candy to create a completely new look and flavor.
- No Baking Required: This recipe is perfect for those who feel intimidated by baking or simply don’t have the time. It’s all about melting, mixing, and assembling—easy as pie (or should I say cookie?).
Ingredients
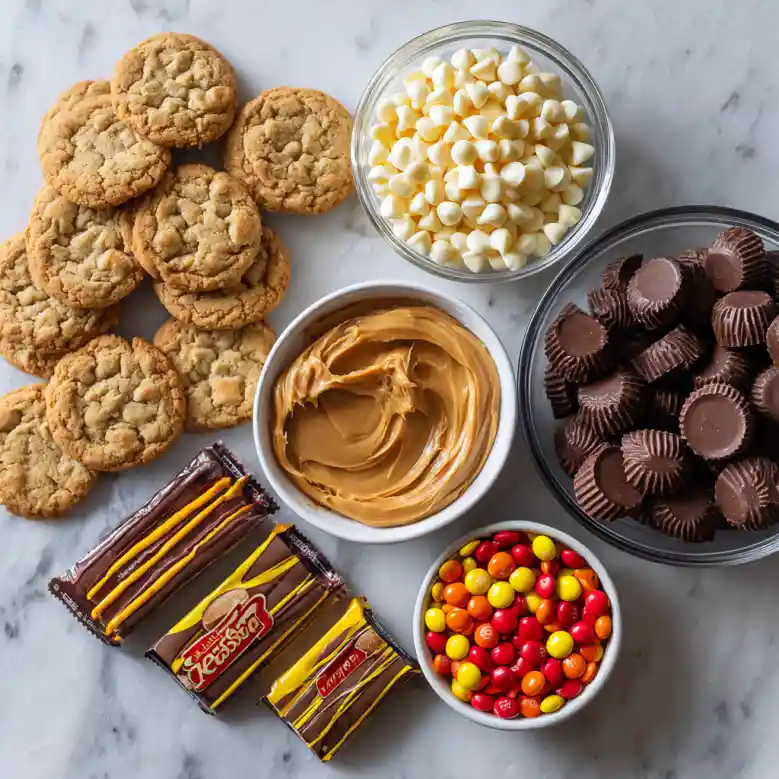
For these delightful Pilgrim Hat Cookies, here’s what you’ll need:
- 1 Cup white chocolate chips: The melted base that gives these cookies their creamy texture. (Brands like Ghirardelli or Nestlé are my go-tos for quality.)
- ½ Cup peanut butter: Creamy or crunchy, whichever you prefer. Just ensure it’s at room temperature for easy mixing.
- 24 mini peanut butter cups (Reese’s dark chocolate): The iconic topping that truly defines the “hat.”
- 24 Keebler fudge striped cookies: These provide the perfect sturdy base. Look for alternatives if you prefer a homemade cookie base—just ensure they are sturdy enough to hold the toppings.
- Mini M&Ms (red, yellow, and orange): The colorful decor that adds a festive touch.
Ingredient Notes
- Substitutions: If you want to reduce the sugar, you could use natural peanut butter for a healthier twist, but be aware that the texture may differ.
- Prep Notes: Make sure your peanut butter is at room temperature, and consider chilling the peanut butter cups slightly before assembly for easier handling.
Step-by-Step Instructions
Preparation
- Line a Sheet: Start by lining a large chopping board or baking sheet with parchment paper. This will make it easy to remove your cookies once they’re set.
- Melt the Chocolate and Peanut Butter: In a microwave-safe bowl, combine the white chocolate chips and peanut butter. Microwave on low power (or defrost setting) in 30-second intervals, stirring frequently until smooth and fully melted—about 1-2 minutes.
- Prepare Your Piping Bag: Transfer the melted mixture into a piping bag. Twist the bag shut and allow it to cool for about 5 minutes—just enough to handle comfortably. Snip off a tiny piece from the tip.
- Assemble the Cookies: Place a fudge striped cookie on the prepared sheet, stripe side facing down.
- Pipe the Filling: Squeeze a circular amount of the white chocolate mixture in the center of the cookie, about the size of a mini peanut butter cup.
- Add the Peanut Butter Cup: Press a mini peanut butter cup upside down into the center of the chocolate circle, with the wide side facing down. Allow the mixture to ooze out slightly, creating a “band” of white chocolate.
- Add the M&M: Place an M&M on the white chocolate band to mimic the buckle of a pilgrim’s hat.
- Let Set: Repeat until all cookies are assembled. Allow them to set completely at room temperature or in the fridge for quicker results.
Chef’s Tips
- Visual Cues: Make sure the chocolate mixture is entirely smooth before piping, ensuring even distribution.
- Common Mistakes: Avoid using the microwave on high; this can scorch the chocolate and ruin the consistency.
Expert Tips & Tricks
- Storage: Keep these cookies in an airtight container at room temperature for up to a week. If you need them for longer, they can be stored in the fridge.
- Make-Ahead: You can prepare the cookie bases in advance and assemble them the day before your event to save time.
- Keep It Fresh: If your chocolate thickens too much while cooling, place it back in the microwave for a few seconds to loosen it up—always do this gradually!
- Troubleshooting: If your white chocolate isn’t melting smoothly, try adding a teaspoon of vegetable oil to help it reach the ideal consistency.
- More Fun: Encourage kids to decorate their cookies with edible glitter or sprinkles for an extra festive touch.
Serving Suggestions
These Pilgrim Hat Cookies are perfect as a standalone dessert, but you can amplify their charm by serving them alongside a warm cup of apple cider or a scoop of vanilla ice cream. Present them on a festive platter garnished with autumn leaves or mini pumpkins for that extra seasonal flair. They’re ideal for Thanksgiving gatherings, school bake sales, or even as a light treat for after dinner.
Variations & Substitutions
- Flavors: For a chocolate lover’s dream, swap out the white chocolate for dark chocolate or butterscotch chips.
- Dietary Needs: To make these gluten-free, use gluten-free cookies. You can also try almond butter if you’re looking for nut-free variations.
- Seasonal Touches: For Halloween, use orange and black M&Ms, or for Christmas, go with red and green.
Nutrition & Storage Info
- Prep Time: 15 minutes
- Cook Time: 0 minutes (no baking needed)
- Total Time: 30 minutes
- Yield: 24 cookies
- Estimated Calories: About 130 calories per cookie
- Storage Instructions: Store at room temperature in an airtight container for up to a week. For longer storage, refrigerate for up to two weeks or freeze for a month.
FAQ Section
- Can I use milk chocolate instead of white chocolate?
- Yes! Just keep in mind it will change the flavor profile.
- How do I store leftovers?
- Keep them in an airtight container at room temperature or refrigerate for a longer shelf life.
- Can I make these cookies vegan?
- You can try using dairy-free chocolate and nut butter to create a vegan version.
- What’s the best way to melt chocolate?
- Microwaving in short intervals or using a double boiler works well. Just make sure to stir often!
- How do I make these ahead of time?
- You can prepare and assemble them a day in advance; just store them properly.
- Can I substitute the peanut butter?
- Absolutely! Almond butter or sunflower seed butter are great alternatives, just ensure they have a similar consistency.
- What other toppings could I use?
- Use mini cookies, gummy candies, or chocolate sprinkles for a fun twist.
- Can I make these cookies without M&Ms?
- Certainly! You can use any kind of candy as decoration or skip it altogether.
- Do I need to refrigerate the cookies?
- They can be kept at room temperature, but refrigerating will help them last longer.
- How do I prevent the chocolate from seizing?
- Ensure no moisture gets into the chocolate while melting; it can cause it to seize up.
Conclusion
These Pilgrim Hat Cookies are not just delightful; they’re also a calming reminder of the sweet moments shared with family during the holidays. I hope you give this easy recipe a try and create your own joyful memories! I’d love to hear what you think, so drop a comment below after you’ve made these treats. For more fun, inspired recipes, don’t forget to check out my other holiday specials on this blog!

Pilgrim Hat Cookies
Ingredients
Method
- Line a large chopping board or baking sheet with parchment paper.
- In a microwave-safe bowl, combine white chocolate chips and peanut butter. Microwave on low power in 30-second intervals until smooth—about 1-2 minutes.
- Transfer the melted mixture into a piping bag and cool for about 5 minutes.
- Place a fudge striped cookie on the prepared sheet, stripe side facing down.
- Pipe a circular amount of the white chocolate mixture in the center of the cookie, about the size of a mini peanut butter cup.
- Press a mini peanut butter cup upside down into the center of the chocolate circle.
- Place an M&M on the white chocolate band to mimic the buckle of a pilgrim’s hat.
- Repeat until all cookies are assembled and allow them to set completely at room temperature.