Table of Contents
Table of Contents
The holiday season has always been about giving and sharing joy, but for me, it’s also about indulging in memories wrapped in sweet moments. One of my favorite childhood memories involves filling the kitchen with the sweet aroma of baking as my mom prepared her Peppermint Bark Cookies. The blend of rich chocolate and the coolness of peppermint would fill our home with warmth and an unmistakable festive spirit. But let me tell you, these aren’t just any Peppermint Bark Cookies — they’re a heavenly creation that outshine store-bought versions and other recipes!
These cookies are soft, perfectly chewy on the inside, and dripping with decadent white chocolate — a taste that dances on your tongue and invokes nostalgia with every bite. The personal touch of crushed candy canes gives them that signature minty crunch, making them not just a treat, but an experience.
In this post, I’ll walk you through every simple step, revealing tips that ensure success in your baking endeavors. Whether you’re looking to impress family during the holidays or simply craving a cookie that bursts with flavor, I promise this recipe will become a cherished favorite in your home, just like it is in mine!
What Are Peppermint Bark Cookies?
Peppermint Bark Cookies are the ultimate holiday indulgence, marrying two classic flavors: rich chocolate and refreshing peppermint. Originating from the traditional peppermint bark that graces many holiday dessert tables, these cookies take that beloved flavor and transform it into something truly special. The beauty lies in the texture; each cookie boasts a crisp exterior that gives way to a soft, chewy center, amplified by a whimsical swirl of melted white chocolate and a sprinkle of crunchy candy canes on top.
These cookies are perfect for holiday gatherings, cozy family nights, or even as a delightful gift for friends. They embody the festive spirit, making them a must-have treat for any seasonal celebration. But don’t let the holidays define them — I often find myself baking them just because I’m in the mood for something wonderfully sweet.
Why You’ll Love This Recipe
Homemade Goodness: Let’s be real — nothing beats the aroma of baking in your kitchen! The moment you pull these Peppermint Bark Cookies out of the oven, you’ll feel a wave of nostalgia wash over you. Plus, there’s something so satisfying about baking from scratch rather than buying pre-made.
Better Than Store-Bought: Sure, you can find peppermint cookies in stores, but can they compare to these delights? I’ve tried several brands, and trust me, the freshness and flavor of these cookies far surpass anything you can buy. Plus, you control the quality of ingredients!
Cost-Effective: Making these cookies at home saves you money. With just a few pantry staples and some chocolate, you can create a batch that rivals the pricey options found in bakeries.
Customization: Want to add a twist? You can easily adjust the mint level or add your favorite nuts and toppings. Whether you prefer a hint of mint or a peppermint explosion, the choice is yours!
Simple to Make: This recipe is straightforward and designed to be user-friendly, even for novice bakers. If you can mix and scoop dough, you can make these cookies! Plus, the chilling time means you can bake them in stages — perfect for busy holiday schedules.

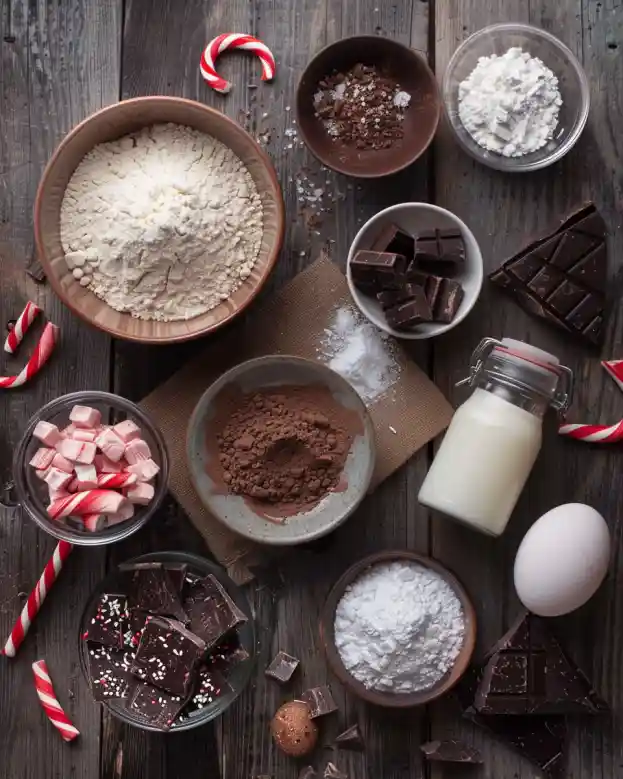
Ingredients Section
Here’s what you’ll need:
- 1 cup (125g) all-purpose flour (gluten-free if needed – Note 1)
- 2/3 cup (55g) natural unsweetened cocoa powder
- 1 teaspoon baking soda
- 1/2 teaspoon kosher salt
- 1/2 cup (1 stick; 120g) unsalted butter, softened to room temperature
- 1/2 cup (100g) granulated sugar
- 1/2 cup (100g) light brown sugar (packed)
- 1 large egg (at room temperature)
- 1 teaspoon vanilla extract
- 1/2 teaspoon peppermint extract
- 1 tablespoon (15ml) milk
- 1 (3.5 ounce) semi-sweet chocolate bar, chopped (plus more for topping, optional – Note 2)
- 9-11 ounces premium white chocolate baking bar, chopped (or chips)
- 2 teaspoons (9g) refined coconut oil or vegetable shortening
- 6-8 candy canes, crushed
Quality Tips:
- Using Quality Ingredients: The flavors in cookie recipes shine through, so I recommend using high-quality chocolate. Brands like Ghirardelli or Callebaut are my go-to for that rich taste.
- Substitutions: Feel free to use coconut oil for a dairy-free option! For gluten-free, a 1:1 gluten-free flour will work well.
Prep Tips:
- Make sure your butter is at room temperature for optimal mixing. This helps incorporate air and keeps the cookies light.
- Chilling the dough is crucial! It keeps these cookies thick and chewy. If you can, chill overnight for the very best texture.
Step-by-Step Instructions
Chill the Dough: Note: This cookie dough requires at least 2 hours of chilling, but ideally overnight. The cookies will be thicker the longer they chill (up to 3 days).
Prepare Dry Ingredients: In a medium bowl, whisk the flour, cocoa powder, baking soda, and salt together until combined.
Mix Wet Ingredients: In a large bowl, use a hand-held or stand mixer fitted with a paddle attachment to beat the softened butter, granulated sugar, and brown sugar on medium-high speed for 2-3 minutes until light and fluffy.
Add Egg and Extracts: Add the egg, vanilla extract, peppermint extract, and milk, then beat until combined, scraping down the sides and bottom of the bowl as needed.
Combine Ingredients: Turn the mixer down to low speed and slowly add the dry ingredients into the wet ingredients until combined. Ensure there are no flour pockets.
Fold in Chocolate: Add the chocolate chunks and mix with a rubber spatula to ensure even distribution.
Chill the Dough: Cover the bowl with plastic wrap and chill for at least 3 hours or up to 3 days.
Preheat Oven: Preheat your oven to 350°F (175°C) and line two large baking sheets with parchment paper.
Scoop Dough: If the dough has been chilling for longer than 24 hours, let it soften for 15-30 minutes for easier scooping. Use a large cookie scoop (3-4 tablespoons) to drop dough balls 2-3 inches apart on the prepared baking sheets.
Bake the Cookies: Bake in the preheated oven for 10-12 minutes, or until the edges are set and the tops look slightly soft. Cool the cookies for 5 minutes on the cookie sheet before transferring to a cooling rack.
Dip in White Chocolate: Before dipping in white chocolate, make sure the chocolate chips inside have cooled completely. Place the white chocolate and coconut oil in a tall, microwave-safe bowl. Microwave in 30-second increments, stirring in between, until melted and smooth.
Finish Up: Dip half of each cookie in the melted white chocolate, place it on parchment paper, and sprinkle with crushed candy canes. Allow to cool completely until the white chocolate is set.
Storage: Baked cookies stay fresh in an airtight container at room temperature for 5 days or can be frozen for up to 3 months.
Expert Tips & Tricks
Don’t Rush the Chilling: Trust me, chilling the dough is a crucial step. It prevents spreading and ensures that each cookie has that perfect chewy center.
Use a Cookie Scoop: This makes it easy to get uniform-sized cookies, which bake evenly. Plus, you look like a baking pro!
Monitor Cooling: To avoid breakage, allow cookies to cool on the sheet for just a few minutes before transferring them to a wire rack.
Storage Recommendations: Keep the cookies in an airtight container to retain their freshness. You can also freeze the unbaked dough in balls for a quick treat anytime.
Troubleshooting: If your cookies spread too much, it’s usually a sign the dough was too warm. Make sure to chill adequately before baking.
Serving Suggestions
These Peppermint Bark Cookies are delightful on their own, but they shine even brighter when paired with a hot cup of cocoa or a frothy peppermint mocha. For a festive presentation, arrange them on a decorative platter, sprinkle with powdered sugar for an extra touch of magic, and add some twinkling holiday lights for flair. They make excellent gifts too, packaged in a mason jar with a festive ribbon!
Variations & Substitutions
- Flavors Galore: Try adding different flavored extracts like orange or almond for a twist! Instead of candy canes, crushed nuts like walnuts or hazelnuts can add a unique crunch.
- Dietary Options: For gluten-free treats, use a gluten-free 1:1 baking flour. For dairy-free versions, see if vegan chocolate works for you!
- Seasonal Variations: How about a pumpkin spice blend for fall or caramel bits for a special twist during the holidays? Get creative!
Nutrition & Storage Info
Prep Time: 20 minutes (excluding chilling time)
Cook Time: 10-12 minutes
Total Time: 2-3 hours (including chilling)
Yield: About 20 cookies, depending on size
Estimated Calories: 140 calories per cookie
Storage Instructions:
- Room temperature: 5 days in an airtight container
- Freezer: Can be frozen for up to 3 months

FAQ Section
Can I use chocolate chips instead of a chocolate bar?
- Yes! Chips will work just as well for the cookie dough.
What happens if my dough is too soft?
- Chill it for a longer time until it firms up, and avoid baking until it’s thick.
How do I know when the cookies are done?
- The edges should be set, and the tops should look slightly soft but not wet.
Can I double the recipe?
- Absolutely! Just ensure you use a large mixing bowl to accommodate the added ingredients.
What if I don’t like peppermint?
- Feel free to skip the peppermint extract or substitute with your favorite flavor, like vanilla.
Can I freeze the cookie dough?
- Yes! Scoop it into balls and freeze on a baking sheet first. Once solid, transfer to a zip-top bag for easy storage.
Is the white chocolate necessary?
- If you’re not a fan, you can skip it or substitute with dark chocolate for a richer taste.
How do I successfully melt white chocolate?
- Use a microwave-safe bowl and microwave in short bursts while stirring frequently to avoid burning.
Do these cookies need to be refrigerated?
- No, they’re best stored at room temperature unless you live in a very warm climate.
How long do they last?
- Up to 5 days at room temperature, or you can freeze them for up to 3 months.
Conclusion
These Peppermint Bark Cookies have truly stolen my heart and have become a cherished recipe in my family. Their delightful crunch paired with the soft chocolatey cookie base is a combination that’s hard to resist. I wholeheartedly encourage you to try this recipe; I believe it will quickly become a favorite in your household as well.
Please share your thoughts or any baking experiences in the comments — I’d love to hear how your version turns out! And if you’re looking for more delicious recipes, be sure to check out my other baking adventures on the blog.
Happy baking!

Peppermint Bark Cookies
Ingredients
Method
- Chill the dough for at least 2 hours, ideally overnight.
- In a medium bowl, whisk together the flour, cocoa powder, baking soda, and salt.
- In a large bowl, beat the softened butter, granulated sugar, and brown sugar until light and fluffy.
- Add the egg, vanilla extract, peppermint extract, and milk, and beat until combined.
- Mix the dry ingredients into the wet ingredients until combined, ensuring no flour pockets remain.
- Fold in the chocolate chunks.
- Cover the bowl with plastic wrap and chill the dough.
- Preheat the oven to 350°F (175°C) and line baking sheets with parchment paper.
- Scoop dough onto prepared sheets 2-3 inches apart.
- Bake for 10-12 minutes until the edges are set; cool on the sheet for 5 minutes before transferring.
- Melt white chocolate with coconut oil and dip half of each cookie, then sprinkle with crushed candy canes.