Irresistible Nutella Shortbread Sandwich Cookies: Your New Favorite Treat!
Warm, buttery shortbread paired with rich, chocolatey Nutella—the thought alone makes my heart flutter! I still remember the day I made these Nutella Shortbread Sandwich Cookies for my family gathering; the house filled with the sweet aroma of toasted hazelnuts and vanilla butter, and the joy on everyone’s faces was priceless. Each bite was a delightful blend of crumbly texture and creamy hazelnut spread that whisked us back to simpler times spent around the kitchen table.
What makes these cookies truly special is their versatility and the undeniable comfort they bring. Unlike store-bought versions that often use artificial ingredients, this recipe allows you to infuse your love into each batch, transforming regular cookie time into something magical. Plus, with just a handful of ingredients and a few simple steps, you’ll craft cookies that taste like a gourmet treat from your favorite bakery.
By the end of this post, you’ll not only have a delightful recipe at your fingertips but also tips to perfect these cookies for family get-togethers, holiday festivities, or simply to satisfy your sweet tooth. So roll up your sleeves and get ready to bake your way to happiness with these Nutella Shortbread Sandwich Cookies!
What are Nutella Shortbread Sandwich Cookies?
Nutella Shortbread Sandwich Cookies combine the irresistible simplicity of classic shortbread and the luscious decadence of Nutella. Traditionally known as a treat enjoyed around the holidays, these cookies bring warmth and love to any occasion. The buttery flavor of the shortbread complements the smoothness of the chocolate hazelnut spread, creating a symphony of taste and texture.
These cookies are unique not only for their delightful flavor but also for their melt-in-your-mouth quality. The buttery shortbread crumbles slightly as you take a bite, transitioning into that creamy Nutella filling—a heavenly experience for any true sweet lover.
When should you make them, you ask? The answer is simple: anytime! Whether it’s for a casual afternoon treat, a special occasion, or just to indulge a sweet craving, these cookies will surely be the star of the show.
Why You’ll Love This Recipe
Unbeatable Flavor: The combination of freshly toasted hazelnuts and rich Nutella creates a flavor explosion that is far superior to any store-bought cookie. Trust me, once you have homemade, you’ll never look back!
Cost-Effective: Baking at home saves you money, and these cookies are no exception! For the price of a couple of cookie jars from the store, you can whip up a whole batch of these delicious treats.
Customizable: Not a fan of Nutella? No problem! You can easily swap it out for other spreads, like almond butter or even a fruit jam, making it perfect for everybody’s preference.
Simplicity: This recipe is straightforward and perfect for bakers of all skill levels. You’ll be surprised at how easily the dough comes together.
Make Ahead: You can prepare the dough days in advance, making this the ultimate time-saver for holidays or busy weeknights. Just roll, chill, cut, bake, and assemble!
With a little love and patience, these cookies will have you feeling like a professional baker in no time—without the hassle of complicated techniques.
Ingredients
To create these delightful Nutella Shortbread Sandwich Cookies, gather the following ingredients:
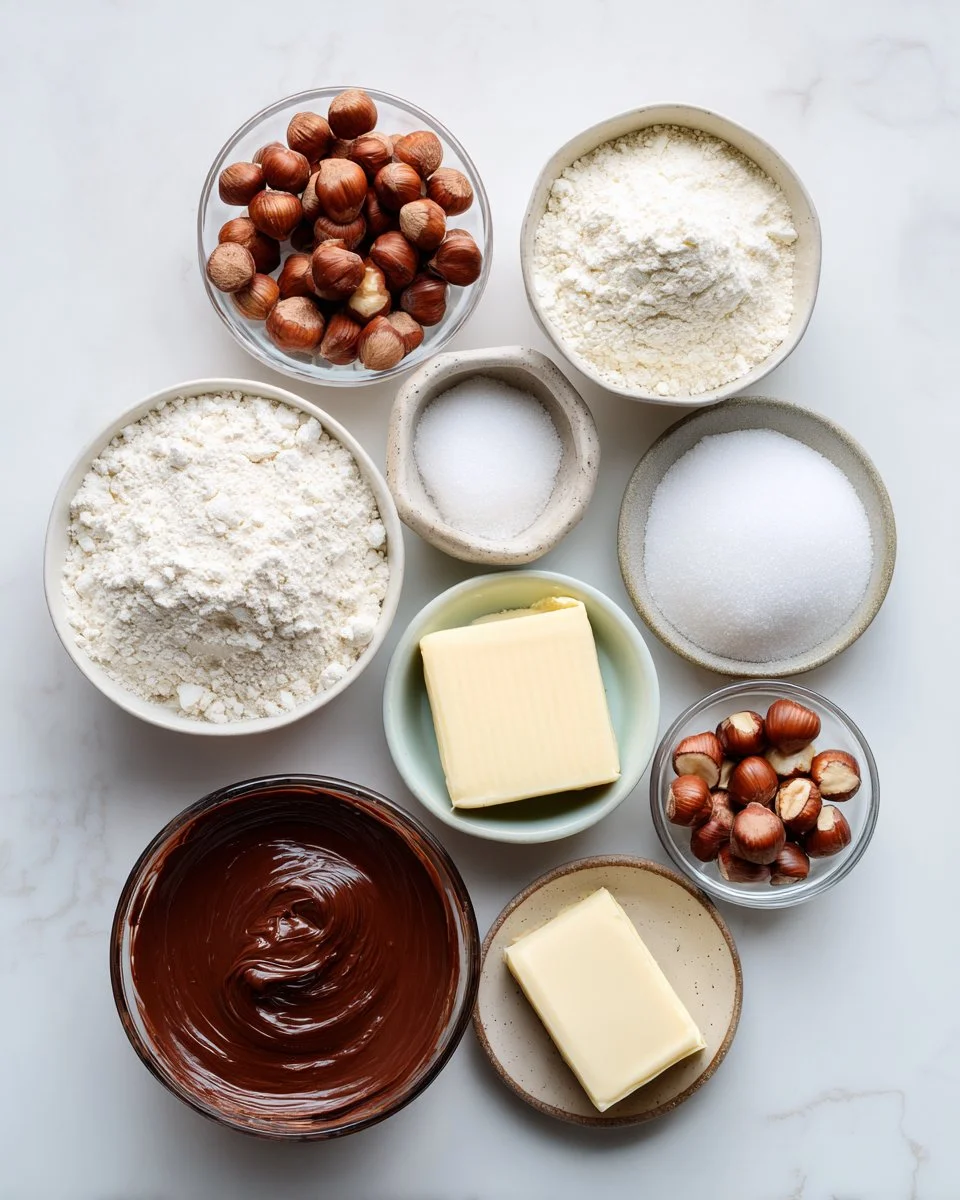
- ½ cup hazelnuts: For that delightful crunch and nutty flavor. Opt for fresh, high-quality hazelnuts for the best taste.
- 2 cups all-purpose flour (spooned and leveled): Use unbleached for a more natural flavor.
- ½ teaspoon Kosher salt: To balance out the sweetness.
- 1 cup unsalted butter (at room temperature, equivalent to 2 standard sticks): Always go for high-quality butter, as it enriches the flavor.
- ½ cup granulated sugar: For a touch of sweetness and a light texture in the cookies.
- ½ teaspoon vanilla extract: Use pure vanilla extract for the best aroma and flavor.
- 13 ounces Nutella (chocolate hazelnut spread): The star of the show! Other chocolate hazelnut spreads can be used, but Nutella holds a special place in my heart.
- Confectioners’ sugar (for dusting): Adds a beautiful finish to your cookies.
Preparation Notes:
- Ensure your butter is at room temperature for easy blending and a smooth dough.
- If you need a nut-free alternative, you can try adding more flour and omitting the hazelnuts.
Step-by-Step Instructions
Prep Your Baking Sheets: Line two large baking sheets with parchment paper or a Silpat mat. Set aside for later.
Toast and Pulse the Hazelnuts: In a skillet over medium heat, warm the hazelnuts until they are fragrant—this usually takes about 3-5 minutes. Be sure to give them a good shake to avoid burning! Transfer the hazelnuts to a food processor and pulse until finely ground. Set this nutty goodness aside.
Mix the Dry Ingredients: In a medium bowl, whisk together the pulsed hazelnuts, all-purpose flour, and Kosher salt. Set aside.
Make the Dough: In a stand mixer or electric mixer, beat the room temperature butter and granulated sugar on medium-high speed for about 3 minutes, until light and fluffy. Add in the vanilla extract. Gradually add the dry ingredients to the mixture, blending on medium speed just until combined. The dough will be moist and slightly sticky—don’t overmix!
Chill the Dough: Transfer the dough onto a sheet of plastic wrap. Place another sheet of plastic wrap on top and roll it into a ½-inch-thick disk. Wrap it well and chill in the refrigerator for at least 1 hour, or up to 3 days ahead.
Roll Out the Dough: Dust a working surface with flour. Using a floured rolling pin, roll the chilled dough to a ¼-inch thickness. If it cracks, don’t stress; just press it back together—this dough is really forgiving! Use a 2½-inch fluted round cutter (or your preferred shape) to cut out cookies. Place them on the lined baking sheets, leaving some space between each—these cookies do expand slightly.
Chill Again: Cover the cut-out cookies with parchment paper and chill in the fridge for another 30 minutes. This helps them keep their shape during baking.
Preheat the Oven: While the dough is chilling, preheat your oven to 350°F (175°C).
Bake the Cookies: Bake the cookies for 9-11 minutes, or until they are set and slightly golden brown around the edges. They may appear pale on top—that’s perfectly fine! Let them cool completely on a wire rack before assembling.
Assemble the Cookies: Pipe your Nutella onto half of the cookies, then sandwich with the remaining cookies. Finish with a dusting of confectioners’ sugar for that elegant touch! Enjoy!
Chef’s Tips:
- Don’t skip chilling the dough: Chilling helps the cookies hold their shape and creates that lovely crumb.
- Ensure your hazelnuts are toasted: It brings out their flavor and gives your cookies a delightful nuttiness.
- Baking times may vary: Keep an eye on them as they bake, as ovens can differ.
Expert Tips & Tricks
Storage Recommendations: Keep your Nutella Shortbread Sandwich Cookies in an airtight container at room temperature for up to 5 days. The flavors only get better as they sit!
Make-Ahead Instructions: Prepare the dough and chill it up to 3 days in advance. You can also freeze the cookie dough for up to 3 months. Roll it in plastic wrap and just thaw it in the refrigerator before rolling and cutting.
Troubleshooting: If your cookies spread too much, try chilling the dough longer or adding a bit of flour. If they’re too crumbly, check if you mixed the butter and sugar enough to create a creamy base.
Adding Variations: Experiment with different fillings! A layer of raspberry or strawberry jam pairs beautifully with the hazelnut flavor.
Diverse Textures: For additional crunch, try folding in some chopped chocolate or extra chopped hazelnuts into the dough before cutting them out.
Perfecting the Dusting: Wait until the cookies are completely cool before dusting them with confectioners’ sugar. This ensures the sugar sticks better for that beautiful presentation!
Serving Suggestions
These Nutella Shortbread Sandwich Cookies are perfect alongside a hot cup of coffee or tea, making them an ideal afternoon snack. For a delightful finishing touch, consider plating them on a cake stand or rustic wooden board, adding some fresh seasonal fruit like strawberries or blueberries for a pop of color.
These cookies are fantastic for any occasion, from holiday gatherings and family celebrations to casual hangouts and bake sales. Feel free to dress them up with festive wrappings for gifts or serve them at a dessert buffet!
Variations & Substitutions
- Flavor Combinations: Switch out the Nutella for other flavor profiles! Try almond butter for a nutty twist, or even a chocolate chip cookie filling for a classic take.
- Dietary Restrictions: For a gluten-free option, substitute the all-purpose flour with a gluten-free blend and ensure your chocolate hazelnut spread is also gluten-free.
- Seasonal Variations: During the holidays, try adding spices like cinnamon or nutmeg to the cookie dough for an extra festive flair, or add some crushed peppermint to the filling!
Nutrition & Storage Info
- Prep Time: 90 minutes (including chilling)
- Cook Time: 11 minutes
- Total Time: 1 hour 45 minutes
- Yield: Approximately 24 sandwich cookies (depends on your cookie cutter size)
- Estimated Calories: Around 150-200 calories per serving (varies based on filling use)
- Storage Instructions: Store cookies in an airtight container at room temperature for up to 5 days, or freeze for up to 3 months.
FAQ SECTION
Can I use salted butter?
- Yes, but then reduce the added Kosher salt in the recipe to balance the flavors.
Can I make these cookies with a mixer?
- Absolutely! A stand mixer or hand mixer will work perfectly for creaming the butter and sugar.
How can I prevent the cookies from spreading too much?
- Ensure your dough is well-chilled and use a baking sheet lined with parchment to prevent sticking.
Can these cookies be frozen?
- Yes! Freeze the assembled sandwiches in an airtight container. Let them thaw at room temperature before serving.
Is it okay to double this recipe?
- Of course! Just ensure your mixing bowl is large enough to accommodate the additional ingredients.
What can I use instead of Nutella?
- You can swap it for any nut butter or chocolate spread of your choice; just make sure it has a similar consistency.
Do I need to let the cookies cool completely before adding the filling?
- Yes, to avoid melting the Nutella or jam during assembly, allow the cookies to cool completely on a wire rack.
Can I use other types of nuts?
- Yes! Pecans, almonds, or walnuts work beautifully, but remember to adjust the flavors accordingly.
What happens if my cookies turn out too dry?
- This can happen if they are overbaked or if the ratios of ingredients were off. Make sure to watch the baking time carefully.
Can I add chocolate chips to the dough?
- Yes! Adding chocolate chips will enhance both flavor and texture! Just fold them in gently before rolling out the dough.
Conclusion
This Nutella Shortbread Sandwich Cookies recipe is a celebration of flavor, nostalgia, and creativity. The ease and adaptability of these cookies make them a must-try for bakers of all levels. I encourage you to experiment, share them with loved ones, and enjoy the warm smiles they evoke with every bite.
I would love to hear your feedback or any unique twists you put on this recipe! Don’t forget to check out my other dessert recipes, where you can indulge in similar delights that will surely tickle your tastebuds!
Happy baking!

Nutella Shortbread Sandwich Cookies
Ingredients
Method
- Line two large baking sheets with parchment paper or a Silpat mat and set aside.
- In a skillet, toast the hazelnuts over medium heat until fragrant, about 3-5 minutes. Pulse in a food processor until finely ground.
- In a medium bowl, whisk together the pulsed hazelnuts, all-purpose flour, and Kosher salt.
- In a stand mixer, beat the room temperature butter and granulated sugar until light and fluffy, about 3 minutes. Add the vanilla extract.
- Gradually add the dry ingredients to the butter mixture, blending until combined. The dough will be moist and slightly sticky.
- Wrap the dough in plastic wrap into a ½-inch thick disk and chill for at least 1 hour.
- Roll the chilled dough out to a ¼-inch thickness and cut out cookies with a fluted round cutter. Place on lined baking sheets.
- Chill the cut-out cookies in the fridge for 30 minutes before baking.
- Preheat your oven to 350°F (175°C).
- Bake the cookies for 9-11 minutes, or until set and slightly golden. Allow them to cool completely on a wire rack.
- Pipe Nutella onto half of the cookies and sandwich with the remaining cookies. Dust with confectioners’ sugar before serving.