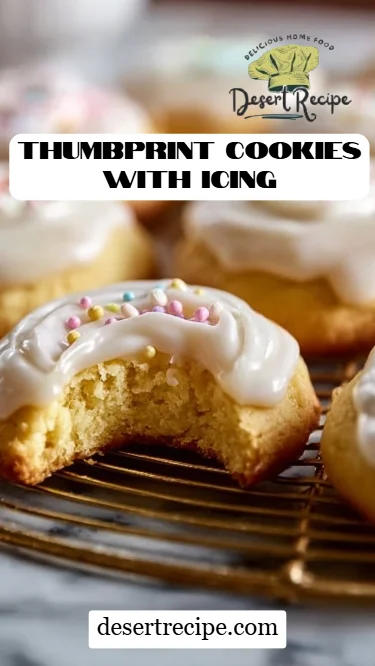
Irresistibly Delicious Thumbprint Cookies With Icing: A Sweet, Nostalgic Treat
Growing up, the kitchen was the heart of my childhood home, filled with laughter and the mouthwatering aromas of freshly baked treats. My favorite moments? Those lazy Sunday afternoons spent baking Thumbprint Cookies With Icing alongside my grandma. We’d roll the dough between our hands, make those cute little indentations, and fill them with colorful icing — a vibrant explosion of sweetness that always felt like a hug in cookie form.
What makes these Thumbprint Cookies so special isn’t just their delightful appearance; it’s the love and memories baked into each bite. Unlike those store-bought sugary discs that often leave you wanting more, my recipe for Thumbprint Cookies With Icing takes you back to homemade wonderland — where the dough is rich, the icing is creamy, and every bite is a beautiful reminder of family traditions. I’ve perfected this easy recipe over the years, ensuring that you get the most delectable, soft, and perfectly sweet cookies right in your kitchen.
So, if you’re looking to create beautiful memories of your own (or just treat yourself to something extraordinary), grab an apron! I promise you’ll learn all the secrets to making these show-stopping Thumbprint Cookies With Icing that are not only scrumptious but also deeply satisfying.
What Are Thumbprint Cookies With Icing?
Thumbprint cookies are charming little confections that boast a simple yet delightful history. Originating from Swedish and German traditions, these cookies typically feature a buttery base lovingly accentuated by a luscious filling in the center. Traditionally, you’d use jam or preserves, but for my version, I swap that with a sweet icing that takes them to another level — think soft, chewy texture gives way to a delightful, sweet burst of flavor from the icing.
What makes these Thumbprint Cookies unique is both their texture and their versatility. The buttery, crumbly dough contrasts beautifully with the smooth icing, which can be easily customized in flavor and color, or even left plain for a more classic approach. Whether you’re crafting them for a holiday gathering, a cozy afternoon tea, or simply to satisfy a sweet tooth, these cookies are sure to impress.
You’ll find the perfect occasion for these cookies in almost any setting! They are ideal for family gatherings, holiday cookie exchanges, or as a sweet pick-me-up during a Netflix binge-watching session. Just a couple of these delightful cookies will make any moment special.
Why You’ll Love This Recipe
Deciding to bake Thumbprint Cookies With Icing means diving into a world of sweetness and nostalgia, and here are a few compelling reasons why this recipe will soon become a staple in your kitchen:
Unmatched Flavor: Forget those flavorless, mass-produced cookies; the buttery goodness and sweet icing of my Thumbprint Cookies will have you reaching for seconds (and thirds!).
Cost-Effective Joy: Making cookies at home is not only fun but also saves you money! Why splurge on overpriced cookies when you can whip up delicious treats with everyday pantry staples?
Customization Galore: This recipe is a blank canvas! Experiment with different icing flavors like lemon, almond, or chocolate. You can even personalize them for different occasions, making each batch completely unique.
Simple and Fun to Make: Whether you’re a seasoned baker or a beginner, this easy recipe requires minimal equipment and offers maximum satisfaction. Plus, kids can help make the thumbprints — just imagine the laughter and joy!
Perfect for Any Occasion: From casual get-togethers to festive events, these cookies shine. Their charming appearance will impress your guests, making them feel like you’ve spent hours in the kitchen (when it actually only took a pinch of your time).
Your journey to baking the best Thumbprint Cookies With Icing starts here, and I’m thrilled to guide you through it!
Ingredients
- 1 cup unsalted butter, softened: Make sure it’s at room temperature for easy creaming. I prefer using organic, high-quality butter like Kerrygold for that rich flavor!
- 1 cup granulated sugar: This adds sweetness and texture!
- 1 large egg: For binding; room temperature eggs will blend better.
- 2 teaspoons vanilla extract: I highly recommend pure vanilla for the best flavor.
- 2 cups all-purpose flour: Essential for structure; sift it before measuring for light and fluffy cookies.
- 1/2 teaspoon salt: A little salt enhances the sweetness.
- 1/2 cup icing sugar: For the icing, finer icing sugar will yield smoother results.
- 2-3 tablespoons milk or cream for icing: Use whole milk for a creamy consistency or even a splash of cream for richness.
Notes on Substitutions: If you’re out of unsalted butter, you can use salted butter but reduce the added salt to a pinch. For a dairy-free option, substitute with coconut oil or a plant-based butter.

Step-by-Step Instructions
Preheat oven to 350°F (175°C): Make sure your oven is fully preheated for even baking.
In a mixing bowl, cream together butter and sugar until light and fluffy: This should take about 3-5 minutes. (Chef’s Tip: Use a stand mixer or hand whisk for even consistency.)
Beat in the egg and vanilla extract: Mix until well incorporated, scraping down the sides as needed.
Gradually mix in flour and salt until well combined: Use a wooden spoon or spatula; the dough will be slightly sticky.
Roll dough into small balls and place them on lined baking sheets: Aim for about 1-inch balls, giving them some space to spread while baking.
Use your thumb to make an indentation in the center of each ball: Press gently but firmly to avoid breaking the cookie.
Bake for 10-12 minutes or until edges are lightly golden: You’ll know they’re done when they’re firm to the touch but still soft in the center.
Let cool completely: This is crucial as the icing will slide off warm cookies.
To make the icing: Mix icing sugar with 2-3 tablespoons of milk until smooth; adjust the consistency according to your preference.
Fill the thumbprint indentations with icing: Be generous! The sweet icing is the star.
Allow icing to set before serving: This will take about 30 minutes — patience is key!
Don’t rush; good things come to those who wait!
Expert Tips & Tricks
Storage Recommendations: Keep these cookies in an airtight container at room temperature for up to a week. If you want them to last longer, store them in the fridge.
Make-Ahead Instructions: You can prepare the dough a day or two in advance. Just wrap it tightly in plastic wrap and refrigerate it. Let it sit at room temperature for 10-15 minutes before rolling.
Troubleshooting Common Problems: If the dough is too sticky to roll, add a little more flour, one tablespoon at a time. If the cookies spread too much while baking, chill the dough first.
Flavor Enhancements: Add a teaspoon of almond extract for a different twist.
Presentation Tips: Consider drizzling extra icing on top once the cookies are set for an added visual appeal.
Experiment with Fillings: Swap icing for chocolate, caramel, or even fruit preserves to create new flavor profiles.
Serving Suggestions
These Thumbprint Cookies With Icing burst with sweetness on their own, but they’re even better with a little extra flair! Pair them with a hot cup of coffee or a soothing herbal tea for a delightful afternoon treat. Consider arranging them on a beautiful platter, dusted with powdered sugar, and surrounded by fresh berries or edible flowers for a stunning presentation. They’re perfect for celebrations, holidays, or as a sweet gift for friends and family.
Variations & Substitutions
Flavor Combinations:
- Chocolate Thumbprints: Stir in cocoa powder into the dough for a chocolatey twist.
- Nutty Bliss: Add finely chopped nuts like almonds or hazelnuts into the cookie dough for an extra crunch.
Dietary Adaptations:
- For gluten-free options, swap the all-purpose flour with a certified gluten-free blend.
- Vegan? Use flax eggs instead of a traditional egg and substitute dairy butter and milk with plant-based versions.
Seasonal Variations:
- Autumn Spice: Incorporate cinnamon and nutmeg into the dough for a seasonal touch.
- Festive Cheer: Add food coloring to the icing and decorate with holiday sprinkles!
Nutrition & Storage Info
- Prep Time: 20 minutes
- Cook Time: 12 minutes
- Total Time: Approximately 40 minutes (plus cooling time)
- Yield: Approximately 24 cookies
- Estimated Calories: About 120 calories per cookie
- Storage Instructions: Store at room temperature in an airtight container or in the fridge for up to a week; they also freeze well for up to three months.
FAQ Section
Can I make these cookies gluten-free?
Absolutely! Just substitute the all-purpose flour with a gluten-free flour blend.How can I change the flavor of the icing?
You can add extracts like lemon or almond directly into the icing mix for a tasty twist!What can I do if my dough is too crumbly?
If the dough seems too dry, add a teaspoon of milk at a time until it comes together.Can I freeze these cookies?
Yes! They freeze well before or after filling with icing. Just remember to wrap them tightly.What if I don’t have icing sugar?
If you’re out of icing sugar, you can make your own by blending granulated sugar until fine (but not too fine to make it a powder).Can I double this recipe?
Certainly! Just ensure you have a large enough mixing bowl – and maybe a friend to help you eat them!How do I prevent the cookies from spreading too much?
Chill the dough for at least 30 minutes before shaping and baking.Is it necessary to chill the dough?
While not necessary, chilling the dough helps maintain shape and texture during baking.Why are my cookies too hard?
Overbaking or using too much flour can lead to hard cookies. An accurate measure and timer will help.What are some good substitutions for the filling?
Raspberry or apricot jam can also be used, as well as chocolate ganache for a more decadent twist.

Conclusion
These Thumbprint Cookies With Icing aren’t just cookies; they’re a sweet trip down memory lane, where each bite unfolds stories of love, laughter, and family traditions. Whether you’re baking them for a special occasion or indulging in a quiet moment at home, I can assure you, they will bring joy to your taste buds. I’d love to hear your thoughts — how did your experience go? Drop a comment below with your feedback or share your favorite variations.
And don’t forget to check out my other delicious recipes on the blog! Happy baking!