Table of Contents
Table of Contents
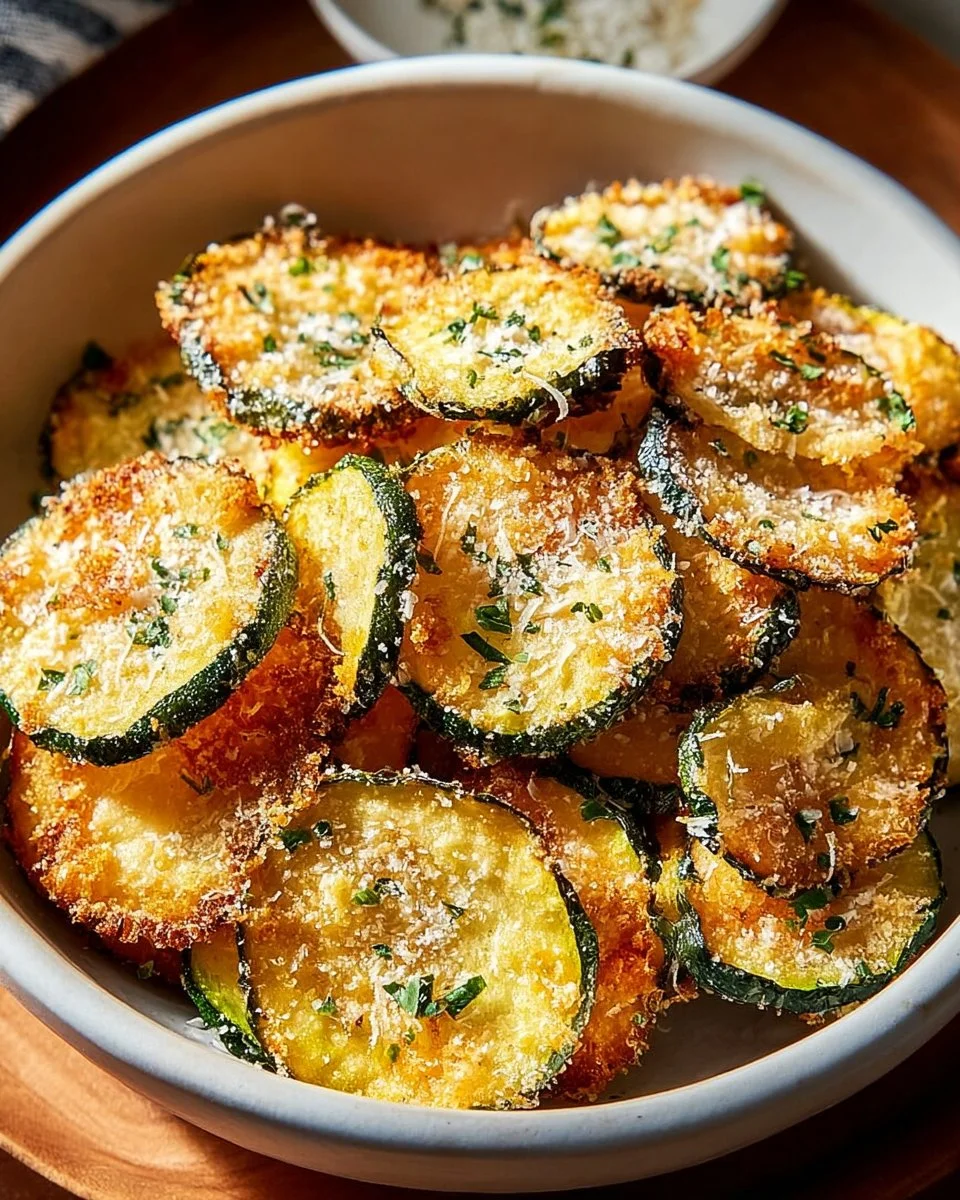
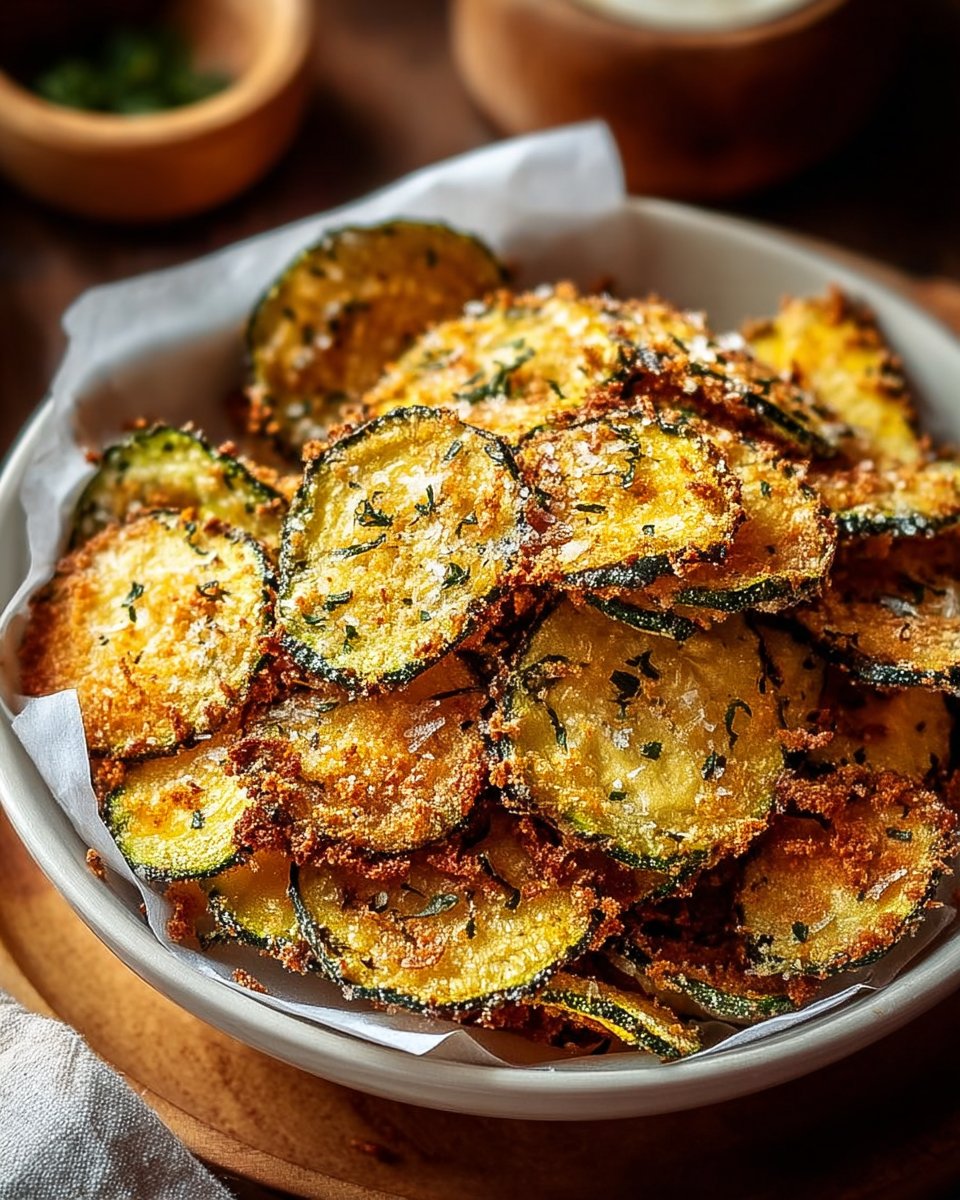
Ah, Crispy Zucchini Chips!. Just saying the name makes me smile because it takes me back to lazy summer afternoons in my grandma’s kitchen. She always had a knack for transforming simple vegetables into delicious snacks that we could never get enough of. One enchanting evening, she handed me a plate of these golden, crunchy goodness that almost seemed like a delicious secret. Each bite was a delightful dance of crunch, flavor, and a hint of nostalgia as we munched away while watching our favorite family movie.
What makes my take on Crispy Zucchini Chips special? For one, they’re not just a typical vegetable chip – they’re a crispy sensation that satisfies my cravings for both health and indulgence. Unlike many store-bought versions, this recipe uses fresh zucchinis and simple pantry staples, ensuring you know exactly what goes into each crunchy bite. Trust me, these chips are light, crispy, and bursting with flavor. In this blog post, I’m excited to share the ultimate guide to making your very own Crispy Zucchini Chips – including how to make them perfectly crispy every time! Get ready to impress your family and friends with a snack that’s not only healthier but far more delicious than anything you can find at the store!
What Are Crispy Zucchini Chips?
Crispy Zucchini Chips have a humble yet fascinating background. Rooted in the garden-fresh concepts of resourceful kitchens, they celebrate one of summer’s favorite vegetables in a way that upgrades your appetizer game! When baked low and slow, zucchini transforms from a tender green veggie into a mouth-watering, crunchy snack that can rival even potato chips.
These chips have a satisfying crunch with a slight chew and an irresistible flavor profile. Imagine the smokiness of paprika, the zest of garlic, and a hint of salt – they take your snacking experience to another level! What sets them apart is the simplicity and versatility; they’re not just a snack but a fantastic canvas for your favorite flavors. Whether you’re whipping them up for a movie night, a gathering, or simply treating yourself, these Crispy Zucchini Chips are a delightful way to indulge guilt-free.
Why You’ll Love This Recipe
There are countless reasons to adore these Crispy Zucchini Chips, but let me break down the top delights for you:
Fresh & Flavorful: Made from fresh zucchinis, you know you’re biting into something wholesome and satisfying. The flavor combinations in this recipe sing, ensuring every chip is as tasty as the last.
Cost-Effective: Why splurge on pricey store-bought vegetable chips, especially when they come from a bag filled with preservatives? This recipe is budget-friendly and allows you to make a big batch for less than you’d spend on a single bag.
Customization Galore: Not a fan of smoked paprika? No problem! You can spice things up with different spices or add cheese for a cheesy twist, allowing you to create a chip that satisfies YOUR cravings!
Easy to Make: You don’t need to be a culinary wizard to nail this recipe! It’s straightforward, requiring minimal equipment (just your oven, cutting board, and a bowl) and straightforward steps. A perfect weekend project!
Perfect for Any Occasion: Whether you need a fun snack to munch on while binge-watching, a crunchy side for your lunch, or a guilt-free appetizer for a party, these chips fit every occasion perfectly.
Ingredients
For these Crispy Zucchini Chips, you’ll want to ensure you use the freshest ingredients for the best results. Here’s what you need:
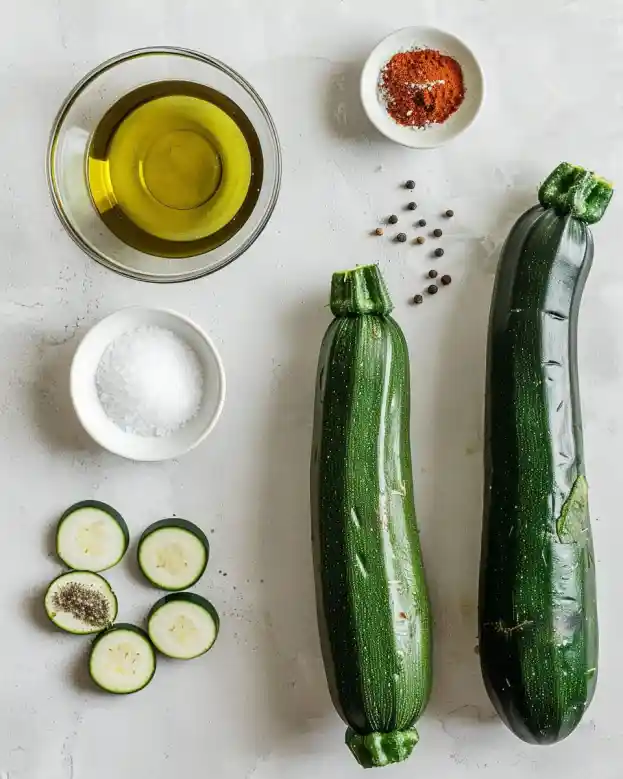
2 medium zucchinis (about 300g): Choose firm, shiny zucchinis for optimal results. Organic is great if you can find them, as it enhances both flavor and quality.
2 tbsp olive oil: For cooking, use high-quality extra virgin olive oil for a rich flavor. You could substitute with avocado oil for a similar taste and health benefits.
1 tsp kosher salt: This is my go-to for seasoning. You can use sea salt as a substitute, but avoid table salt, as it’s finer and may lead to over-salting.
1 tsp smoked paprika: This spice adds incredible depth to your chips. Regular paprika will work in a pinch, but you’ll miss that smoky flavor!
½ tsp garlic powder: For a subtle garlicky bite, feel free to increase or decrease based on your personal preference.
¼ tsp black pepper: Just enough for a gentle kick; adjust to your taste.
Prep Notes: Allow your olives and ingredients to reach room temperature before starting. This helps improve the overall texture!
Step-by-Step Instructions
Ready to dive into making your Crispy Zucchini Chips? Let’s break it down step-by-step!
Preheat Your Oven:
- Set your oven to 225°F (107°C). This low temperature is the secret to achieving that perfect crunch!
Prepare the Zucchini:
- Wash and dry your zucchinis thoroughly with a kitchen towel. Any excess moisture will lead to soggy chips! Slice them into thin rounds (approximately 1/8 inch thick). The thinner you slice them, the crisper they will become.
Season the Zucchini:
- In a large mixing bowl, toss the zucchini slices with olive oil, kosher salt, smoked paprika, garlic powder, and black pepper until evenly coated. Don’t skimp on the oil—it’s essential for crispiness!
Arrange for Baking:
- Line two baking sheets with parchment paper (this helps with easy cleanup!). Spread the zucchini slices in a single layer without overlapping. Any overlapping can lead to uneven baking.
Bake:
- Place the baking sheets in your preheated oven and bake for about 1 hour and 15 minutes, flipping the chips halfway through for even crispiness. Keep a close eye on them during the last few minutes; they can go from perfectly crispy to burnt quickly!
Cool and Serve:
- Once baked to golden perfection, allow them to cool on a wire rack for a few minutes before serving. This cooling step enhances their crunch!
Chef’s Tip: For extra crispiness, after flipping the chips halfway through, turn up the oven to 250°F (121°C) for the last 10 minutes.
Expert Tips & Tricks
Creating the perfect Crispy Zucchini Chips takes practice. Here are some pro tips to help you achieve gloriously crunchy snacks:
Use a Mandoline: For uniform slices, a mandoline slicer is your best friend. This ensures even cooking and consistency in crunch!
Watch for Moisture: Zucchinis contain a lot of water; pressing down on the sliced zucchini with paper towels before seasoning can help extract moisture.
Flavor Variations: Experiment with different spices! Try adding a pinch of cayenne for a spicy kick, or sprinkle with a bit of parmesan after baking for a cheesy finish.
Storage Recommendations: To maintain crispiness, store in an airtight container at room temperature for up to three days. You can also freeze them for up to a month, but be warned: they may lose some crunch when reheated.
Make-Ahead Instructions: Prep zucchini slices ahead of time and store them in the fridge. Just be sure to toss them in oil and seasonings right before baking.
Troubleshooting: If they aren’t crisping up as expected, try increasing the bake time or reducing the oven temperature a bit for better moisture evaporation.
Serving Suggestions
These Crispy Zucchini Chips are not just tasty on their own but can pair beautifully with various dips! I love serving them alongside homemade tzatziki or spicy hummus – it’s the perfect combination of textures and flavors.
To present your chips wonderfully, stack them in a tall, clear glass or a woven basket lined with parchment paper for a rustic charm. Perfect for gatherings, movie nights, or just as an afternoon treat!
Variations & Substitutions
The beauty of Crispy Zucchini Chips is in their versatility! Here are some delicious variations to try:
Flavor Combinations:
- Cheesy Zucchini Chips: Toss with nutritional yeast or finely grated parmesan cheese before baking.
- Herb-Infused: Blend in some dried oregano, thyme, or even ranch seasoning for an herbal infusion.
Dietary Restrictions:
- These chips are naturally gluten-free and vegan, making them suitable for a variety of diets.
Seasonal Variations:
- In the fall, try adding pumpkin spice to your chips for a sweet twist. In the summer, toss in fresh herbs like basil or oregano before cooking!
Nutrition & Storage Info
- Prep Time: 10 minutes
- Cook Time: 1 hour 15 minutes
- Total Time: 1 hour 25 minutes
- Yield: About 4 servings
- Estimated Calories per Serving: 50-60 calories
- Storage Instructions: Store at room temperature in an airtight container for 2-3 days. Refrigerate for up to a week (they may lose crispness). For longer-term storage, freeze for up to a month.
FAQ Section
1. Can I use a different vegetable besides zucchini?
Absolutely! Sweet potatoes, beets, and carrots can all work well using similar preparation methods.
2. How can I make these chips spicier?
Add cayenne pepper or sprinkle with chili powder for an extra kick.
3. Is it necessary to peel the zucchinis?
I prefer to leave the skin on for nutritional benefits and color; however, feel free to peel if you prefer!
4. How do I know when the chips are done?
Look for a golden brown color and a firm crunch when bitten into!
5. Can I use a dehydrator instead of an oven?
Yes! Just remember that drying times can vary, so check periodically until they reach your desired crispiness.
6. How do I reheat leftover chips?
To restore their crunch, pop them back in an oven preheated to 350°F (175°C) for about 5 minutes.
7. What’s the best way to slice the zucchini?
A sharp knife or mandoline makes for the easiest and most uniform slices for baking.
8. Is there a way to make them healthier?
You can reduce the amount of oil or try using an air fryer.
9. Can I use frozen zucchini?
While fresh is best for chips, you can use frozen. However, make sure to thaw and drain any excess moisture before baking.
10. What else can I do with leftover bits of zucchini?
Chop them up for stir-fries, soups, or even toss them into a frittata for extra veggie goodness!
Conclusion
These Crispy Zucchini Chips are a fantastic way to explore the world of healthy snacking while indulging your taste buds. They’re not just chips; they’re a nostalgic reminder of family gatherings and warm kitchens. I encourage you to give this recipe a try! I promise it will bring smiles to your loved ones’ faces, just as it did for mine.
I’d love to hear how yours turn out—did you add a twist? Do you have a flavor favorite? Drop a comment to let me know! And for more delicious recipes, check out my blog for an assortment of healthy treats that your taste buds will adore!

Crispy Zucchini Chips
Ingredients
Method
- Preheat your oven to 225°F (107°C).
- Wash and dry zucchinis thoroughly and slice them into thin rounds (approximately 1/8 inch thick).
- In a large mixing bowl, toss zucchini slices with olive oil, kosher salt, smoked paprika, garlic powder, and black pepper until evenly coated.
- Line two baking sheets with parchment paper and spread zucchini slices in a single layer without overlapping.
- Bake in the preheated oven for about 1 hour and 15 minutes, flipping the chips halfway through.
- In the last 10 minutes, you can increase the oven temperature to 250°F (121°C) for extra crispiness.
- Allow chips to cool on a wire rack for a few minutes before serving.