The Ultimate Buffalo Chicken Dip Sandwich: A Comfort Food Revolution
There’s a little magic to Buffalo Chicken Dip — it’s creamy, spicy, and utterly addictive. But what happens when we take that beloved dip and transform it into an unforgettable sandwich? Well, folks, that’s where the Buffalo Chicken Dip Sandwich enters the spotlight! Picture this: a cozy evening, friends gathered around, the smell of something delicious wafting through the air, and that first melty, cheesy bite. Heaven, right?
This isn’t just any sandwich; this is a masterclass in comfort food that revs up the classic Buffalo Chicken Dip into an easy-to-make, hearty meal. Why is it better than the rest? For me, it’s all about the balance of flavors and textures. You’ve got the spicy, creamy filling contrasted beautifully against the toasted, crunchy bread — every bite is a little love letter to your taste buds. These sandwiches have become a centerpiece in my family’s weekend feasts, evoking laughter and shared stories.
In this recipe, I’ll take you step-by-step through crafting these incredible sandwiches from scratch. By the end of this post, you’ll not only have an awesome recipe but also tips and tricks that ensure your Buffalo Chicken Dip Sandwich turns out perfect every time. Ready to make your new favorite dish? Let’s dig in!
What Are Buffalo Chicken Dip Sandwiches?
Originating from the classic Buffalo Chicken Dip, these sandwiches elevate the well-loved appetizer into an entirely new realm. As friends huddled around a game or party table munch on the dip, the idea to pile that mouthwatering mixture onto bread is almost too good to resist.
Think of the taste: a delightful balance of spicy, creamy chicken filling topped with gooey cheese, all encased in perfectly toasted bread. The crunch of the outer layer gives way to the warm, rich filling that dances on your palate. There’s something undeniable about that comforting blend of flavors, making these sandwiches perfect for game nights, casual gatherings, or just when you need a fix of good old comfort food.
When you’re looking for something quick yet satisfying, the Buffalo Chicken Dip Sandwich should be your go-to. They’re easy to whip up, highly customizable, and, dare I say, the ultimate crowd-pleaser. You’ll want to add these to your regular rotation!
Why You’ll Love This Recipe
Gourmet Flavor Without the Fuss: Unlike many store-bought options, this recipe packs authentic flavors. With just a few quality ingredients, you can elevate a simple dinner into a feast. You won’t find this delicious combination of spicy, creamy, and tangy just anywhere!
Cost-Effective: Why spend a fortune at restaurants when you can make these sandwiches for a fraction of the cost? With basic ingredients and no need for fancy equipment, you can serve up gourmet meals straight from your kitchen.
Customization Galore: Want to kick up the heat? Add extra hot sauce! Prefer a milder flavor? Dial back on the spice or add more cream cheese. These sandwiches truly adapt to what you love and have on hand.
Quick Prep and Cook Time: I mean, who has hours to spare in the kitchen? You can have these delicious sandwiches whipped up in about 30 minutes, making them perfect for weeknight dinners or last-minute entertaining.
Comfort Food at Its Best: There’s something incredibly special about food that brings people together—these sandwiches evoke memories of love and laughter at the dining room table. Plus, they are perfect for any occasion, from game day to cozy family dinners.
When you make the Buffalo Chicken Dip Sandwich, you’re not just preparing a meal; you’re embracing an experience. Let’s dive into those ingredients to get started!

Ingredients
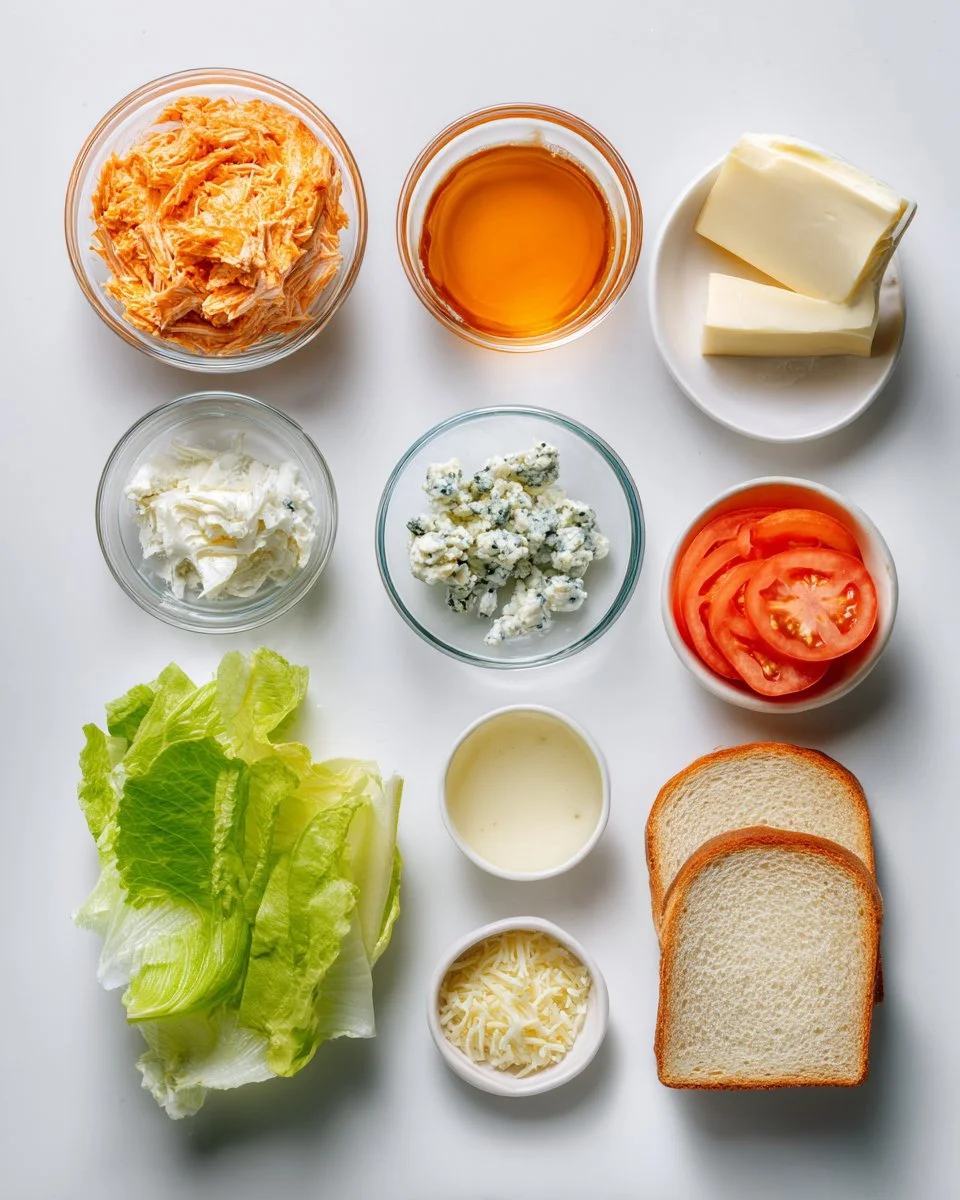
- 1 1/2 cups chicken, finely shredded: Use rotisserie chicken for convenience or poach your own chicken breast for a fresher flavor.
- 1/3 cup cream cheese: Ensure it’s at room temperature for easy mixing; this is the key to a creamy filling.
- 1/3 cup hot sauce: Choose your favorite brand; Frank’s RedHot is a classic choice that strikes a great flavor balance.
- 1/4 cup onion, finely diced: Yellow or green onions provide a subtle crunch and sweetness (feel free to use shallots for a milder taste).
- 2 tablespoons crumbled blue cheese: Adds an unmistakable tang. If you’re not a fan, feta or even cheddar can work!
- 8 slices bread: Opt for hearty bread like sourdough or whole wheat for a robust sandwich.
- 8 slices cheese: I recommend a sharp cheddar or pepper jack for that extra flavor punch.
- 4 leaves lettuce: Crisp Romaine or Lettuce keeps things fresh and adds crunch.
- 8 slices tomato: Juicy Roma tomatoes work wonderfully; pick some that are ripe.
- Cooking spray: For that golden crust when toasting!
Preparation pro tip: Set out any cold ingredients like cream cheese to soften before you start, and preheat your skillet, so it’s ready when you are!
Step-by-Step Instructions
Step 1: Prepare the Buffalo Chicken Filling
In a good-sized bowl, combine 1 1/2 cups of finely shredded chicken, 1/3 cup of softened cream cheese, 1/3 cup hot sauce, 1/4 cup finely diced onion, and 2 tablespoons of crumbled blue cheese. Microwave the mixture for 30-45 seconds, stirring halfway through. You want the cream cheese fully melted and the filling warm, creamy, and spreadable—think of it as the heart of your sandwich!
Chef’s Tip: Taste the filling and adjust the hot sauce or cheese to match your spice tolerance!
Step 2: Assemble the Sandwiches
Lay out all 8 slices of bread on a clean work surface. On 4 of those slices, carefully place one cheese slice on each, then divide the warm Buffalo chicken filling evenly among these 4 slices and spread it over the cheese. Top them with another cheese slice and place the remaining 4 slices of bread on top. Gently press down to ensure everything is snug.
Visual Cue: Each sandwich should feel firm, but not squished, with a nice height to it.
Step 3: Toast the Sandwiches
Lightly coat the outer side of each sandwich with cooking spray. Heat your skillet over medium-high heat; you want it good and hot! Place the sandwiches in batches if necessary, cooking for 2.5 to 3 minutes until the bread is beautifully golden brown and the cheese starts to ooze. Carefully flip each sandwich and cook for another 1.5 to 2 minutes on the other side until that side is equally golden, and you have a nice crispy crust!
Chef’s Tip: Don’t crowd the skillet—it’ll cause steaming instead of toasting!
Step 4: Finish and Serve
Once toasted, transfer the sandwiches to a cutting board. Slice them diagonally for that café-style presentation and top with crisp leaves of lettuce and tomato slices. Serve immediately while they’re melt-in-your-mouth warm!
** common mistake to avoid**: Don’t rush the toast; you’ll want that crunchy exterior for texture—trust me!
Expert Tips & Tricks
Storage Recommendations: These sandwiches are best enjoyed fresh. If you have leftovers, store the filling separately in an airtight container for up to 3 days in the refrigerator. You can quickly reheat and make fresh sandwiches each time.
Make-Ahead Instructions: Prepare the buffalo chicken filling a day in advance and store it in the fridge. Assemble the sandwiches just before cooking for the best texture.
Troubleshooting Common Problems: If the filling feels too dry, stir in a little more cream cheese or hot sauce to loosen it—you want it creamy, not crumbly!
Reheating Tips: To reheat a cooked sandwich, try a toaster oven on a low setting for even heating without burning the bread.
Serving Suggestions
These Buffalo Chicken Dip Sandwiches are great on their own, but why not add a few sides to round out your meal? Serve them with a fresh crunchy salad, crispy sweet potato fries, or homemade coleslaw for a perfect platter. For a casual presentation, stack the sandwiches upright on a wooden board with dipping sauces like ranch or more hot sauce on the side.
They’re perfect for every occasion: game day, potlucks, or a cozy outing with friends—everyone will want in on the deliciousness!
Variations & Substitutions
Different Flavor Combinations: Swap out the hot sauce for BBQ sauce for a tangy twist, or experiment with different cheeses like pepper jack for a spicy kick!
Dietary Restriction Adaptations: For a healthier option, use whole grain bread and incorporate shredded veggies into the filling. Gluten-free bread works just as well for those who need an alternative.
Seasonal Variations: In winter, add roasted red peppers or spinach for warmth. In summer, use fresh herbs to brighten up your filling!
Nutrition & Storage Info
- Prep Time: 10 minutes
- Cook Time: 15 minutes
- Total Time: 25 minutes
- Yield: 4 servings
- Estimated calories per serving: Approximately 500 calories (varies based on bread and cheese choice)
Storage Instructions: Keep in an airtight container for up to 3 days, and the filling can be frozen for up to 2 months, just make sure to slice the bread fresh for every serving!
FAQ Section
Can I use frozen chicken?
Definitely! Thaw and cook it as needed. It works just as well!What if I don’t like blue cheese?
You can substitute it with mozzarella or feta for a milder flavor.How spicy is this recipe?
It depends on the hot sauce you use; start with less and adjust according to your taste!Can I make this sandwich in advance?
While best fresh, you can prepare the filling ahead of time and assemble the sandwich just before cooking.What type of bread is best?
Sourdough or whole grain bread offers great texture, but feel free to use whatever you enjoy!Can I grill these instead of using a skillet?
Absolutely! Grill them over medium heat for a lovely charred flavor.How can I store leftovers?
Store the sandwiches in an airtight container in the refrigerator for up to 3 days.What sides pair well with these sandwiches?
Salads, sweet potato fries, or chips make excellent pairings!Can this recipe be scaled up for a crowd?
You bet! Simply multiply the ingredients and use multiple skillets or cook in batches.What if my sandwiches are soggy from the filling?
Make sure your bread is toasted well, and avoid overfilling to maintain that perfect crust!

Conclusion
So there you have it—your new go-to recipe for Buffalo Chicken Dip Sandwiches that’s nothing short of spectacular. They blend the comforting essence of the classic dip with a fun twist everyone will love! I encourage you to try making these for your next gathering or just as a cozy evening treat.
Have you given this recipe a shot? I’d love to hear how your sandwiches turned out! Let’s connect in the comments and swap stories. Don’t forget to check out other recipes on the blog for more delicious ideas to elevate your home cooking game!

Buffalo Chicken Dip Sandwich
Ingredients
Method
- In a bowl, combine 1.5 cups of finely shredded chicken, 1/3 cup of softened cream cheese, 1/3 cup hot sauce, 1/4 cup finely diced onion, and 2 tablespoons of crumbled blue cheese. Microwave for 30-45 seconds, stirring halfway until creamy.
- Lay out 8 slices of bread. On 4 slices, place one cheese slice each, then divide the warm Buffalo chicken filling evenly, spreading it over the cheese. Top with another cheese slice and place the remaining 4 slices of bread on top.
- Coat the outer side of each sandwich with cooking spray. Heat a skillet over medium-high heat. Toast the sandwiches for 2.5 to 3 minutes until golden brown, then flip and cook for another 1.5 to 2 minutes.
- Transfer toasted sandwiches to a cutting board, slice diagonally, and serve with lettuce and tomato slices while warm.