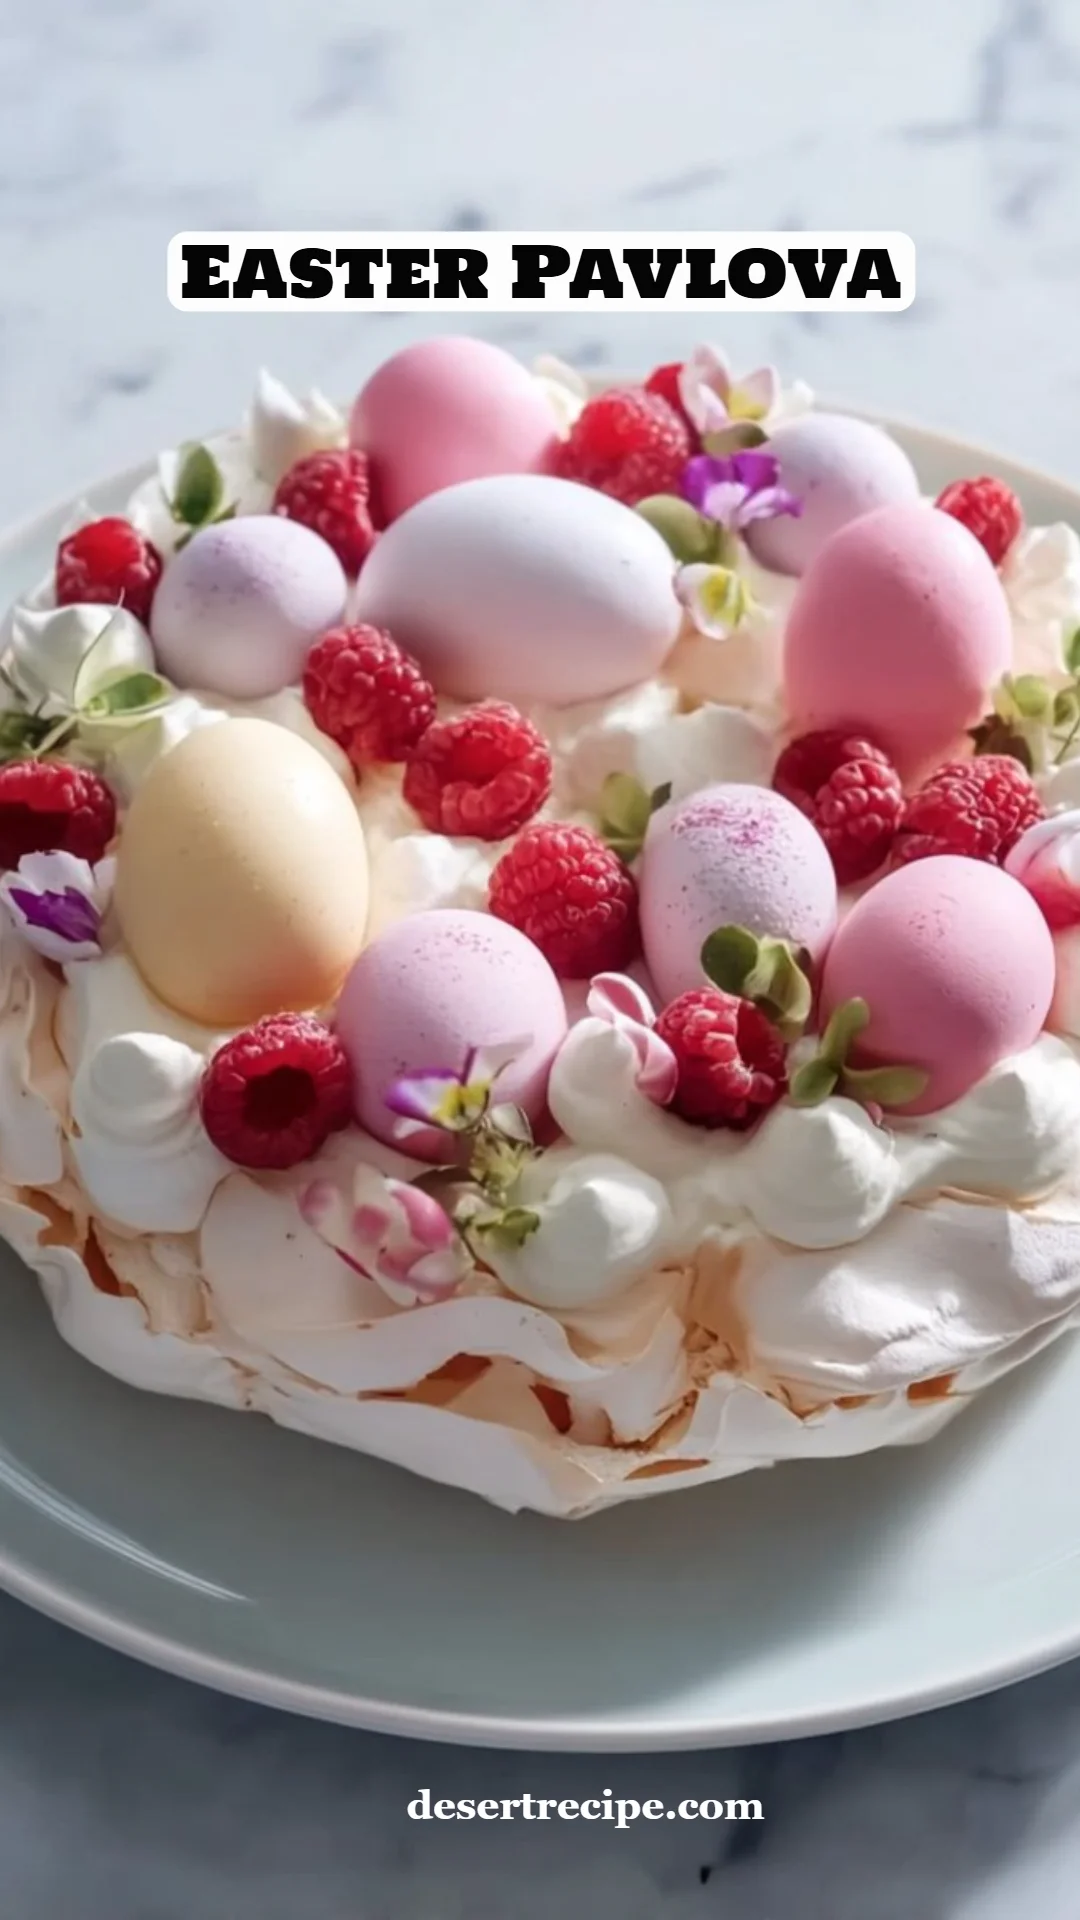
Heavenly Easter Pavlova: The Ultimate Showstopper for Your Spring Celebration!
Ah, Easter! A time when flowers bloom, the sun shines brighter, and families come together to celebrate. Growing up, Easter meant one delightful tradition that I cherished above all else—my grandmother’s Easter Pavlova. Every year, I would help her whip up a fluffy meringue, folding in memories and laughter along the way. As the Pavlova slowly baked, the aroma wafting through the house would draw everyone to the kitchen. The crispy golden exterior contrasted with the marshmallow-like center, topped off with a fluffy cloud of whipped cream and fresh, vibrant fruits. That, my friends, is the magic of Easter Pavlova!
But here’s the thing: my grandmother’s recipe has received a little modern twist. I’ve streamlined the process without sacrificing that nostalgic flavor, which makes my version extra special. Every bite is like a hug from home, transporting me back to those cherished family gatherings. And the best part? I’m excited to share this delectable recipe with you so you can create your own Easter memories! In this post, you’ll learn the secrets to making the perfect Easter Pavlova—from meringue to toppings. Get ready to wow your loved ones with this light and airy dessert that not only looks stunning but tastes divine!
What are Easter Pavlova?
The Easter Pavlova is a classic meringue dessert believed to have been created in honor of the Russian ballerina Anna Pavlova during her tour to Australia and New Zealand in the 1920s. Unlike other desserts, Pavlova’s brilliance lies in its delicate balance of textures: a light and crunchy shell with a soft, pillowy center that melts in your mouth.
What sets it apart is the luxurious cream and the fresh fruit topping, which offer a delightful contrast between sweet and tangy. Traditionally, this dessert is synonymous with Easter and Spring celebrations, embodying the spirit of renewal and revitalization. It’s perfect for any gathering, whether you’re hosting a festive brunch or a simple family dinner.
Why You’ll Love This Recipe
Flavor Explosion: The harmonious blend of crispy meringue, luscious cream, and tart fresh raspberries creates a flavor profile that is simply unbeatable. Each bite is a celebration of textures and tastes!
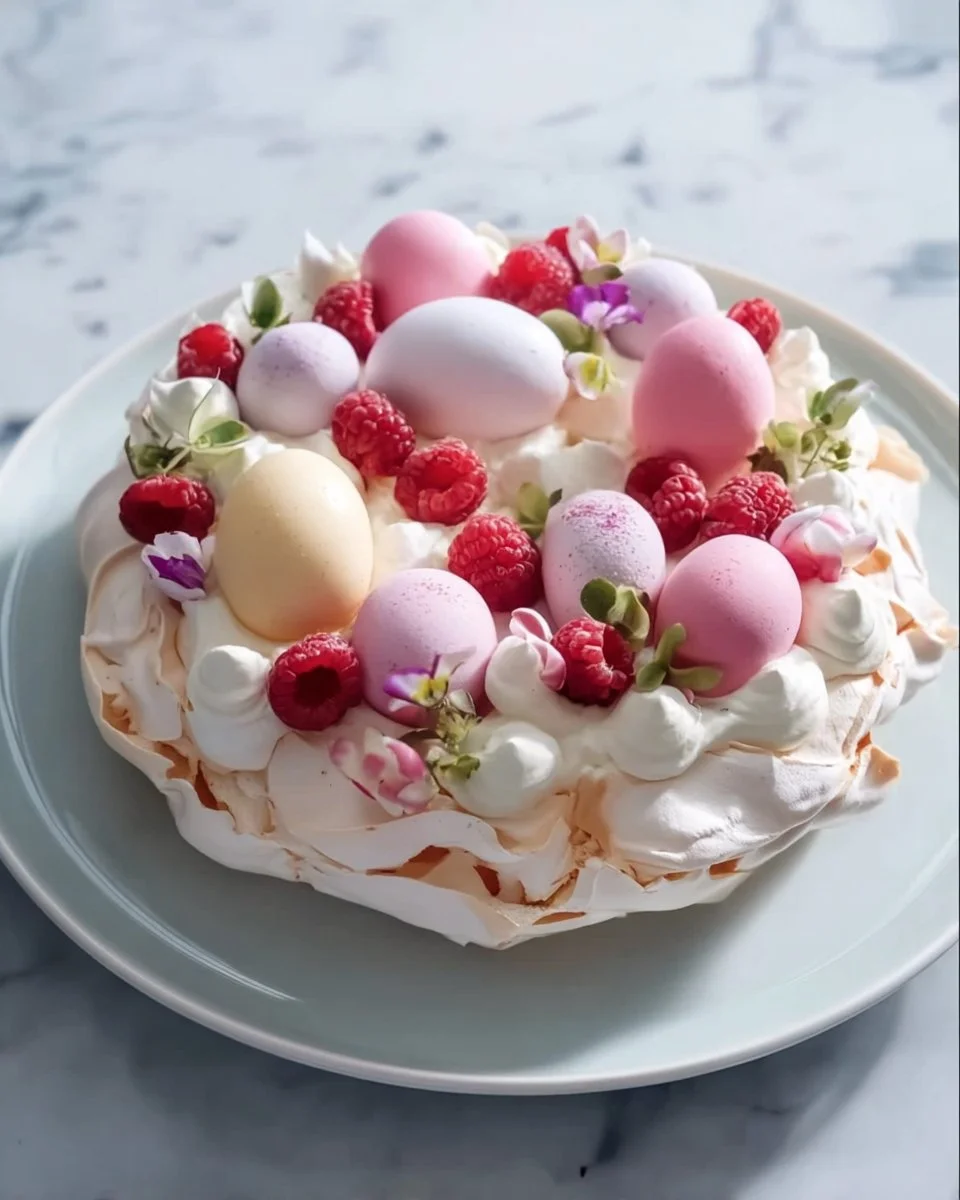
A Feast for the Eyes: This dessert is as much about appearance as it is about flavor. The bright colors of seasonal fruits and edible flowers make this Pavlova a stunning centerpiece for your table.
Cost-Effective: While some may see pavlova as a fancy dessert requiring a trip to a high-end bakery, you’ll be pleasantly surprised at how affordable it is to make at home. With just a handful of ingredients, you can impress your guests without breaking the bank!
Customization Galore: One of the best parts of this recipe is how easy it is to personalize! You can swap out fruits based on the season, or even infuse different flavors into your whipped cream.
Beginner-Friendly: Don’t worry if you’re new to baking! This recipe breaks down the process into simple steps, with tips included to help you avoid any common pitfalls. Plus, once you master it, you’ll feel like a pro!
So, grab your apron, and let’s make some Easter Pavlova magic together!
Ingredients for Easter Pavlova
For the Meringue:
- 4 large egg whites (Make sure they’re at room temperature for better volume)
- 1 cup caster sugar (Fine sugar helps create a smooth meringue)
- 1 tsp white vinegar (Helps stabilize the meringue)
- 2 tsp cornstarch (For a marshmallow-like consistency)
- 1 tsp vanilla extract (Pure is best for flavor)
For the Topping:
- 1 cup heavy cream (Chilled, for easy whipping)
- 2 tbsp powdered sugar (For sweetness)
- 1/2 tsp vanilla extract (To enhance the cream flavor)
- 1 1/2 cups fresh raspberries (Sweet and tart for that perfect balance)
- Edible flowers (such as violets, dianthus, or lavender, for a beautiful presentation)
- Meringue eggs or mini pastel candies (Optional, for decoration)
Notes: The quality of your ingredients matters! Use organic eggs for a better texture and flavor. If you can’t find caster sugar, you can blitz regular sugar in a blender until fine.

Step-by-Step Instructions for Perfect Easter Pavlova
Preheat your Oven: Set it to 250°F (120°C). While it heats, line a baking sheet with parchment paper, drawing an 8-inch circle on the underside as a guide for shaping.
Whip the Egg Whites: In a large, clean bowl, beat the egg whites on medium speed until soft peaks form. This should take about 2-3 minutes. The peaks should gently fold back when you pull the beaters out.
Add Sugar Gradually: With the mixer still running, slowly add the caster sugar, a tablespoon at a time. This process should take about 10 minutes until the mixture looks thick and glossy. You should be able to rub a bit between your fingers and feel no graininess.
Fold in the Ingredients: Gently fold in the vinegar, cornstarch, and vanilla extract. Be careful not to deflate the meringue; you want to maintain its volume!
Shape the Meringue: Spoon the meringue onto the prepared baking sheet, using your drawn circle as a guide. Create a slight well in the center to hold the cream and fruit later.
Bake: Place the baking sheet in the oven and bake for 1 hour and 15 minutes. After baking, turn off the oven and leave the door slightly ajar for 1 hour to prevent cracking.
Whip the Cream: While the meringue cools, whip the heavy cream with the powdered sugar and 1/2 tsp vanilla extract until soft peaks form. Keep it chilled until you’re ready to assemble.
Assemble Your Pavlova: Once cooled, carefully transfer the Pavlova to a serving platter. Fill the center with whipped cream, and top generously with fresh raspberries. Adorn with edible flowers and candies for that Easter touch.
Serve Immediately: Indulge in the Pavlova while it’s fresh for the best taste and texture. Enjoy!
Chef’s Tips: Avoid humidity when making your meringue, as it’s your enemy! Choose a dry day for optimal results, and always ensure your mixing bowl is free of any grease.
Expert Tips & Tricks
Storage Guidelines: Since meringue can absorb moisture, it’s best enjoyed the same day. However, you can store any leftovers in an airtight container at room temperature for up to 1 day.
Make-Ahead: You can prepare the meringue a day in advance. Just store it in a cool, dry place wrapped in plastic wrap to keep it crisp. Whip the cream and assemble right before serving.
Troubleshooting: If your Pavlova cracks, don’t panic! It’s still delicious. Cracking can happen due to rapid temperature changes; just handle it gently.
Egg Whites Matter: Make sure there are no yolks in your egg whites. Even a tiny bit of fat can prevent them from whipping properly.
Flavor Infusion: For a delightful twist, consider infusing your whipped cream with a splash of lemon zest or using different berries like strawberries or blueberries.
Serving Suggestions
Pairing your Easter Pavlova with a light fruity cocktail or a tart lemonade can enhance the fresh flavors of the dessert. For presentation, consider arranging the Pavlova on a rustic wooden board surrounded by more fresh fruits and edible flowers. It’s ideal for brunches, holiday gatherings, or simply as a sweet ending to a family dinner.
Variations & Substitutions
Feeling adventurous? Here are some fun ideas to switch things up:
- Flavor Combos: Try adding crushed pistachios on top or drizzling with warm chocolate sauce.
- Seasonal Variations: Switch up the fruits based on the season! In summer, try peaches or strawberries; in fall, consider pears or figs.
- Dietary Needs: For a dairy-free option, substitute heavy cream with coconut cream. Just chill the can of coconut milk overnight, scoop out the solid cream, and whip it up!
Nutrition & Storage Info
- Prep Time: 20 minutes
- Cook Time: 1 hour 15 minutes
- Chill Time: 1 hour
- Total Time: Approximately 2 hours 35 minutes
- Yield: Serves 8-10
- Estimated Calories: Approximately 200 calories per serving (calories may vary based on specific ingredients used).
- Storage Instructions: Store leftovers at room temperature in an airtight container. Best consumed the same day but can last up to 1 day.
FAQ Section
What can I substitute for caster sugar?
You can pulse granulated sugar in a food processor or blender until fine, as this mimics caster sugar closely.Why did my meringue collapse?
This could be due to under-whipping the egg whites or incorporating moisture. Ensure your mixing bowl is clean and dry.Can I make this gluten-free?
Absolutely! All the ingredients are gluten-free, so you’re good to go!How do I know when the Pavlova is done?
The outside should be firm and dry to the touch, and it should easily lift off the parchment paper.What’s the best way to serve Pavlova?
Serve it immediately after assembling to enjoy the best texture. If you need to prepare ahead, keep the components separate until serving.Is it possible to freeze Pavlova?
It’s not recommended to freeze the entire Pavlova, as the meringue will lose its texture. However, you can freeze leftover meringue for later use.How long does it take for meringue to cook?
Typically, meringue takes about 1 hour 15 minutes at a low temperature to dry out completely.Can I add other fruits?
Definitely! Feel free to mix and match your favorite fruits like kiwi, strawberries, or even citrus for a zesty kick.Is there a way to make this healthier?
Be mindful of the sugar. While you won’t get the same texture, you can reduce the sugar slightly or explore sugar alternatives.What if my Pavlova cracks during baking?
Cracking is normal, especially if there’s rapid temperature change. Focus on flavor; it’ll still taste delicious!
Conclusion
In a world filled with complicated desserts, this Easter Pavlova stands out as a symbol of simplicity and joy. Its lightness and fresh flavors make it an unforgettable treat that brings smiles around the table. I encourage you to try this recipe, infusing your own family traditions into every fluffy bite. I’d love to hear how it turns out for you! Share your experience in the comments, and check out my other spring dessert recipes for more inspiration. Happy baking, friends!