Table of Contents
Table of Contents
As the holiday season rolls around, my kitchen transforms into a warm, inviting haven filled with the sweet scents of baking goodies that evoke cozy memories. One of my absolute favorites? Peppermint Swirl Cookies. Every time I bake them, I recall a heartwarming family tradition where we’d gather around the kitchen, laughter mixing with the frosty scents of peppermint and vanilla. These cookies are more than just a festive treat — they’re little bites of joy that bring smiles, nostalgia, and a hint of magic to our gatherings.
What makes my Peppermint Swirl Cookies stand out? While many recipes leave you with bland, overly sweet cookie dough, this one strikes the perfect balance between buttery richness and refreshing minty flavor. The vibrant red swirls not only make them visually appealing but also elevate their festive spirit. As I share this treasured recipe, my promise to you is that you’ll not only learn how to make these dazzling cookies but also create heartwarming new memories with friends and family.
What Are Peppermint Swirl Cookies?
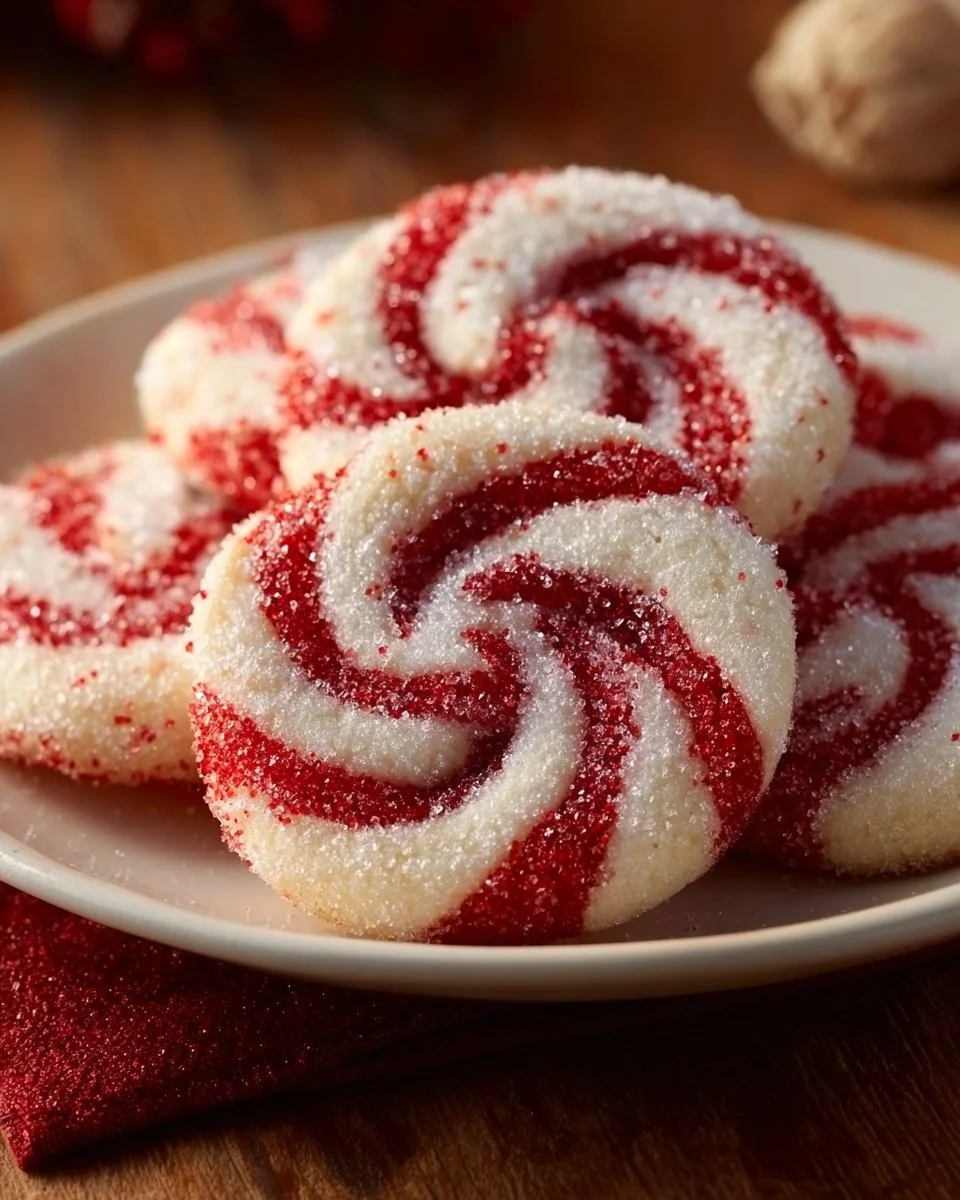
Peppermint Swirl Cookies are a delightful combination of flavors and colors that celebrate the essence of the holiday season. Originating from classic cookie recipes that emphasize festive spirit, these cookies are distinguished by their captivating red and white swirls. The rich butter-based dough infused with peppermint extract delivers a satisfying texture—crispy edges with a soft, chewy center that melts in your mouth.
What truly makes them unique is the beautiful contrast of colors as they bake. The vibrant red swirls married with the creamy white of the dough create visual magic that’s perfect for sharing during the holidays or any festive occasion. These cookies are ideal for cookie swaps, holiday parties, or simply to enjoy by the fireplace. Whether you’re rekindling childhood memories or making new ones, these cookies add a sweet sparkle to every gathering.
Why You’ll Love This Recipe
Unique Flavor Combination: Unlike many store-bought cookies that rely heavily on artificial flavors, my Peppermint Swirl Cookies are lush and bursting with authentic peppermint flavor. The combination of vanilla and peppermint creates a captivating taste sensation that will leave your taste buds wanting more.
A Feast for the Eyes: These cookies aren’t just delicious; they are stunning! The red and white swirls make them a showstopper on any cookie platter. They’ll have your guests oohing and aahing.
Customization Options: This recipe opens the door to creativity! Feel free to swap out peppermint for other flavors like almond or vanilla, or even try adding chocolate chips for an extra indulgence. The possibilities are endless!
Cost-Effective Delight: Making these delicious cookies at home is much more budget-friendly than purchasing fancy treats from the bakery. Plus, they’re fun to make, allowing you to enjoy the process as much as the result.
Suitable for All Skill Levels: Whether you’re a seasoned baker or just starting, this recipe is straightforward, with step-by-step instructions that make it hard to mess up. The end result is both impressive and deeply satisfying—perfect for bakers of all ages.

Ingredients Section
Essential Ingredients
- 2 ½ cups all-purpose flour (use high-quality flour for the best texture)
- 1 teaspoon baking powder (ensures your cookies rise nicely)
- ½ teaspoon salt (balances the sweetness)
- 1 cup (2 sticks) unsalted butter, softened (room temperature butter is key; I recommend using Kerrygold for a rich flavor)
- 1 cup granulated sugar (for that perfect sweetness)
- 1 large egg (room temperature helps with mixing)
- 1 teaspoon vanilla extract (pure vanilla extract enhances the flavor)
- 1 teaspoon peppermint extract (go for the real deal for that fresh mint taste)
- Red gel food coloring (gel colors are more vibrant)
- ¼ cup coarse sugar or crushed peppermint candies (for a delightful finishing touch)

Notes on Ingredient Quality and Substitutions
Using high-quality ingredients will greatly impact your cookies’ flavor and texture. For the butter, always choose unsalted for more control over your final sweetness. If you’re looking for alternatives, feel free to experiment with dairy-free butter or even coconut oil.
Prep Notes
- Butter: Make sure your butter is at room temperature to cream well with sugar.
- Egg: Allow it to come to room temperature before mixing for smoother dough.
Step-by-Step Instructions
Prepare the Dry Ingredients: In a medium bowl, whisk together the flour, baking powder, and salt thoroughly. This step ensures that the leavening will distribute evenly throughout your dough. Set aside.
Cream the Butter and Sugar: In a large bowl, using an electric mixer, cream together the softened butter and granulated sugar until the mixture is light and fluffy—about 3-5 minutes.
Add the Egg and Extracts: Beat in the egg, then the vanilla extract, and finally the peppermint extract until well combined. This step adds flavor and richness to your dough.
Combine Wet and Dry Ingredients: Gradually add the dry ingredients to the wet mixture, mixing on low speed until just combined. A soft dough should form; remember not to overmix!
Divide the Dough: Carefully divide the dough in half. Keep one half plain and add red gel food coloring to the second half, mixing until the color is uniform. The vibrant color will create those beautiful swirls.
Chill the Dough: This is crucial for achieving sharp swirls. Wrap each half of the dough in plastic wrap and chill in the refrigerator for at least 30 minutes. Chilling firm up the dough, making it easier to roll.
Roll Out the Dough: On a lightly floured surface, roll out the plain dough into a 10×12 inch rectangle, about ¼ inch thick. Do the same with the red dough.
Layer the Dough: Carefully lay the red dough rectangle directly on top of the plain dough. Gently press them together to eliminate air pockets.
Roll into a Log: Starting from one long side, carefully roll the layered dough tightly into a log. Press gently to eliminate air pockets as you roll. A tightly rolled log keeps your swirls intact!
Chill Again: Wrap the dough log tightly in plastic wrap and chill again for at least 2 hours. This ensures the dough is firm enough to slice well.
Preheat the Oven: Set your oven to 375°F (190°C) and line your baking sheets with parchment paper.
Coat the Log: Remove the chilled dough log from the refrigerator. If desired, brush it lightly with water or a whisked egg white before rolling in coarse sugar or crushed peppermint candies to coat.
Slice the Cookies: Using a sharp knife, slice the log into ¼ inch thick rounds. Place the sliced cookies about 1 inch apart on the prepared baking sheets.
Bake: Bake for 8 to 10 minutes, or until the edges are lightly golden. Be sure not to overbake, as you want that chewy center.
Cool: Let the cookies cool on the baking sheets for a few minutes before transferring them to a wire rack to cool completely.
Chef’s Tips
- Timing and Visual Cues: Watch the edges! They should turn golden, indicating that they’re just right.
- Common Mistakes to Avoid: Overbaking will lead to dry cookies; check them a minute earlier than the recommended time.
- Professional Techniques: When rolling out dough, try using parchment paper to prevent sticking.
Expert Tips & Tricks
Storage Recommendations: Store baked cookies in an airtight container at room temperature for up to a week. For longer storage, freeze them for up to three months.
Make-Ahead Instructions: Prep the logs ahead of time and freeze. Just slice and bake whenever you’re ready to indulge!
Troubleshooting: If your dough feels too sticky, chill it longer. If you notice your swirls are bleeding, ensure to chill the log adequately before slicing.
Enhance Flavor with Extracts: Feel free to experiment by swapping flavors. Almond extract or a hint of orange zest can add a delightful twist.
Serving Suggestions: Pair these festive cookies with hot cocoa or peppermint tea for a cozy treat.
Serving Suggestions
These Peppermint Swirl Cookies are both beautiful and delicious on their own, but they shine even brighter when served alongside other festive treats. Consider creating a holiday cookie platter with chocolate chip cookies and frosted sugar cookies for variety. For a fun twist, add them to a dessert charcuterie board featuring cheese, fruit, and a splash of festive cheer. These cookies are perfect for holiday parties, gift-giving, or simply enjoying at home while curled up with your favorite hot beverage.
Variations & Substitutions
Different Flavor Combinations: Experiment with other extracts like chocolate mint or vanilla bean. You could even add zest from oranges or lemons for a refreshing citrus note.
Dietary Restrictions: For gluten-free options, replace all-purpose flour with a 1:1 gluten-free flour blend. You can also use vegan butter and flaxseed for the egg.
Seasonal Variations: During the holidays, consider dusting them with powdered sugar for a snowy effect, or drizzle with white chocolate for a decadent finish.
Nutrition & Storage Info
- Prep Time: 30 minutes (plus chilling time)
- Cook Time: 10 minutes
- Total Time: 2 hours 40 minutes
- Yield: About 24 cookies
- Estimated Calories: Approximately 130 calories per cookie
- Storage Instructions: Store at room temperature in an airtight container for up to a week, or freeze for three months.

FAQ Section
Can I freeze these cookies?
Yes! The dough log can be frozen for up to 3 months. Just slice and bake straight from the freezer, adding a minute or two to your baking time.What if I don’t have peppermint extract?
You can substitute it with double the amount of vanilla extract for a delightful vanilla cookie.Why did my cookies spread too much while baking?
This might be due to warm dough. Ensure your dough is completely chilled before slicing and baking.Can I use other colorings besides red?
Absolutely! Feel free to use any gel food colors to create different designs and flavors.What type of baking sheets should I use?
Insulated baking sheets are ideal as they prevent over-browning. If you’re unsure, using parchment-lined regular baking sheets will also work well.How many cookies does this recipe make?
This batch typically yields about 24 cookies, depending on the thickness of your slices.Can I use cookie cutters instead of slicing?
Yes, after rolling out the dough, you can use cookie cutters for fun shapes before chilling.What’s the best way to decorate these cookies?
Consider drizzling white chocolate on top or adding festive sprinkles for an extra festive touch.Do these cookies need to be refrigerated?
No, as long as they are stored in an airtight container at room temperature.Can I replace butter with coconut oil?
Yes, but it will slightly alter the texture. Make sure the coconut oil is at room temperature for best mixing.
Conclusion
These Peppermint Swirl Cookies are more than just a treat; they’re a slice of nostalgia, a way to create new memories, and the perfect festive addition to your holiday baking repertoire. I encourage you to give this recipe a try, and I promise your kitchen will fill with delightful scents and smiles. Let me know how your baking went in the comments below! And if you’re hungry for more holiday recipes, be sure to check out my blog for scrumptious ideas, like Gingerbread Men and Chai Snickerdoodles.
Happy baking!

Peppermint Swirl Cookies
Ingredients
Method
- In a medium bowl, whisk together the flour, baking powder, and salt thoroughly. Set aside.
- In a large bowl, using an electric mixer, cream together the softened butter and granulated sugar until the mixture is light and fluffy—about 3-5 minutes.
- Beat in the egg, then the vanilla extract, and finally the peppermint extract until well combined.
- Gradually add the dry ingredients to the wet mixture, mixing on low speed until just combined.
- Carefully divide the dough in half. Keep one half plain and add red gel food coloring to the second half, mixing until the color is uniform.
- Wrap each half of the dough in plastic wrap and chill in the refrigerator for at least 30 minutes.
- On a lightly floured surface, roll out the plain dough into a 10×12 inch rectangle, about ¼ inch thick.
- Roll out the red dough into a similar rectangle.
- Carefully lay the red dough rectangle directly on top of the plain dough and gently press them together.
- Starting from one long side, carefully roll the layered dough tightly into a log.
- Wrap the dough log tightly in plastic wrap and chill again for at least 2 hours.
- Preheat the oven to 375°F (190°C) and line your baking sheets with parchment paper.
- Remove the chilled dough log, brush lightly with water or whisked egg white, and roll in coarse sugar or crushed peppermint candies to coat.
- Slice the log into ¼ inch thick rounds and place the sliced cookies about 1 inch apart on the prepared baking sheets.
- Bake for 8 to 10 minutes, or until the edges are lightly golden.
- Let the cookies cool on the baking sheets for a few minutes before transferring them to a wire rack to cool completely.