Indulge in the Irresistible Flavors of Traditional Greek Tsoureki: A Sweet Easter Delight!
INTRODUCTION
Growing up in a Greek household, the aroma of freshly baked bread was always a nostalgic soundtrack to my childhood. As a family, we never missed the opportunity to come together over the warm, fluffy delight of Traditional Greek Tsoureki. I remember sneaking bits of dough while my grandma prepared it for our Easter festivities, fully immersed in the sweet, buttery scent that filled the home. This braided bread, with its perfect blend of spices and rich texture, holds a special place in my heart and on my holiday table.
What makes this Tsoureki more than just any sweet bread? It’s the love and tradition woven into each strand—every braided loaf is a celebration of togetherness and a bridge to our cultural heritage. While many recipes can replicate its flavors, I’ve honed this version to perfection, ensuring a moist interior that remains soft for days and a crispy crust that makes every slice a heavenly experience.
In this post, I’ll guide you through my step-by-step process for achieving that perfect Tsoureki, sharing personal tips and tricks along the way to ensure your baking adventure is as rewarding as gathering around the table with loved ones. Get ready to create lasting memories with this delightful, easy recipe that’s bound to become a family favorite!
WHAT ARE Traditional Greek Tsoureki?
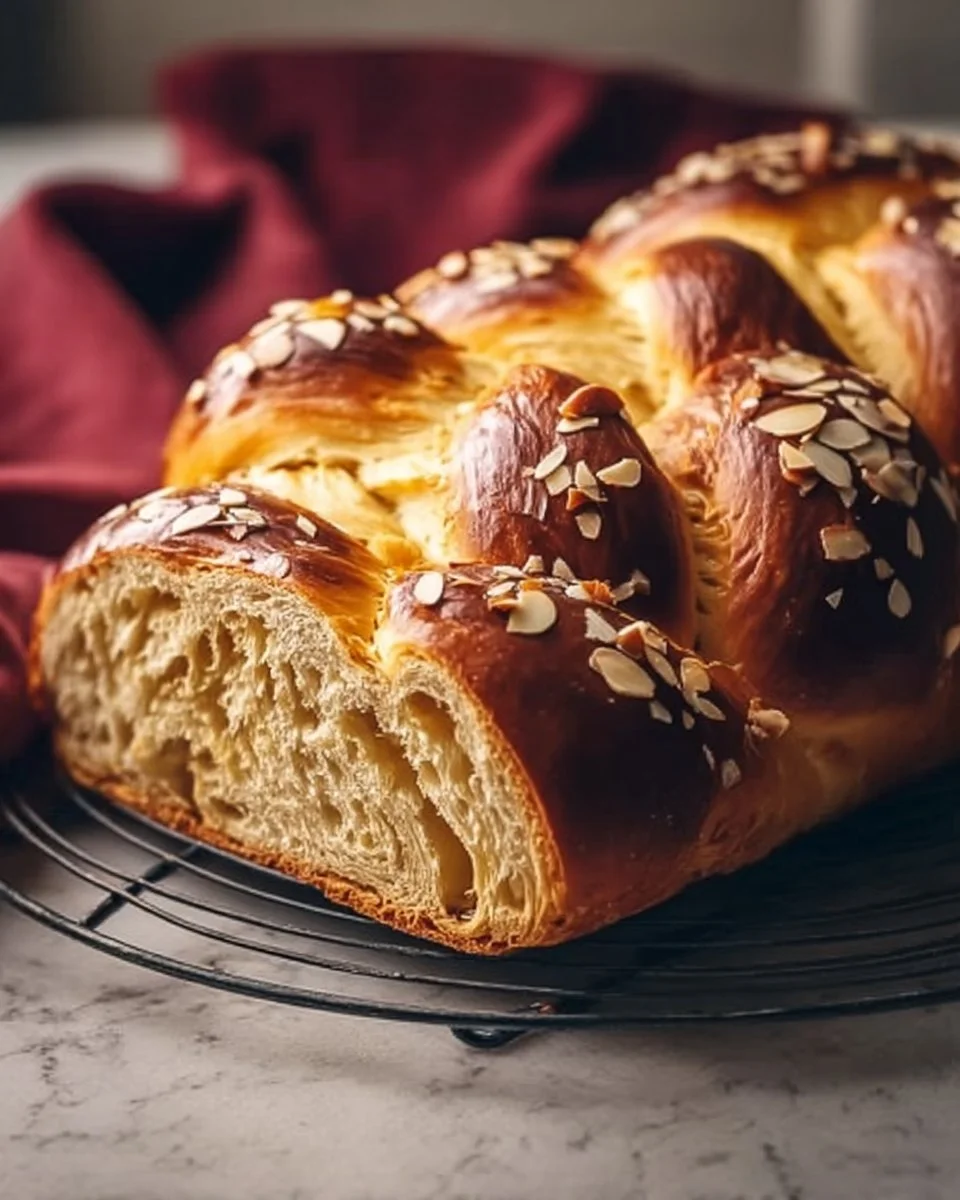
Traditional Greek Tsoureki is a sweet, braided bread that boasts an enchanting blend of flavors, enriched with spices such as ground mastic and mahleb—both of which have deep roots in Greek culinary traditions. Originating from the ancient Greeks, it holds a special significance during Easter and other festive occasions. Tsoureki stands out with its slightly sweet, pillowy texture, buttery aroma, and delightful crust.
Each bite transports you to a place of warmth and comfort, evoking memories of family gatherings and holiday celebrations. Tsoureki is more than just a bread; it symbolizes unity and tradition. Whether you’re sharing slices with friends over coffee or placing it on the center of your Easter table, this bread is designed to be savored and celebrated.
This recipe is perfect for those seeking a blend of heritage and modern simplicity, ensuring that you create a loaf that resonates with deep-rooted traditions while being approachable for any home baker ready to take on this delightful challenge!
WHY YOU’LL LOVE THIS RECIPE
Authenticity Meets Simplicity: This recipe captures the essence of Traditional Greek Tsoureki, allowing you to recreate the magic of your grandmother’s kitchen without needing to be a professional baker. The step-by-step instructions are straightforward, making it accessible for bakers of all levels.
Cost-Effective Goodness: Homemade Tsoureki is not only more flavorful but also more economical than store-bought versions. With simple ingredients—most of which you may already have on hand—you’ll save money while impressing family and friends!
Customization Options: This recipe encourages creativity! Want to add a twist? Consider incorporating your favorite nuts or dried fruits, or experiment with different spices for a unique flavor profile. Make it your own!
Freshness Guaranteed: Nothing beats the experience of pulling a loaf of Tsoureki out of the oven, filling your kitchen with mouthwatering aromas. You will relish slicing into warm, fresh bread, enjoying it in its prime—a luxury that store-bought varieties simply can’t match.
Perfect for Any Occasion: While Tsoureki is traditionally enjoyed during Easter, it’s equally great for Christmas, family brunches, or even as an everyday delight. Plus, it freezes well, so you can always have a special treat on hand to lift your spirits!
Ready your kitchen, because I promise you’re about to embark on a delicious journey with this Traditional Greek Tsoureki recipe—one that elevates your baking prowess while filling your home with warmth and love!

INGREDIENTS SECTION
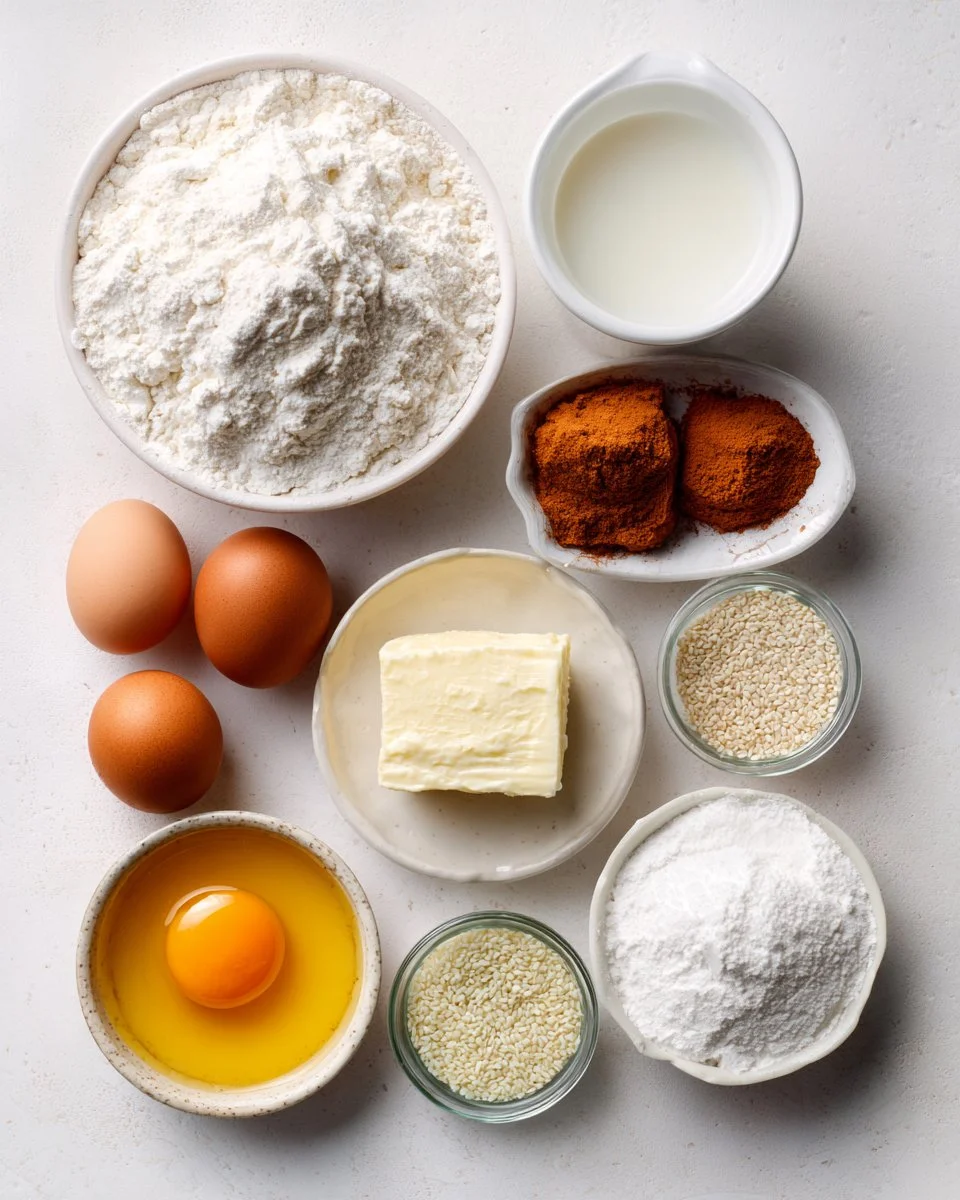
To create your Traditional Greek Tsoureki, gather the following ingredients:
- 4 cups all-purpose flour: Choose a high-quality brand like King Arthur.
- 1 cup milk: Whole milk recommended for richness; can use almond or oat milk for dairy-free.
- 1/2 cup granulated sugar: For sweetness; adjust up or down based on preference.
- 1/2 cup unsalted butter, softened: Let it come to room temperature for easy mixing; I often use Land O’Lakes.
- 3 large eggs: Ensure they are at room temperature for even mixing.
- 1 packet active dry yeast: Look for quick-rise yeast to speed up the process.
- 1/4 teaspoon salt: Enhances flavor.
- 1/4 teaspoon ground mastic (optional): Adds a traditional flavor; not easy to find but worth the hunt.
- 1/4 teaspoon ground mahleb (optional): A wonderful cherry-like flavor; I use this whenever I can find it!
- Zest of 1 orange: Fresh zest brightens up the flavor; definitely don’t skip this step!
- 1 egg (for egg wash): Gives the Tsoureki a beautiful golden color.
- Sesame seeds (for topping): For crunch and visual appeal.
Preparation Tips:
- Ensure your butter is at room temperature for easy incorporation.
- If you are using ground mastic or mahleb, consider grinding your own for optimal freshness.
STEP-BY-STEP INSTRUCTIONS
Activate the Yeast: In a small bowl, dissolve the yeast in warm milk (about 110°F) and let it sit for 5-10 minutes until frothy. This vital step awakens the yeast, ensuring a beautiful rise in your dough.
Combine Dry Ingredients: In a large mixing bowl, whisk together the flour, sugar, salt, ground mastic, ground mahleb, and orange zest until well mixed.
Form the Dough: Make a well in the center of the flour mixture. Add the melted butter, eggs, and activated yeast mixture. Stir until a shaggy dough forms.
Knead Until Smooth: Transfer the dough to a floured surface. Knead for about 10 minutes until the dough is smooth and elastic. (Pro tip: If your dough feels very sticky, add a little more flour, but be cautious not to over-flour.)
First Rise: Place the dough in a greased bowl, cover with a damp cloth, and let it rise in a warm place for about 1-2 hours, or until doubled in size. (Visual cue: It should be pillowy and light!)
Shape the Dough: Once risen, punch down the dough to release excess air. Divide it into three equal pieces, rolling each into a long strand. Braid the strands together gently, tucking the ends under.
Second Rise: Place the braided dough on a greased baking sheet, cover it lightly, and let it rise for another hour.
Preheat the Oven: 10 minutes before baking, preheat the oven to 350°F (175°C). Prepare the egg wash by beating the additional egg and then brush it over the risen dough. Sprinkle with sesame seeds for an added crunch.
Bake to Perfection: Bake for 30-35 minutes or until the bread turns golden brown and sounds hollow when tapped. (Chef’s tip: Check the bottom of the loaf; it should feel light and sound hollow!)
Cool and Savor: Remove from the oven and let it cool on a wire rack. Slice, serve, and most importantly, enjoy every bite of your homemade Tsoureki!

EXPERT TIPS & TRICKS
Storage: Store your Tsoureki in an airtight container at room temperature for 3-5 days. For longer preservation, wrap in plastic and freeze for up to 3 months—just thaw overnight before serving.
Make-Ahead: You can prepare the dough a day in advance. After the first rise, punch it down and refrigerate it. The next day, shape and braid before the second rise.
Common Mistakes: Avoid under-kneading the dough—this is crucial for developing gluten, which gives the bread its desirable texture.
Scent and Flavor: Infuse your kitchen with the scent of fresh bread by baking your Tsoureki early in the morning—there’s nothing like a warm loaf to start the day.
Troubleshooting: If your dough doesn’t rise, ensure your yeast is fresh and that the liquid used to activate it isn’t too hot.
SERVING SUGGESTIONS
Traditional Greek Tsoureki is delightful on its own, but consider pairing it with various accompaniments! Spread some whipped butter or homemade jam for a luxurious touch. You could also serve it alongside a hot cup of coffee or tea for a comforting afternoon snack.
For festive occasions, create a stunning platter by slicing the Tsoureki and arranging it with fresh fruits and a sprinkle of powdered sugar. Celebrate your efforts by showcasing your beautiful baked creation at gatherings, making it the centerpiece of those special moments!
VARIATIONS & SUBSTITUTIONS
Flavor Combinations: Add chocolate chips for a sweet surprise, or mix dried fruits like currants or raisins into the dough for added texture and flavor.
Dietary Restrictions: For a dairy-free version, substitute the milk with non-dairy alternatives and use coconut oil in place of butter. Additionally, you can use aquafaba (chickpea water) for the egg wash!
Seasonal Touches: During the holiday seasons, consider adding spices like cinnamon or nutmeg for a festive flare. In summer, lemon zest can replace orange zest for a refreshing taste!
NUTRITION & STORAGE INFO
- Prep Time: 20 minutes (plus rising times)
- Cook Time: 30-35 minutes
- Total Time: Approximately 2-3 hours (including rising)
- Yield: About 12 servings
- Estimated Calories: 220 per slice
- Storage: Room temperature for 3-5 days; airtight.
- Freezing Instructions: Wrap tightly and store in the freezer for up to 3 months.
FAQ SECTION
Can I make Tsoureki without mastic and mahleb?
- Absolutely! While they add traditional flavors, the bread will still be delicious using just basic ingredients.
Can I use instant yeast instead of active dry yeast?
- Yes, you can. The dough will rise a bit faster, so adjust your rising times accordingly.
Is Tsoureki suitable for vegetarians?
- Yes, this recipe is completely vegetarian as it doesn’t contain any meat or seafood.
What is the best way to serve Tsoureki?
- You can eat it plain, toast slices lightly, or enjoy it with fresh fruit and jam!
How long should I let the dough rise?
- The first rise typically takes 1-2 hours, while the second rise takes about 1 hour, or until the dough has approximately doubled in size.
What if my dough doesn’t rise?
- Ensure your yeast is fresh and that your liquid is warm, not hot. Yeast needs warmth to activate properly!
Can I use bread flour instead of all-purpose flour?
- Yes, bread flour can yield a chewier texture due to its higher protein content.
What toppings can I add to my Tsoureki?
- Sesame seeds are traditional, but you could sprinkle poppy seeds or even chopped nuts for variety.
How do I know when Tsoureki is done baking?
- It should be golden brown on the outside and sound hollow when tapped on the bottom.
Can I make Tsoureki ahead of time?
- Yes! You can prepare the dough the day before, refrigerate it after the first rise, and then shape and bake it the next day.
CONCLUSION
Traditional Greek Tsoureki is not just a recipe—it’s an experience filled with love, tradition, and deliciousness. From its sweet aroma wafting through your kitchen to the joy of sharing it with family and friends, baking this bread brings people together. I encourage you to give this recipe a try and create your own heartwarming memories with each slice!
Don’t forget to share your thoughts and experiences in the comments below! Also, if you enjoyed this recipe, check out similar delightful creations on my blog, like my popular Greek Baklava and Flaky Spanakopita recipes!