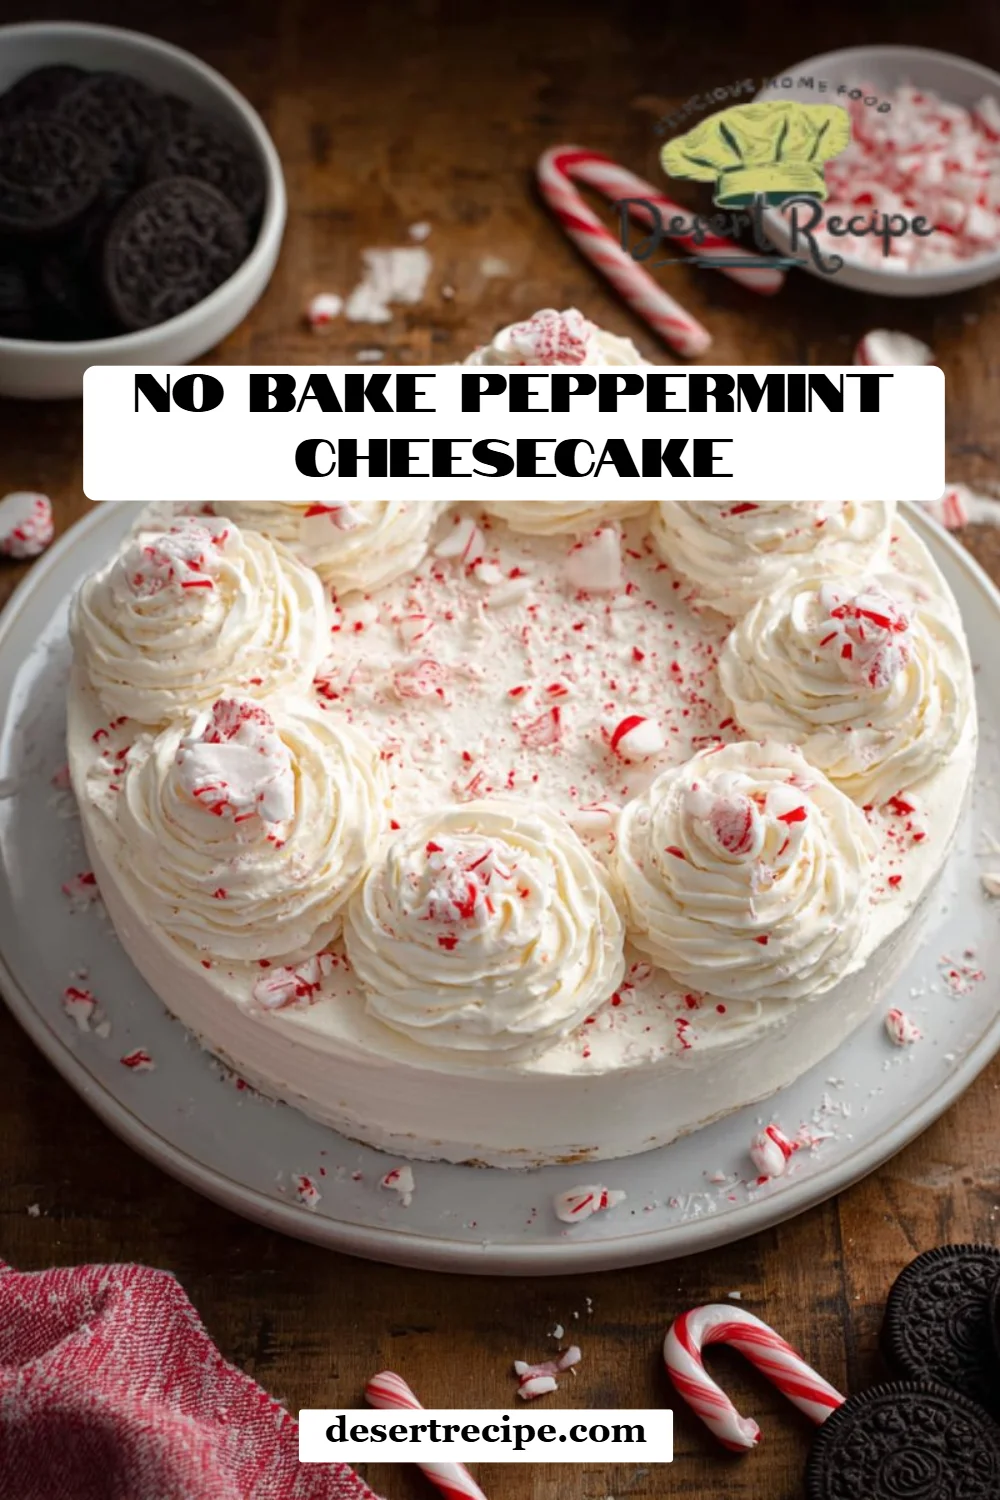
Irresistibly Easy No Bake Peppermint Cheesecake: A Festive Delight for Your Holiday Table
Picture this: the holiday season is in full swing. The soft glow of lights twinkles against the crisp winter night, and the scent of peppermint wafts through the air. As a passionate home baker, nothing brings me more joy than gathering around the table with family, sharing laughs, stories, and of course, delectable desserts. That’s where my No Bake Peppermint Cheesecake comes into play—a scrumptious treat that perfectly captures the essence of the season.
What makes this cheesecake so special? For starters, it’s an easy recipe that requires no baking, which means you can whip it up while juggling all your holiday activities. The smooth, creamy filling combined with the crunchy Oreo crust and the delightful pops of crushed candy canes creates a flavor and texture pairing that is nothing short of heavenly. It holds a special place in my family’s holiday traditions, often accompanying stories of cherished memories over the years.
Whether you’re hosting a holiday party or just craving a slice of nostalgia, this cheesecake is the answer. In this post, I promise to guide you through every step of crafting this delightful dessert, sharing tips and tricks to ensure your No Bake Peppermint Cheesecake is a showstopper at your next celebration!
What Are No Bake Peppermint Cheesecakes?
No Bake Peppermint Cheesecakes are the ultimate holiday dessert that combines the creamy richness of a traditional cheesecake with the refreshing flavor of peppermint. These delightful treats are believed to have originated from the classic cheesecake but have since evolved into a no-bake variant that is both easier to make and enjoy.
With a velvety texture that melts in your mouth, this cheesecake is layered atop a crunchy cookie crust that perfectly contrasts its softness. The unique twist of peppermint not only adds a festive flair but also complements the sweetness of the cheesecake, making it an indulgence for anyone who loves rich desserts with a refreshing finish.
This is the perfect dessert to make for any holiday gathering, whether it’s a family dinner, a work party, or a cozy evening with friends—ideal for when you want to impress without the fuss of baking!
Why You’ll Love This Recipe
Easy to Make: You don’t need to be a pro in the kitchen to whip up this cheesecake. With just a few simple steps, you can have a stunning dessert chilling in your fridge in no time!
Cost-Effective: Imagine serving a gourmet dessert that costs a fraction of what you’d spend at a restaurant! This recipe utilizes ingredients that are easy on the wallet and sure to satisfy.
Customization Options: The base of this cheesecake allows for endless variations! Want to try a chocolate peppermint version? Or perhaps a white chocolate swirl? The only limit is your imagination.
No Bake, No Problem: Not turning on your oven during the holidays is a blessing! This recipe saves you precious energy and time, letting you focus on other festive preparations.
Mouthwatering Flavor: The combination of sweet, creamy cheesecake with refreshing peppermint creates a symphony of flavors that makes this dessert unforgettable. Your friends and family will be raving about it long after the last bite!
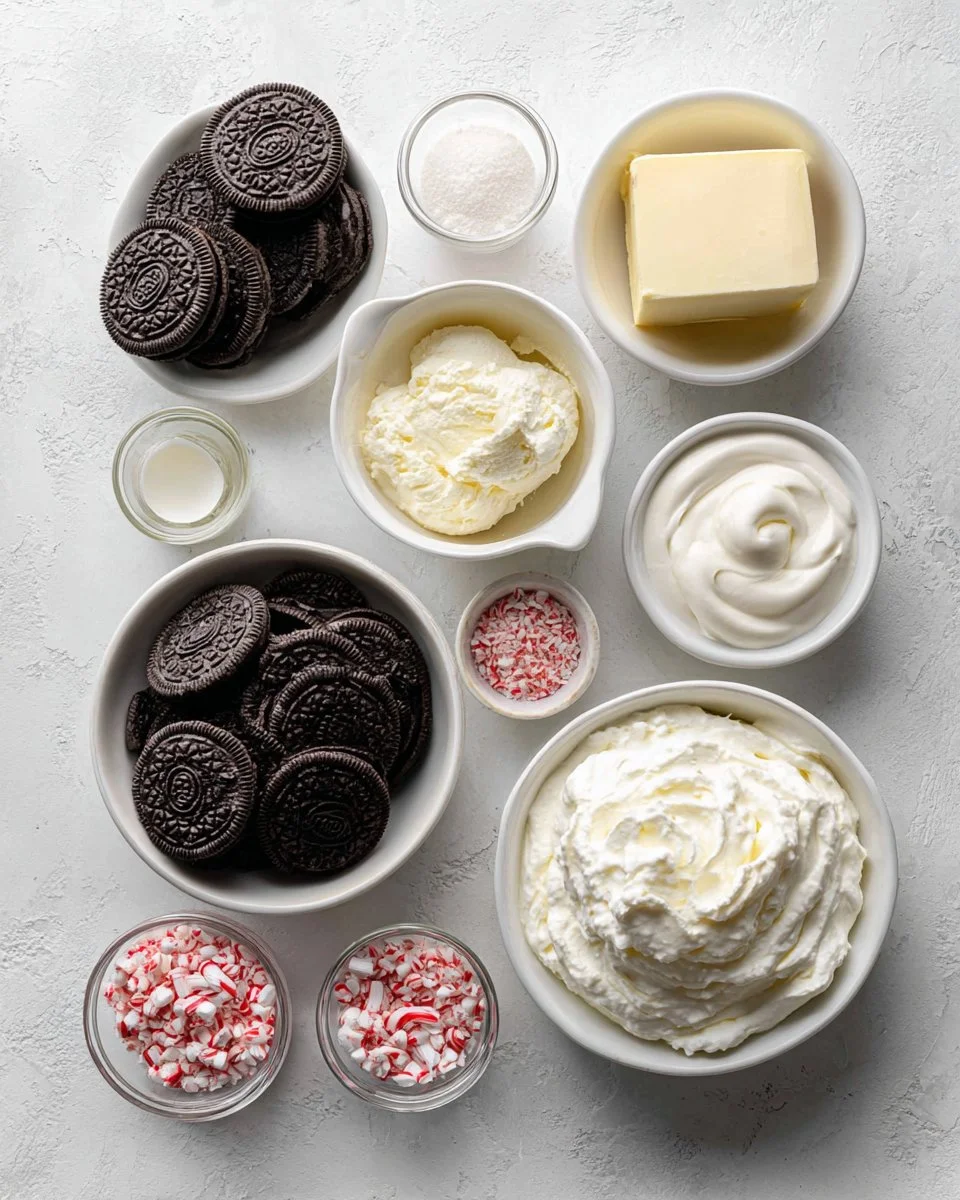
Ingredients
For the Crust:
- 2 cups crushed Oreo Cookies (about 20 cookies) – Use regular or double-stuffed for a richer flavor
- 1/4 cup unsalted butter, melted – Make sure it’s at room temperature to ensure easy mixing
For the Filling:
- 2 packages cream cheese, softened (8 ounces each) – I recommend using full-fat cream cheese for a creamier texture
- 1 cup granulated sugar – You can substitute with powdered sugar for an even smoother filling
- 2 cups heavy whipping cream – Make sure this is chilled and fresh for optimal whipping results
- 1/2 teaspoon peppermint extract – Peppermint oil can also be used for a more concentrated flavor; adjust to taste
- 1/2 teaspoon vanilla extract – A quality vanilla extract will enhance the overall flavor
- 1/4 cup crushed candy canes (plus more for topping) – Feel free to adjust the amount based on your love for peppermint!
- Whipped cream (for topping) – Store-bought or homemade will do; just make sure it’s stable for serving
Prep Notes:
- Ensure all dairy products are at room temperature before starting.
- If you’re using salted butter, reduce the amount of sugar slightly to balance the flavors.
Step-by-Step Instructions
Prepare the Pan: Spray a 9-inch springform pan with nonstick cooking spray and set aside. This ensures that your cheesecake will come out easily once it’s set.
Make the Crust: In a small bowl, combine the crushed Oreo cookie crumbs with melted butter, ensuring every crumb is coated. This will create a solid crust that holds its shape.
- Timing Tip: Let the mixture sit for about 5-10 minutes to absorb the butter for the best texture.
Press the Crust: Press the mixture evenly into the bottom and halfway up the sides of the springform pan. Use the back of a measuring cup for a uniform thickness.
Prepare the Filling: In a large mixing bowl, beat the softened cream cheese and granulated sugar on medium speed until smooth and creamy, about 2-3 minutes.
- Chef’s Tip: Ensure your cream cheese is very soft; this will prevent lumps in your filling.
Add Heavy Cream and Flavoring: Add the heavy whipping cream, peppermint extract, and vanilla extract, and continue beating on medium speed for another 1-2 minutes until the mixture is light and fluffy.
Fold in Candy Canes: Gently fold in the crushed candy canes. This will add delightful crunch and peppermint flavor throughout the filling.
Pour and Smooth: Pour the cheesecake filling into the prepared crust and smooth the top with a spatula to create an even surface.
Chill the Cheesecake: Refrigerate until firm, about 6 hours or overnight. Overnight chilling is recommended for the best texture.
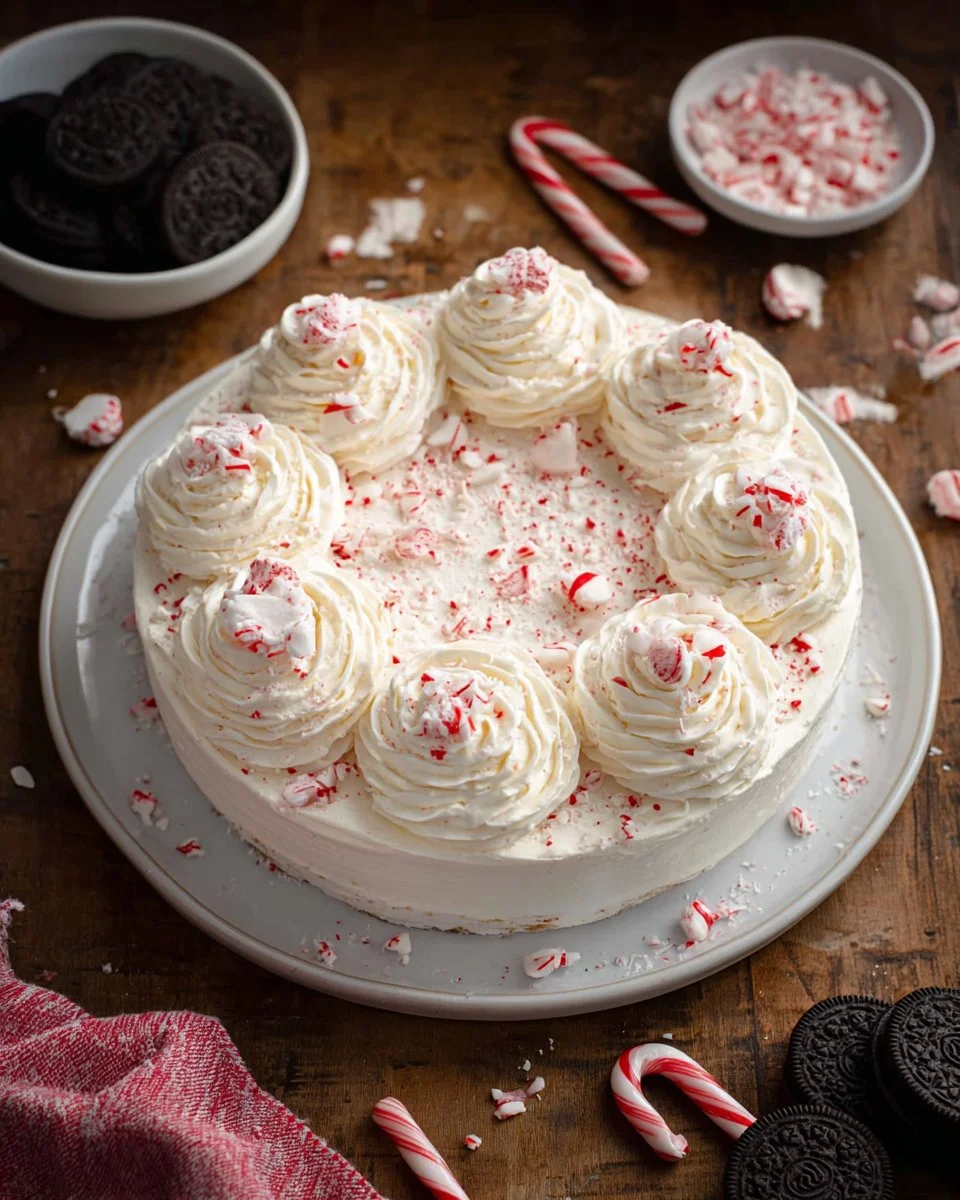
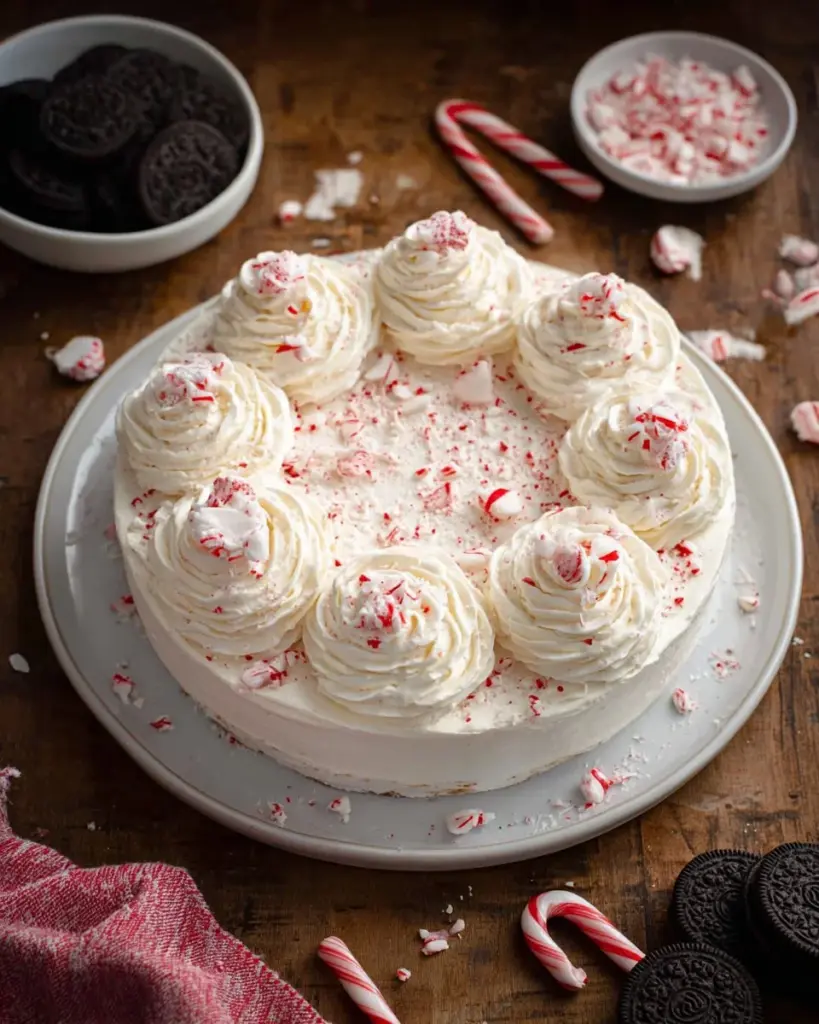
Garnish and Serve: When ready to serve, garnish with whipped cream and sprinkle more crushed candy canes on top for an eye-catching finish.
- Visual Cue: The cheesecake should be firm and set before attempting to slice it.
Expert Tips & Tricks
Quality Ingredients Matter: Using high-quality cream cheese and fresh cream will significantly impact the final taste and texture.
Storage Recommendations: This cheesecake can be stored in the fridge for up to a week. If you want to make it ahead, feel free to freeze it for up to two months!
Make-Ahead Instructions: Prepare the cheesecake a day or two in advance. Just make sure to cover it well to avoid absorbing other fridge odors.
Troubleshooting: If your filling seems runny before refrigerating, beat a bit more until it thickens. If your crust crumbles when you slice, try pressing it down more firmly next time.
Experiment with Flavors: Try adding orange zest or substituting the peppermint extract with hazelnut for a unique twist.
Serving Suggestions
Pair your No Bake Peppermint Cheesecake with a festive hot cocoa or a warm cup of spiced cider. For presentation, serve slices on pretty holiday dessert plates and garnish with additional whipped cream and a sprinkle of candy cane dust. This dessert is perfect for festive family gatherings, office holiday parties, or simply as a delicious treat while cozying up by the fire.
Variations & Substitutions
Different Flavors: Consider chocolate peppermint cheesecake by adding cocoa powder to the filling or swapping Oreo crust for chocolate graham cracker crust.
Dietary Adaptations: For a gluten-free option, use gluten-free Oreos or a nut-based crust.
Seasonal Variations: During summer, swap peppermint for berries or citrus, creating a refreshing No Bake Lemon or Berry Cheesecake.
Nutrition & Storage Info
- Prep Time: 15 minutes
- Chill Time: 6 hours (or overnight)
- Total Time: 6 hours 15 minutes
- Yield: About 12 servings
- Estimated Calories: 350 calories per slice
Storage Instructions:
- Room Temperature: Best enjoyed chilled
- Refrigeration: Store covered in the fridge for up to 1 week
- Freezer: Can freeze for up to 2 months; defrost in the fridge overnight before serving.
FAQ Section
Can I use low-fat cream cheese?
- Yes! While the texture might be slightly different, it will still be delicious.
How can I make this cheesecake more festive?
- Add holiday sprinkles or use a stencil to dust powdered sugar shapes on top!
What if I can’t find peppermint extract?
- You can substitute with crushed peppermint candies or use a splash of mint extract for a different flavor.
Can I make individual cheesecakes instead of one big one?
- Absolutely! Use muffin tins lined with cupcake wrappers for cute individual servings.
How do I prevent my crust from falling apart?
- Ensure the butter is evenly mixed, and press the crumbs firmly into the pan.
What’s the best way to slice a no-bake cheesecake?
- Use a sharp knife dipped in hot water, wiping it clean between slices for smooth edges!
How long does it take to thaw from frozen?
- About 4-6 hours in the fridge is perfectly sufficient.
Can I substitute heavy whipping cream?
- If you prefer less fat, half-and-half can be used, but the texture may not be as light and fluffy.
Will the cheesecake hold its shape when sliced?
- Yes, if you let it chill properly and use a sharp knife.
Is it possible to use flavored cream cheese?
- Certainly! Just be mindful of the flavors you choose so they complement peppermint.

Conclusion
In conclusion, my No Bake Peppermint Cheesecake is not just a dessert; it’s a celebration of the season, a way to create lasting memories, and a treat that everyone will adore. I encourage you to try this recipe for your next get-together! If you do, drop a comment and let me know how it turned out, or share your favorite variations. Looking for more delicious ideas? Check out my blog for related recipes like my No Bake Chocolate Cheesecake or festive Gingerbread Cake. Happy baking!
No Bake Peppermint Cheesecake
Ingredients
Method
- Spray a 9-inch springform pan with nonstick cooking spray and set aside.
- In a small bowl, combine the crushed Oreo cookie crumbs with melted butter, ensuring every crumb is coated.
- Let the mixture sit for about 5-10 minutes to absorb the butter for the best texture.
- Press the mixture evenly into the bottom and halfway up the sides of the springform pan.
- In a large mixing bowl, beat softened cream cheese and granulated sugar on medium speed until smooth and creamy, about 2-3 minutes.
- Add the heavy whipping cream, peppermint extract, and vanilla extract, and continue beating on medium speed for another 1-2 minutes until light and fluffy.
- Gently fold in the crushed candy canes.
- Pour the cheesecake filling into the prepared crust and smooth the top with a spatula.
- Refrigerate until firm for about 6 hours or overnight. Overnight chilling is recommended.
- When ready to serve, garnish with whipped cream and sprinkle more crushed candy canes on top.