Table of Contents
Table of Contents
Every year, as the air turns crisp and festive lights begin to twinkle, I find myself reminiscing about the cozy moments spent with family during the holidays. One of my favorite traditions is baking—especially the moment when the warm, spicy aroma of fresh Gingerbread Whoopie Pies fills the house. These delightful treats, with their pillowy soft texture and creamy, tangy filling, have become a symbol of comfort and celebration for our family.
What makes my Gingerbread Whoopie Pies with Cream Cheese Filling stand out from the myriad of holiday sweets? It’s that perfect balance of sweet and spice, with a rich cream cheese center that feels like a hug from the inside out. As I roll out this recipe, I promise you’ll learn not just how to create these heavenly pies, but how to infuse a little bit of love and warmth into your kitchen. So, grab your apron, and let’s dive into the joy of making Gingerbread Whoopie Pies that will surely become a cherished part of your holiday traditions!
What Are Gingerbread Whoopie Pies with Cream Cheese Filling?
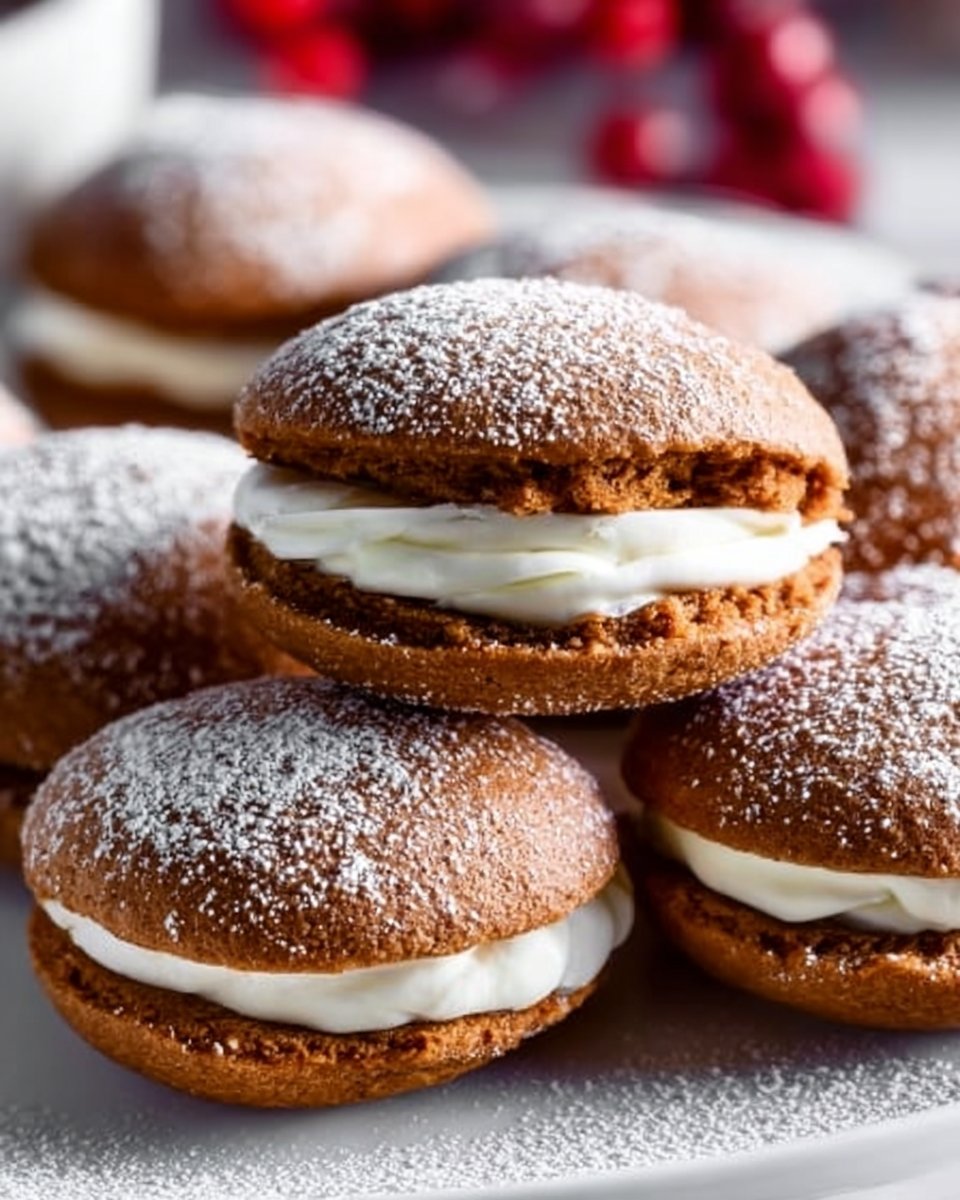
Gingerbread Whoopie Pies are a delightful twist on the classic whoopie pie, drawing inspiration from the traditional gingerbread cookie. Originating from the Northeastern United States, these baked goods consist of two soft gingerbread cakes that are perfectly nestled together, with a luscious cream cheese filling sandwiched in between. The combination of warm spices, like cinnamon, ginger, and nutmeg, creates a symphony of flavors that sings of winter festivities.
The texture is key here. Imagine the soft cake hugging the creamy filling—a delightful contrast that melts in your mouth. These treats are not just for holiday gatherings; they’re perfect for cozy afternoons, family movie nights, or “just because” moments when you need a pick-me-up. The gingerbread pie’s festive vibes make them an ideal gift or contribution to any potluck, ensuring you spread joy with every bite!
Why You’ll Love This Recipe
Home-Made Goodness: Unlike store-bought versions, these Gingerbread Whoopie Pies with Cream Cheese Filling offer a personal touch that store-bought treats simply can’t match.
Cost-Effective Indulgence: Why pay for flashy desserts when you can create a batch at home for a fraction of the cost? This recipe is friendly on your wallet while delivering big on flavor.
Customize to Your Heart’s Content: Feeling adventurous? You can tailor the flavors—add a hint of orange zest to the cream cheese filling or sprinkle in some chocolate chips.
Simple Yet Impressive: Despite the exquisite flavor and gorgeous presentation, the recipe is straightforward enough for even beginner bakers. You’ll impress your family and friends without stressing out in the kitchen!
Make-Ahead Delight: Whip up a batch ahead of time. These whoopie pies actually taste better the next day, as the ginger flavors deepen and the filling sets up beautifully.
With all these reasons to love Gingerbread Whoopie Pies, you’ll never want to go back to ordinary dessert options again!
Ingredients
To make mouthwatering Gingerbread Whoopie Pies with Cream Cheese Filling, you’ll need:
For the Gingerbread Cakes:
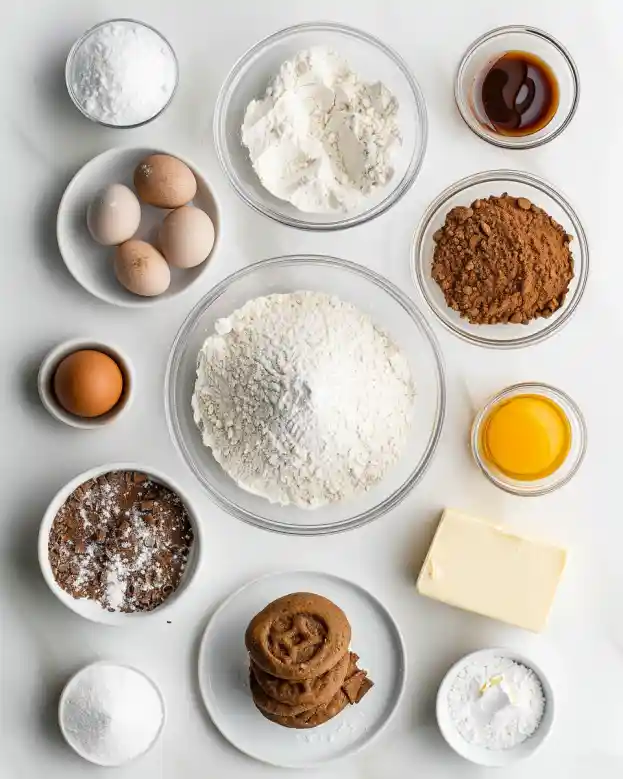
- 2 1/2 cups all-purpose flour: Use high-quality flour for the best results. I prefer King Arthur or Bob’s Red Mill.
- 1 1/2 teaspoons baking soda
- 1 tablespoon ground ginger: Freshly ground ginger can elevate the flavor.
- 1 tablespoon ground cinnamon
- 1/2 teaspoon ground nutmeg
- 1/2 teaspoon ground cloves
- 1/4 teaspoon salt
- 1/2 cup unsalted butter (room temperature): I love using Kerrygold for its rich flavor.
- 1 cup dark brown sugar
- 1/2 cup molasses: Look for unsulfured molasses for a sweeter taste.
- 2 large eggs
- 1 teaspoon vanilla extract
For the Cream Cheese Filling:
- 8 oz cream cheese (room temperature): Philadelphia is my go-to brand for the best creaminess.
- 1/2 cup unsalted butter (room temperature)
- 2 cups powdered sugar
- 1 teaspoon vanilla extract
Prep Notes:
- All ingredients should be at room temperature for the best results.
- Preheat your oven to 350°F.
Step-by-Step Instructions
Step 1: Preheat and Prepare
Timing: 10 minutes
Preheat your oven to 350°F (175°C). Line two baking sheets with parchment paper for easy removal later.
Chef’s Tip: Make sure your baking sheets are cool before placing the batter on them for even baking.
Step 2: Mix the Dry Ingredients
Timing: 5 minutes
In a medium bowl, whisk together the flour, baking soda, ginger, cinnamon, nutmeg, cloves, and salt. Set this flavorful mix aside.
Step 3: Cream the Butter and Sugar
Timing: 5 minutes
In a large bowl, beat the softened butter and brown sugar together until light and fluffy. This usually takes about 3-4 minutes.
Chef’s Tip: Scrape down the sides of the bowl to ensure everything is well combined.
Step 4: Add Molasses and Eggs
Timing: 5 minutes
Add the molasses, eggs, and vanilla to the butter mixture. Beat until fully incorporated. You’ll love the smell!
Step 5: Combine the Dry and Wet Ingredients
Gradually add the dry ingredient mix to the wet ingredients, mixing just until combined. Avoid overmixing to keep the cakes tender.
Step 6: Bake the Gingerbread Cakes
Timing: 12-15 minutes
Drop heaping tablespoons of batter onto the prepared baking sheets, spacing them about 2 inches apart. Bake for 12-15 minutes, or until the edges are firm but the centers are soft.
Visual Cue: They should spring back when lightly touched.
Step 7: Cool the Cakes
Once baked, remove from the oven and allow the cakes to cool on the baking sheets for 5 minutes before transferring them to a wire rack to cool completely.
Step 8: Make the Cream Cheese Filling
While the cakes are cooling, beat together the cream cheese, butter, powdered sugar, and vanilla until smooth and creamy.
Step 9: Assemble Your Whoopie Pies
Once the cakes are cool, spread a generous dollop of cream cheese filling on the flat side of one cake and top with another.
Step 10: Enjoy!
Serve fresh, or store in an airtight container for up to 3 days.
Common Mistake: Don’t rush the cooling process—warm whoopie pies can make the filling melt and ooze out.
Expert Tips & Tricks
Storage Recommendations: These whoopie pies can be kept at room temperature for up to 3 days, or refrigerated for up to a week. For longer storage, freeze them without the filling for up to 3 months.
Make-Ahead Instructions: Bake the gingerbread cakes ahead of time and freeze them. Prepare the filling the day you plan to serve.
Troubleshooting: If your whoopie pies spread too much, make sure your butter isn’t too warm before mixing, and consider chilling the batter for 30 minutes before baking.
Flavor Enhancements: For extra depth, you can add a pinch of black pepper or fresh grated ginger to the batter.
Presentation Ideas: Dust the finished whoopie pies with powdered sugar or drizzle them with a bit of melted chocolate for a stunning touch.
Avoiding Common Problems: Ensure you measure your ingredients accurately. Use a kitchen scale for the best results, especially with flour.

Serving Suggestions
These Gingerbread Whoopie Pies pair perfectly with a warm cup of spiced chai or a classic hot chocolate. For special occasions, consider arranging them on a festive platter surrounded by cranberries or sprigs of evergreen.
Variations & Substitutions
- Flavor Combos: Try adding chocolate chips to the batter for a sweeter contrast, or swap in pumpkin puree for a pumpkin gingerbread twist.
- Dietary Adaptations: For a gluten-free alternative, substitute the all-purpose flour with a 1:1 gluten-free blend.
- Seasonal Variations: Incorporate peppermint extract into the filling for a holiday twist, or add a splash of orange juice for a bright summer variation.
Nutrition & Storage Info
- Prep Time: 30 minutes
- Cook Time: 15 minutes
- Total Time: 45 minutes
- Yield: About 12-14 whoopie pies
- Estimated Calories per Serving: 220 calories
- Storage Instructions: Keep at room temperature for 3 days or refrigerate for 1 week. Freeze unfilled cakes for up to 3 months.
FAQ SECTION
Can I make these ahead of time?
Yes! You can bake the whoopie pies a day or two in advance. Keep them in an airtight container until you’re ready to serve.Why did my whoopie pies spread too much?
It’s likely due to warm butter or too much liquid in the batter. Make sure to measure accurately and let the dough chill if necessary.What can I substitute for cream cheese in the filling?
You can substitute mascarpone cheese for a creamier option or make a vegan filling using whipped coconut cream.How can I decorate the whoopie pies?
You can dust them with powdered sugar or drizzle melted white or dark chocolate on top for an elegant touch.Are these whoopie pies suitable for freezing?
Absolutely! You can freeze the gingerbread cakes without filling for up to 3 months. Just thaw before adding the filling.How long can I store the whoopie pies?
They can be stored at room temperature for about 3 days and in the refrigerator for about a week.Can I turn this into a cake instead of whoopie pies?
Yes! Simply pour the batter into a cake pan and adjust baking time. Frost with the cream cheese filling when cool.What if I don’t have molasses?
In a pinch, you can substitute molasses with dark corn syrup, though the flavor will differ slightly.What’s the best way to achieve a smooth filling?
Ensure both cream cheese and butter are at room temperature for easy blending. Beat until completely smooth and creamy for best results.Can I add spices to the cream cheese filling?
Yes! A dash of cinnamon or nutmeg can enhance the flavor of your filling beautifully.
Conclusion
Gingerbread Whoopie Pies with Cream Cheese Filling are not only a delightful holiday treat but a way to share cherished memories with your loved ones. This recipe will undoubtedly warm your kitchen and heart. I encourage you to give it a shot and experience the joy of creating something special from scratch. I’d love to hear your thoughts and see your creations, so please leave your feedback in the comments! And don’t forget to check out my other seasonal recipes that celebrate the joy of baking!
Happy Baking!

Gingerbread Whoopie Pies with Cream Cheese Filling
Ingredients
Method
- Preheat your oven to 350°F (175°C). Line two baking sheets with parchment paper.
- In a medium bowl, whisk together the flour, baking soda, ginger, cinnamon, nutmeg, cloves, and salt. Set this aside.
- In a large bowl, beat the softened butter and brown sugar together until light and fluffy, about 3-4 minutes.
- Add the molasses, eggs, and vanilla to the butter mixture and beat until incorporated.
- Gradually add the dry ingredients to the wet ingredients, mixing just until combined.
- Drop heaping tablespoons of batter onto the prepared baking sheets, spacing them about 2 inches apart.
- Bake for 12-15 minutes, or until the edges are firm but the centers are soft.
- Allow the cakes to cool on the baking sheets for 5 minutes before transferring them to a wire rack to cool completely.
- While the cakes are cooling, beat together the cream cheese, butter, powdered sugar, and vanilla until smooth and creamy.
- Spread a generous dollop of cream cheese filling on the flat side of one cake and top with another.
- Serve fresh, or store in an airtight container for up to 3 days.