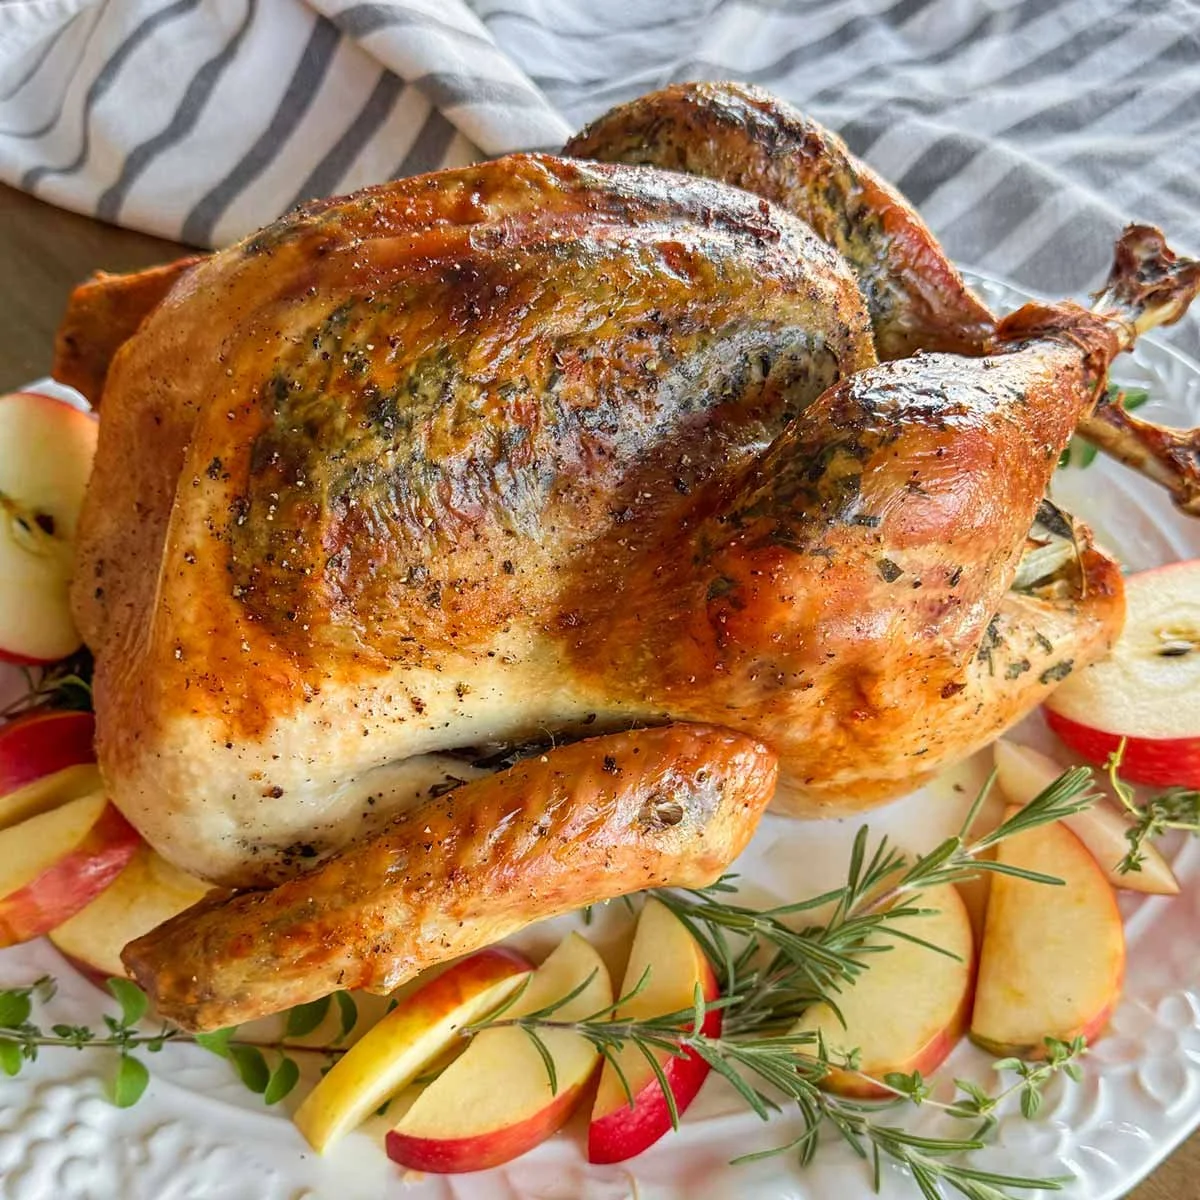
Mastering Dry Brine Turkey: The Secret to Juicy, Flavor-Packed Holiday Perfection
There’s something truly magical about gathering around the table during the holidays, isn’t there? I can still remember the first time I tried my hand at making turkey for our family Thanksgiving. The aroma of herbs and butter filled the house, making my stomach rumble in anticipation. But it wasn’t until I discovered the art of Dry Brine Turkey that I unlocked the secret to an extraordinarily juicy and flavorful bird. Traditional brining is all well and good, but there’s something absolutely special about the dry brine method.
What makes a dry brined turkey stand out is how the salt draws out moisture, allowing it to mingle with herbs and spices, culminating in a turkey that’s deeply flavorful with crisp, golden skin. As I served my first dry brined turkey to family and friends, their delighted expressions confirmed that this wasn’t just another holiday meal; it was a beautiful creation that would earn its place in our family’s memory bank.
In this recipe, I promise you’ll learn how to achieve that perfect blend of texture and taste, turning a simple turkey into a mouthwatering centerpiece. So, grab your apron and let’s embark on this delicious journey together!
What Are Dry Brine Turkeys?
The concept of dry brining has ancient roots, tracing back to the days of salt curing meats. By applying salt to the outside of the turkey and letting it rest in the refrigerator, you allow the salt to penetrate deep into the meat. This process enhances the flavor and retains moisture during cooking, leading to a succulent turkey that’s hard to resist.
When it’s done right, a dry brined turkey offers a crispy skin with a tender, juicy meat beneath. The combination of salt with herbs creates a unique flavor profile that elevates even the simplest of side dishes. You should reach for this recipe when you want to impress your guests or make any special occasion unforgettable.
Why You’ll Love This Recipe
- Unmatched Flavor: The salt and herb combination penetrates the meat, resulting in perfectly seasoned turkey throughout, far superior to anything you’d find in a store or restaurant.
- Crispy Skin Heaven: The dry brining method ensures that the skin becomes crispy as it roasts, keeping all those delightful juices intact.
- Cost-Effective: Preparing your turkey at home is generally cheaper than buying pre-cooked or restaurant versions, plus you’ll get a whole lot more satisfaction from making it yourself!
- Total Customization: Feel free to experiment with different herbs and spices based on your family’s preferences. You might find a new favorite blend!
- Simple Yet Impressive: Despite the gourmet outcome, this recipe is straightforward enough for any home cook, even those who might be intimidated by roasting a turkey.
This turkey will become a beloved staple on your holiday table, one that friends and family will request year after year.
Ingredients
- 1 (12-15 pound) turkey, thawed (see notes: neck and giblets removed)
- 3 tablespoons Kosher salt
- 2 teaspoons fresh minced herbs (I use rosemary, thyme, and sage or 1½ teaspoons dried)
- 2 teaspoons garlic powder
- 1 teaspoon ground black pepper
- 8 tablespoons unsalted butter (fully softened, don’t use salted)
- 3 teaspoons fresh minced herbs (additional; I use rosemary, thyme, and sage or 1 teaspoon dried)
- 2 tablespoons freshly chopped Italian parsley
- 6 cloves fresh garlic, minced
- Zest of 1 lemon
- Olive oil (for rubbing the outside skin)
- Onions, celery, and lemon (chopped, for stuffing the cavity)
- 6 to 8 cups chicken broth (for the pan, plus more as needed)
Ingredient Quality and Substitutions
- Turkey: Choose a fresh or minimally processed turkey for the best flavor.
- Salt: Kosher salt is preferred; feel free to reduce the amount slightly for other salt types.
- Herbs: Mix and match herbs based on what you have or love! Dried herbs can work in a pinch.
- Butter: Always stick with unsalted butter for better control over the flavor.
Prep Notes: Let the butter sit at room temperature for a bit before using it, as this will make it easier to spread.
Step-by-Step Instructions
Dry Brine Turkey 24-48 Hours Ahead
Prepare the Dry Brine Mixture: In a bowl, combine the kosher salt, minced herbs, garlic powder, and pepper. Mix well.
Apply the Dry Brine: Pat the turkey dry with paper towels. Rub the salt mixture evenly all over the turkey, both on the skin and under it. Be generous over the breast and thighs.
Refrigerate the Turkey: Place the turkey on a rack or directly in a roasting pan, then refrigerate uncovered for 24 to 48 hours. It’s essential for the salt to work its magic with no interference from moisture.
Before Roasting
Prep the Butter Mixture: In a bowl, beat together the softened butter, minced herbs, garlic, lemon zest, and parsley until well combined.
Preheat the Oven: Preheat your oven to 325°F (160°C).
Bring the Turkey to Room Temp: Take the turkey out of the refrigerator about an hour before roasting. This will help it cook evenly.
Prepare the Turkey
Rinse Off the Brine: Gently rinse the turkey under cold running water to remove excess salt. Pat dry thoroughly; this important step will help crisp the skin.
Butter It Up: Carefully lift the skin on the breasts and thighs and spread some of the herb butter mixture underneath, then coat the exterior of the turkey with the remaining butter.
Stuff the Cavity: Fill the cavity with onions, celery, and lemon for extra flavor.
Roast
Place in the Oven: Pour chicken broth into the bottom of your roasting pan. Place the turkey breast-side up on the rack above the broth.
Basting: Roast the turkey for about 13-15 minutes per pound. Baste every 30-45 minutes until the skin turns a golden brown. The turkey is done when the internal temperature reaches 165°F (74°C) in the thickest part of the thigh.
Rest Before Carving: Once cooked, let the turkey rest for at least 20-30 minutes before carving. This allows the juices to redistribute, ensuring each slice is tender and juicy.
Chef’s Tips
- Don’t Skip the Resting Time: This step is crucial for a juicy bird. You’ll be rewarded with moist meat!
- Use a Meat Thermometer: For best results, invest in an inexpensive digital probe thermometer to monitor the turkey as it cooks.
Common Mistakes to Avoid:
- Not Drying the Turkey Properly: This can lead to soggy skin. Always pat it dry!
- Rushing the Brining: Allow the turkey to brine for the full time recommended for the best flavor.

Expert Tips & Tricks
Storage Recommendations: Leftover turkey can be stored in an airtight container in the refrigerator for up to 4 days.
Make-Ahead Instructions: You can prepare the dry brine two days ahead, mixing your herbs and salt, ready to use when you need it.
Troubleshooting Common Problems: If your turkey isn’t browning well, increase the oven temperature to 375°F (190°C) in the last 30 minutes of cooking for a crispy finish.
What to Do if the Turkey is Too Salty: Rinse it well next time; have salt in moderation in mind during your next culinary adventure.
Experiment with Flavors: Don’t shy away from adding citrus zest or smoked paprika in the butter for a unique twist.
Serving Suggestions
Pair your mouthwatering dry brine turkey with roasted seasonal vegetables, creamy mashed potatoes, and some tart cranberry sauce for a classic holiday feast.
For presentation, consider serving on a large wooden cutting board garnished with fresh herbs and citrus slices; it adds a rustic touch and a pop of color!
This turkey is perfect for Thanksgiving, Christmas, or any gathering where you want to impress your family and friends.
Variations & Substitutions
- Herb Variations: Try substituting rosemary with dill or using spices like cumin or smoked paprika for a twist.
- Dietary Restrictions: This recipe is gluten-free, just ensure the broth is free of gluten-containing ingredients.
- Seasonal Variations: In fall, add pumpkin pie spice to the butter mixture for a seasonal twist that will surprise and delight your guests.
Nutrition & Storage Info
- Prep time: 30 minutes
- Cook time: 2.5 to 3 hours
- Total time: 24-48 hours + 3 hours (including brining)
- Yield: 10-12 servings
- Estimated calories: 300 – 400 calories per serving, depending on size and portion
- Storage Instructions:
- Room Temperature: Leftovers should not sit out for more than 2 hours.
- Fridge: Store in an airtight container in the fridge for up to 4 days.
- Freezer: Freeze for up to 3 months in a well-sealed container or wrap.
FAQ Section
Can I use table salt instead of kosher salt?
Yes, but remember that table salt is denser than kosher salt, so use about half the amount.Is it necessary to rinse the turkey after dry brining?
It is recommended to rinse off excess salt to avoid overly salty meat.What if I can’t find fresh herbs?
Dried herbs are suitable; use about one-third of the amount for a robust flavor.Can I brine a turkey overnight?
Yes, but for the best flavor, try to allow at least 24 hours.What can I use instead of chicken broth?
Vegetable broth or even white wine can serve as substitutes for liquid in the roasting pan.Do I have to stuff the turkey?
No, you can roast it unstuffed. Just make sure to add flavor to the cavity with onions and lemon.Can I make this recipe with a smaller turkey?
Yes, the technique remains the same; just adjust the salt and brining time accordingly.How can I tell if the turkey is fully cooked?
A meat thermometer inserted into the thickest part of the thigh should read at least 165°F (74°C).What should I do with leftovers?
Slice and store in an airtight container or make turkey sandwiches with gravy or cranberry sauce!Can I use this method for other meats?
Absolutely! Dry brining works well with chicken, pork, and even some cuts of beef.
Conclusion
In a world where we’re all familiar with the hustle and bustle, serving up a Dry Brine Turkey offers a sweet reminder of home and cherished family moments. With every juicy bite, you’re not just enjoying a meal; you’re relishing the laughter and love shared around the table. So, gather your loved ones and give this recipe a try!
I’d love to hear how your turkey turned out—leave me a comment below! And for more inspiration, check out my other festive recipes that will surely complement your holiday feast. Happy cooking!
This recipe beautifully marries tradition with modern techniques for unforgettable results. Enjoy the journey of developing your culinary skills while creating delicious memories!

Dry Brine Turkey
Ingredients
Method
- Prepare the Dry Brine Mixture: In a bowl, combine the kosher salt, minced herbs, garlic powder, and pepper. Mix well.
- Apply the Dry Brine: Pat the turkey dry with paper towels. Rub the salt mixture evenly all over the turkey, both on the skin and under it. Be generous over the breast and thighs.
- Refrigerate the Turkey: Place the turkey on a rack or directly in a roasting pan, then refrigerate uncovered for 24 to 48 hours.
- Prep the Butter Mixture: In a bowl, beat together the softened butter, minced herbs, garlic, lemon zest, and parsley until well combined.
- Preheat the Oven: Preheat your oven to 325°F (160°C).
- Bring the Turkey to Room Temp: Take the turkey out of the refrigerator about an hour before roasting.
- Rinse Off the Brine: Gently rinse the turkey under cold running water to remove excess salt. Pat dry thoroughly.
- Butter It Up: Carefully lift the skin on the breasts and thighs and spread some of the herb butter mixture underneath, then coat the exterior of the turkey with the remaining butter.
- Stuff the Cavity: Fill the cavity with onions, celery, and lemon.
- Place in the Oven: Pour chicken broth into the bottom of your roasting pan. Place the turkey breast-side up on the rack above the broth.
- Basting: Roast the turkey for about 13-15 minutes per pound. Baste every 30-45 minutes until the skin turns a golden brown.
- Rest Before Carving: Once cooked, let the turkey rest for at least 20-30 minutes before carving.