Elevate Your Celebration with This Irresistible Holiday Cheese Board Recipe
The holiday season is upon us, and that means it’s time to gather around the table with family and friends, sharing memories over delicious food! Nothing brings people together quite like a beautifully curated Holiday Cheese Board, showcasing an array of cheeses, meats, and fruits. I remember the first time I put together my own cheese board—it was for a festive gathering with my family, and the moment I laid it out, the room filled with excitement and hungry smiles. The savory scents and vibrant colors transformed the dining room into a feast for the eyes and palate!
This Holiday Cheese Board recipe is special because it not only combines delightful flavors and textures but also invites creativity, letting you customize it to reflect your taste and theme. Trust me; this homemade version outshines any store-bought platter with its fresh ingredients, personal touch, and incredible variety. I promise you’ll learn to assemble your own stunning cheese board that will impress everyone at your holiday gathering, sparking more cherished family memories along the way.
What Are Holiday Cheese Boards?
The tradition of cheese boards dates back centuries, originating from Europe as a way to showcase local cheeses and regional specialties. As time has gone by, they’ve evolved into a versatile and creative centerpiece for any occasion. A Holiday Cheese Board captures a delightful array of flavors—from the creamy textures of brie to the sharp tang of blue cheese—each bite offers a unique experience that tantalizes the taste buds.
What makes them so appealing is the balance of tastes, where sweet, savory, and salty elements come together harmoniously. Picture the creamy softness of a brie, the crumbly richness of blue cheese, paired with sweet figs and spicy salami. These boards are perfect for festive gatherings, holiday parties, or casual family dinners when you want to impress your guests without the fuss of cooking a full meal.
Why You’ll Love This Recipe
Impressive Presentation: This cheese board is a visual masterpiece! Your guests will oooh and aaah as they take in the vibrant colors and arrange the ingredients with artistic flair.
Cost-Effective: When compared to store-bought platters, making your own cheese board can save you money while allowing you to choose high-quality, gourmet ingredients that you love.
Customizable: Feel free to swap out cheeses or add seasonal fruits and spreads. This recipe is a blank canvas—you can make it truly your own, reflecting your preferences and those of your guests.
Quick Assembly: Once you’ve gathered your ingredients, this simple process will take you under an hour to create a stunning board that feels gourmet.
No Cooking Required: Say goodbye to long hours in the kitchen! This recipe is perfect for every home cook, even beginners, since it involves minimal prep and no cooking.
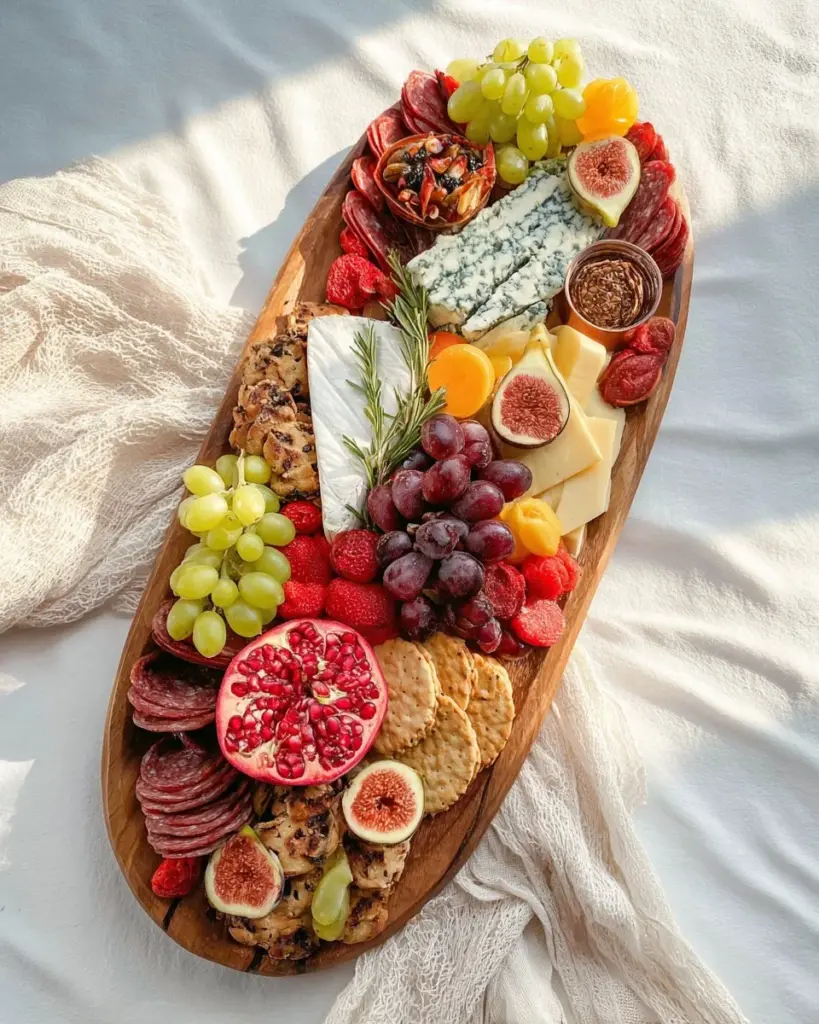
Ingredients
{image_template}
- 20 slices Genoa salami: Opt for high-quality, thinly sliced salami for extra flavor.
- 1 wheel pineapple cream cheese: This sweet and tangy cheese serves as a delightful contrast!
- 1 triangle blue cheese: The crumbly texture and strong flavor create an exciting layer.
- Half small wheel brie cheese: Choose the extra creamy type for a truly indulgent experience.
- Half small wheel brie cheese (extra creamy): More brie? Yes, please!
- 1 cup Havarti, cubed: A mild cheese that complements the bold flavors.
- 1 cup cheddar, cubed: Sharp or mild—choose according to your preference.
- Crackers or crisps: Opt for a variety to add crunch—think water crackers or flavored crisps.
- Green grapes: Add a sweet pop of color and freshness.
- Red grapes: They provide a lovely color contrast to green grapes.
- Any jam (e.g., fig jam): That touch of sweetness balances the cheeses beautifully.
- Olives of choice: Consider a mix of green and black for added visual interest.
- A few figs, cut in half: Fresh figs offer a beautiful touch of sweetness.
- 1 pack golden berries: These add a burst of flavor along with visual appeal.
- Pomegranate seeds: These little jewels bring vibrant color and a crunch.
- Grapefruit slices: Tart and refreshing!
- Hazelnuts or any nuts: Choose your favorite for added texture.
- Sprigs of rosemary: Perfect for presentation, adding a touch of greenery.
Prep Notes: Let your cheeses sit at room temperature for about 30 minutes before serving to ensure the best flavor and texture.
Step-by-Step Instructions
Start with the Salami: Take a glass and start arranging the salami in a circle, flipping it to form a rose. Position this stunning centerpiece in the middle of your board.
Add the Cheeses: Place the pineapple cream cheese on the bottom of your board, with the blue cheese on the opposite side. If you like, break up the blue cheese to let its creaminess peep out!
Position the Brie: Cut the brie into triangles and arrange them on either side of the salami rose. The melted brie will elevate the flavor of every bite.
Cube the Cheddar and Havarti: Place the cubed Tickler cheese (cheddar) and Havarti on opposite sides of your board for visual symmetry.
Fill It In with Crisps: Take the crisps and place them between the salami rose and cream cheese, seamlessly filling in any gaps.
Enhance with Fruits and Jams: Add the green and red grapes on opposite sides, interspersing the two small jars of jam around the cheese. Position a small bowl of olives between the salami rose and cheddar.
Finish with Figs and Nuts: Finally, add the halved figs to the top of the plate or board, and use the remaining ingredients creatively to fill in any blanks. Enjoy this gorgeous spread!
Chef’s Tips: Aim for a balance of textures—creamy, crunchy, and juicy ingredients will engage all the senses.
Expert Tips & Tricks
- Ingredient Quality: Always prioritize quality over quantity—artisan cheeses and fresh fruits make a world of difference!
- Storage Recommendations: If you have leftovers, store the board covered in the fridge. Most cheeses will last up to a week when wrapped tightly.
- Make-Ahead: You can prep some elements in advance, like cutting cheeses and fruits, ensuring a quicker assembly on the day of serving.
- Troubleshooting: If your cheeses don’t have that perfect texture, remember to always bring them to room temperature before serving for optimal taste!
- Visual Appeal: Use a large wooden board or platter and consider layering to add depth to your display.
Serving Suggestions
Pair your Holiday Cheese Board with a selection of dried fruits, fresh baguette slices, or artisanal breadsticks for a wonderful experience. A delightful wine—perhaps a crisp Sauvignon Blanc or a bold Cabernet—can elevate the flavors even further.
This board makes a fantastic addition to holiday parties, family get-togethers, or cozy gatherings of friends to ring in the season!
Variations & Substitutions
Don’t shy away from experimenting! Try different cheese flavors, such as smoked gouda or herbed goat cheese to add a unique twist. For dietary restrictions, opt for gluten-free crackers and replace traditional cheese with nut-based alternatives. Seasonally, consider using pumpkin seeds in fall or festive cranberries in winter to add an extra cheer!
Nutrition & Storage Info
- Prep Time: 30 mins
- Total Time: 1 hour
- Yield: Serves 8-10
- Estimated Calories: Approximately 350 calories per serving
- Storage Instructions: Store in the fridge for up to 5 days (be cautious with different cheese types).
- How Long They Last: Most ingredients can hang around for about a week under proper storage conditions.
FAQ Section
- Can I use different types of cheese?
- How do I prevent my berries from spoiling?
- Can I prepare this a day in advance?
- What type of crackers pair best?
- Are there vegan options?
- What’s the best way to serve olives?
- How can I make my cheese board look fuller?
- Can I use frozen fruit?
- Is this meal gluten-free?
- What drinks pair well with cheese?

Conclusion
This Holiday Cheese Board isn’t just a dish; it’s an experience that invites you to create beautiful memories with loved ones. You have the power to transform your gatherings with this visually stunning and flavor-packed recipe. I encourage you to give it a try—I can’t wait to hear how your friends and family enjoyed your gorgeous creation! Don’t forget to check out my other festive recipes for more ideas on spreading joy this holiday season!
Holiday Cheese Board
Ingredients
Method
- Let your cheeses sit at room temperature for about 30 minutes before serving to ensure the best flavor and texture.
- Start with the Salami: Arrange the salami in a circle, flipping it to form a rose. Position this centerpiece in the middle of your board.
- Add the Cheeses: Place the pineapple cream cheese on the bottom of your board, opposite the blue cheese.
- Position the Brie: Cut the brie into triangles and arrange them on either side of the salami rose.
- Cube the Cheddar and Havarti: Place on opposite sides of your board for visual symmetry.
- Fill It In with Crisps: Position the crisps between the salami and cheese to fill in gaps.
- Enhance with Fruits and Jams: Add grapes and intersperse jars of jam.
- Finish with Figs and Nuts: Place halved figs atop the board and fill in with remaining ingredients.