Bright & Cheery Easter Funfetti Cookies: The Ultimate Treat for Your Celebrations!
Growing up, Easter was always a magical time for my family. The house would fill with the sweet aroma of baking, colorful eggs would peek out from the grass, and laughter would echo through the rooms as we gathered around the table. One of my fondest memories is baking Easter Funfetti Cookies with my mom—each sprinkle a burst of joy and color that promised deliciousness. These cookies aren’t just sweet treats; they are symbols of family togetherness and festive cheer.
What truly sets my recipe apart from others is the fluffy, melt-in-your-mouth texture combined with an explosion of vibrant sprinkles. While many recipes out there call for dry cookie mixes, this one uses real butter and a perfect blend of sugars, ensuring every bite is just as heavenly as I remember. The love infused into each batch brings comfort and warmth—a true taste of nostalgia that fills my heart with happiness.
In this post, I’ll share my treasured recipe for these delightful Easter Funfetti Cookies, complete with tips, tricks, and personal anecdotes. By the end, you’ll be equipped to create your own batch of these whimsical cookies, bringing a slice of joy to your celebrations! 🥳
What Are Easter Funfetti Cookies?
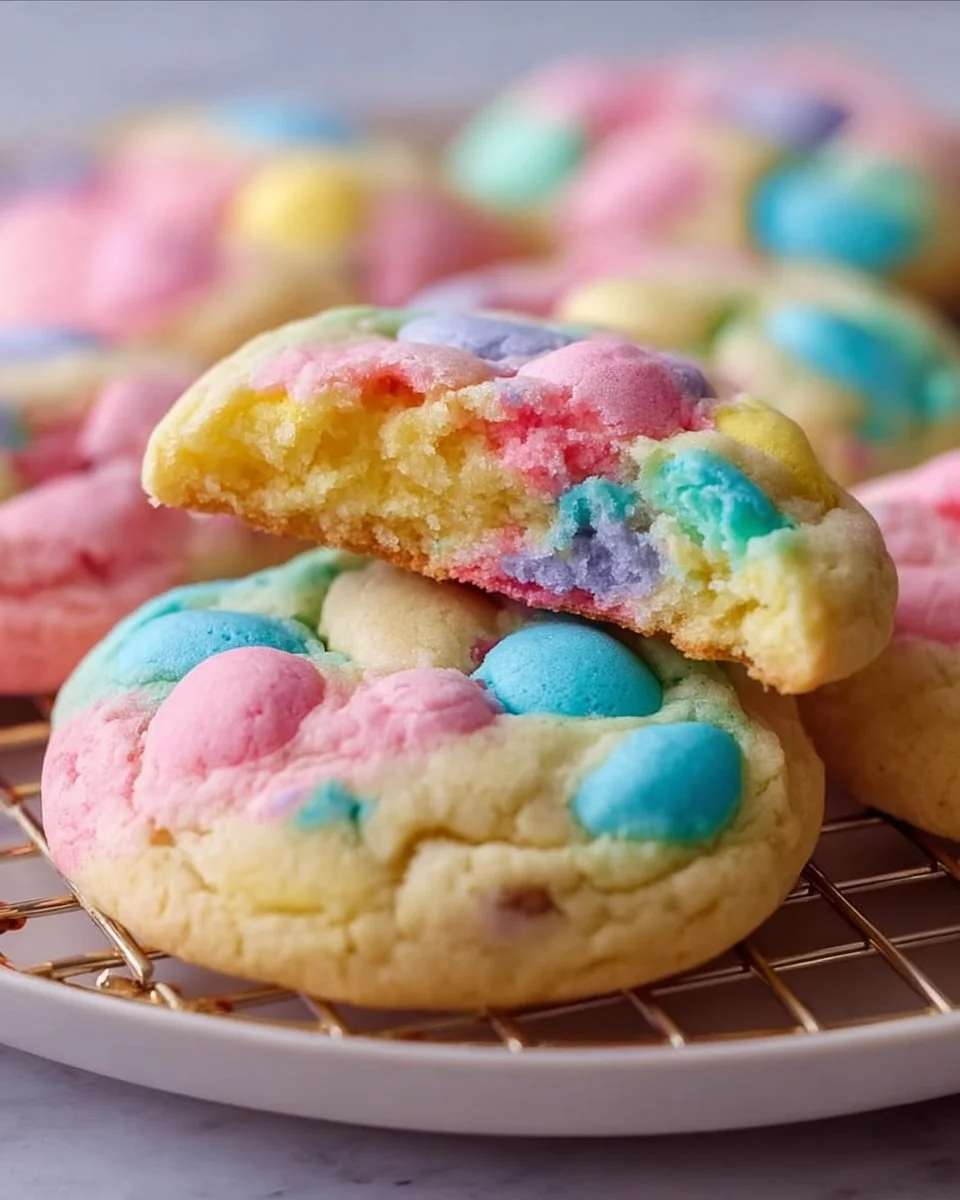
Easter Funfetti Cookies are an iconic treat that brings a burst of color and flavor to any spring celebration. The origins of Funfetti date back to the 1980s when cake mixes loaded with colorful sprinkles took the baking world by storm. Today, we’re taking that joy and transforming it into soft, chewy cookies that dance with pastel-colored sprinkles, perfect for Easter gatherings or any occasion that calls for a sprinkle of fun!
These cookies have a delightful chewy texture, with a crisp edge and a gooey center, thanks to the combination of granulated and brown sugar. But what makes them truly unique is the pop of color and sweetness from the sprinkles, which brightens the overall flavor profile. They’re not only fun to eat; they’re also a feast for the eyes, making them an Instagram-worthy addition to your dessert table.
Whether you’re hosting a festive brunch or simply want to treat your family, Easter Funfetti Cookies bring joy that’s guaranteed to elevate your celebrations!
Why You’ll Love This Recipe
Easy to Make: If you’re a baking novice, fret not! This recipe is straightforward, with minimal steps that even kids can help with. In less than 30 minutes of hands-on time, you’ll bring these colorful cookies to life!
Cost-Effective: Forget pricey store-bought treats! With ingredients like all-purpose flour, butter, and sugar, you can whip up a batch of cookies for a fraction of the cost—leaving you with more money for egg dye or grass for your basket.
Customization Options: Switch up the sprinkles for seasonal colors or blend in your favorite chocolate chips. Feeling adventurous? You can also add lemon zest or almond extract for a unique twist. The possibilities are endless!
Taste vs. Store-Bought: Trust me, once you try these cookies, store-bought versions will pale in comparison. There’s something incredibly satisfying about biting into a cookie made from scratch—creamy butter, rich sugars, and vibrant sprinkles make for a treat that will have everyone begging for more.
Perfect for Any Occasion: While these cookies are tied to Easter, their vibrant colors and delightful taste make them suitable for birthday parties, playdates, or just as a surprise treat for your kids after school.
With these compelling reasons at hand, I know you’ll fall in love with this recipe just like I have!
Ingredients

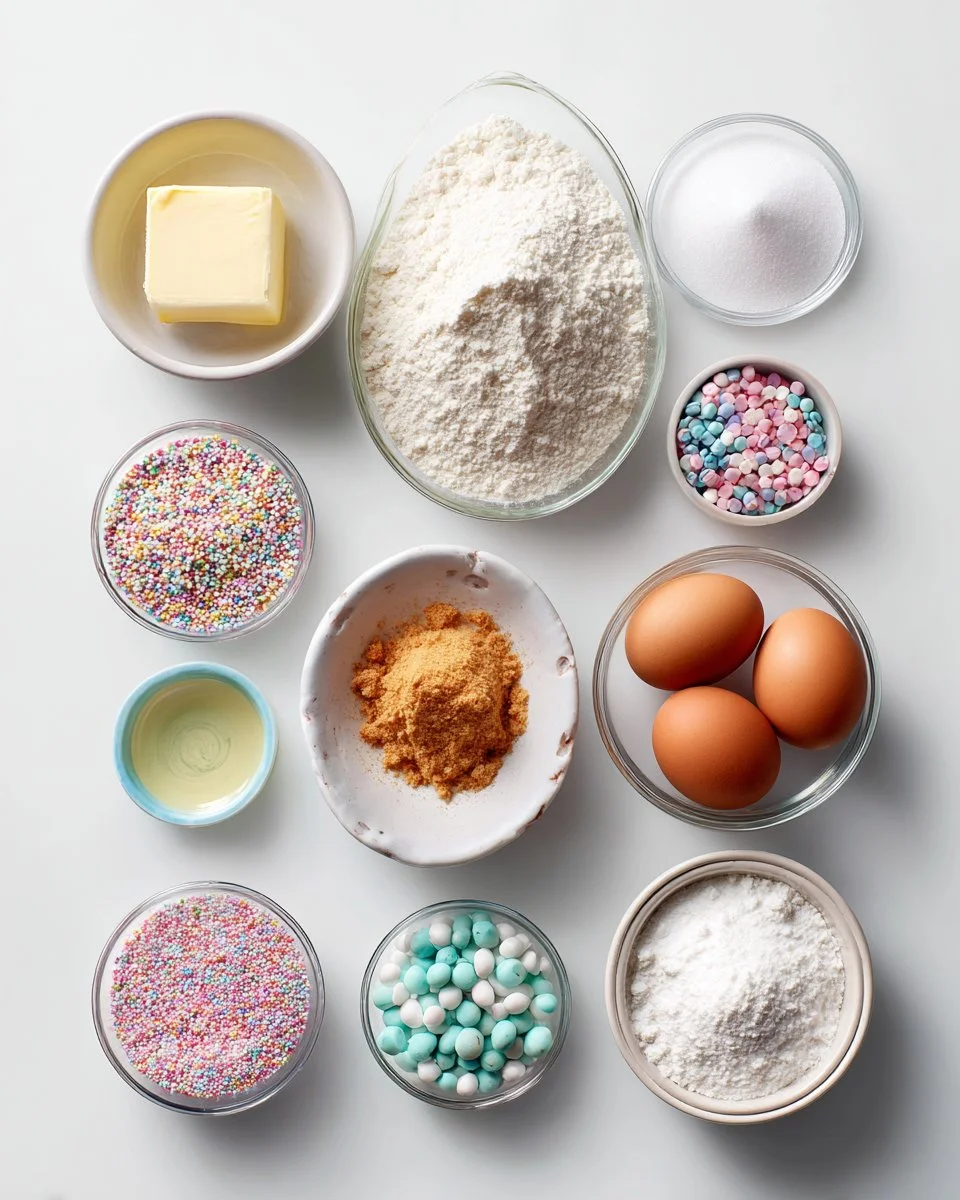
- 2 3/4 cups all-purpose flour (I recommend using a high-quality brand like King Arthur Flour for the best results.)
- 1 teaspoon baking soda
- 1/2 teaspoon salt
- 1 cup unsalted butter, softened (Ensure it’s at room temperature for easy mixing—trust me, no one wants chunky butter in their cookies!)
- 1 1/2 cups granulated sugar
- 1 cup packed brown sugar (Feel free to use light or dark brown sugar for different flavor profiles.)
- 2 large eggs
- 1 teaspoon vanilla extract (Pure vanilla extract will elevate the flavor significantly.)
- 1 cup pastel sprinkles (Choose a quality brand for maximum color and fun—Wilton’s sprinkles work like a charm!)
Step-by-Step Instructions
- Preheat Oven: Heat your oven to 350°F (175°C) so it’s nice and hot for your cookies.
- Dry Ingredients: In a medium bowl, whisk together the flour, baking soda, and salt. This helps to evenly distribute the leavening agent and avoids clumps.
- Cream the Butters and Sugars: In a separate, larger bowl, cream together the softened butter, granulated sugar, and brown sugar. Mix until the mixture is light and fluffy—about 3-5 minutes. This aeration is key for fluffy cookies!
- Add Eggs and Vanilla: Beat in the eggs one at a time, ensuring each is fully incorporated before adding the next. Stir in the vanilla extract until just combined.
- Combine Mixtures: Gradually mix the dry ingredients into the wet ingredients. I like to do this in two or three additions for a smoother result—don’t overmix!
- Fold in Sprinkles: Gently fold in the pastel sprinkles, being careful not to overwork the dough.
- Shape Cookies: Using a tablespoon or cookie scoop, drop generous tablespoonfuls of dough onto ungreased baking sheets, ensuring space between each for spreading.
- Bake: Bake in the preheated oven for 10-12 minutes, or until the edges are lightly golden. Keep an eye on them—overbaking will lead to crunchy cookies.
- Cool Down: Allow the cookies to cool on the baking sheets for about 5 minutes before transferring them to wire racks to cool completely.
Chef’s Tip: For extra chewy cookies, underbake them by a minute or two. They’ll continue to cook on the baking sheet as they cool, giving you that perfect texture!
Expert Tips & Tricks
Storage: Keep your cookies in an airtight container at room temperature for up to five days. You can also freeze the dough for longer storage—just scoop the dough onto a baking sheet and freeze until solid, then transfer to a zip-top bag for up to three months.
Make-Ahead: This dough can be refrigerated for a couple of days! Just cover it tightly to prevent it from drying out.
Troubleshooting: If your cookies spread too much while baking, try chilling the dough for 30 minutes before baking. This will help them hold their shape.
Reheat for Freshness: If your cookies lose their soft texture, pop them in the microwave for 5-10 seconds before serving. It brings back that fresh-baked goodness!
Conversion Tip: Want to make these cookies gluten-free? Substitute the all-purpose flour with a 1:1 gluten-free blend—Bob’s Red Mill works beautifully.
Batch Size: If you find yourself baking for a crowd (or just want to stock up), this dough can easily be doubled or halved. Just adjust your baking time accordingly.
Serving Suggestions
These Easter Funfetti Cookies are perfect on their own but can shine even brighter when paired with a delicious beverage! Serve them alongside a glass of cold milk or a refreshing fruit-infused iced tea for a delightful afternoon treat. For special occasions, arrange them on a pastel-colored platter and sprinkle extra festive sprinkles on top for an eye-catching presentation!
Variations & Substitutions
- Different Flavor Combinations: Swap out the vanilla extract for almond extract, or incorporate white chocolate chips for a luscious twist.
- Dietary Adaptations: Make them vegan by substituting eggs with flax eggs (1 tablespoon of flaxseed meal + 2.5 tablespoons of water = 1 egg) and use plant-based butter.
- Seasonal Variations: Experiment with fun summer sprinkles, or for Halloween, use orange and black sprinkles for eerie cookies.
Nutrition & Storage Info
- Prep time: 15 minutes
- Cook time: 10-12 minutes
- Total time: About 30 minutes
- Yield: Approximately 24 cookies
- Calories: About 170 per cookie
- Storage: Room temperature for up to 5 days, in the fridge for up to 1 week, and in the freezer for up to 3 months.
FAQ Section
Can I use different types of sprinkles?
Yes! You can use any type of sprinkles you prefer, just make sure they’re color-safe for baking.What if my cookies come out too dry?
Overbaking is usually the culprit. Keep an eye on them and remove them when they’re just starting to turn golden.Can I freeze the dough?
Absolutely! Scoop and freeze the dough on a baking sheet, then transfer to a zip-top bag once solid. They’ll last up to three months.Is it necessary to use both types of sugar?
Using both granulated and brown sugar gives the cookies a delicious flavor and perfect texture.How do I make these cookies chewy?
Avoid overbaking and let them cool slightly on the baking sheet. This ensures they stay soft in the centers.What can I serve them with?
They pair well with milk, coffee, or even a scoop of ice cream for an extra treat!Can I add nuts?
Absolutely! Chopped pecans or walnuts can add a delightful crunch. Just be cautious if you have guests with nut allergies.How can I make these cookies vegan?
Substitute eggs with flax eggs or applesauce, and use vegan butter.Can I double the recipe?
Yes! Just adjust the baking time slightly if you’re using multiple trays.What’s the best way to store these cookies?
Keep them in an airtight container to maintain freshness!

Conclusion
Why not bring some joy and color to your next celebration with these Easter Funfetti Cookies? Each bite is a reminder of family, laughter, and the sweetness of life, making them truly special. I invite you to try this recipe, and I’d love to hear your feedback! Did you add your twist? How did your family react? Don’t forget to check out my other delicious recipes for more fun baking adventures. Happy baking! 🌈

Easter Funfetti Cookies
Ingredients
Method
- Preheat your oven to 350°F (175°C).
- In a medium bowl, whisk together the flour, baking soda, and salt.
- In a larger bowl, cream the softened butter, granulated sugar, and brown sugar until light and fluffy.
- Beat in the eggs one at a time and stir in the vanilla extract.
- Gradually mix the dry ingredients into the wet ingredients, taking care not to overmix.
- Gently fold in the pastel sprinkles.
- Drop generous tablespoonfuls of dough onto ungreased baking sheets.
- Bake for 10-12 minutes until the edges are lightly golden.
- Allow cookies to cool on baking sheets for about 5 minutes, then transfer to wire racks.