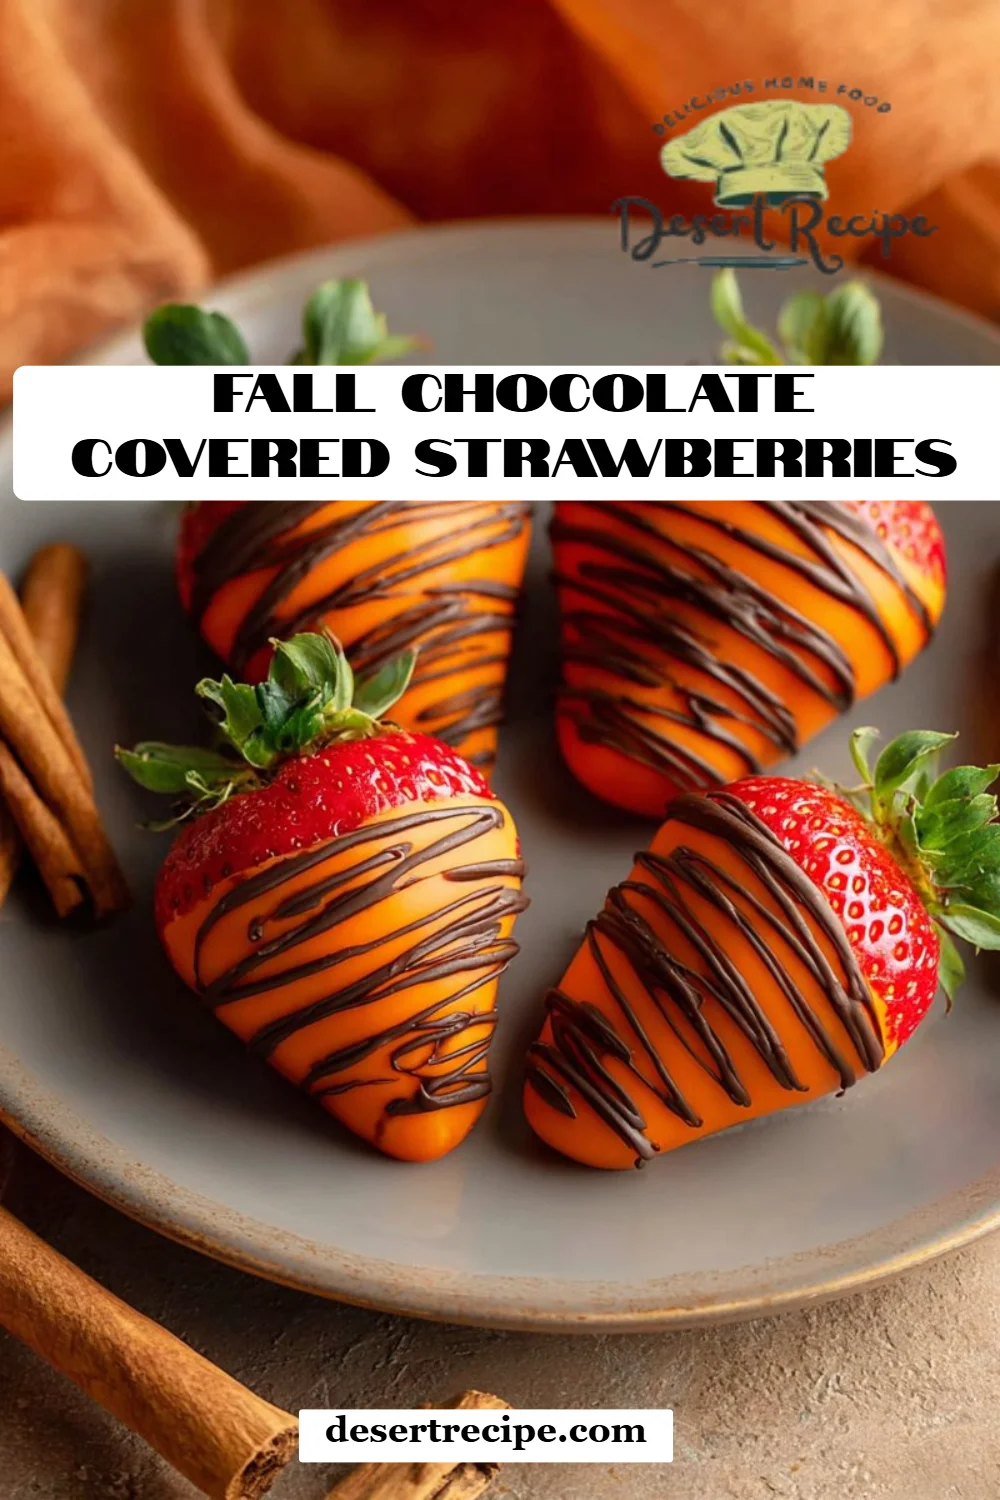
Autumn Delights: Irresistible Fall Chocolate Covered Strawberries Recipe
As the leaves start to turn and the air becomes crisp, my kitchen transforms into a little cocoon of warmth and flavors that shout “Fall!” One of my favorite indulgences during this season is crafting Fall Chocolate Covered Strawberries. It all started one chilly October afternoon when my youngest daughter and I decided to celebrate the season in a sweet way. Inspired by her excitement, we dipped juicy strawberries into luscious chocolate and decorated them with all sorts of fun fall colors. Those delicious bites became a delightful family tradition, sparking joyful memories of laughter, warmth, and sweet treats.
What makes these chocolate-covered strawberries stand out? It’s not just about the decadent chocolate; it’s about infusing the essence of autumn into each bite! This recipe enhances every beautiful strawberry with hints of orange, delightful decorations, and a touch of whimsy. Compared to store-bought options, these homemade delights are not only fresher but also allow you to customize your flavors and decorations—making them a true masterpiece worthy of the season.
Join me as I share this easy, delightful recipe, perfect for any fall gathering, and create your own delicious memories!
What Are Fall Chocolate Covered Strawberries?
Fall Chocolate Covered Strawberries are a delightful twist on the classic treat, blending juicy strawberries with rich, melted chocolate and festive autumn-themed decorations. The origins of chocolate-covered strawberries date back to the 1960s when they became popular in candy shops and gourmet stores. However, this version takes inspiration from the vibrant colors and flavors of the fall season.
Imagine biting into a strawberry that’s perfectly coated in silky milk chocolate, with a subtle hint of orange zest, dotted with crunchy sprinkles that take you straight to a cozy autumn afternoon. These strawberries are not just desserts; they are an experience, an expression of creativity, and a way to embrace the flavors of the season. They’re ideal for decorations at autumn gatherings, Halloween parties, or even as delightful snacks while watching your favorite fall movies.
Why You’ll Love This Recipe
Customizable Elegance: You can make these strawberries your own! Whether you prefer classic chocolate or want to dive into adventurous flavors, like caramel or white chocolate, the opportunities are endless. The use of autumn-themed decorations allows you to showcase your personality and creativity!
Fresh and Flavorful: Unlike store-bought chocolates that can often taste stale or artificial, using fresh strawberries ensures that each bite bursts with natural flavor. Plus, you get to choose the quality of chocolate, ensuring it’s the best possible.
Cost-Effective Treat: If you’ve ever walked past a gourmet chocolate shop, you know how pricey chocolate-covered strawberries can be! This recipe allows you to make a larger batch at a fraction of the cost, perfect for sharing (or keeping all to yourself!).
Quick and Fun to Make: This is an easy recipe perfect for home bakers of any skill level. From prepping to chilling, it generally takes just over an hour, with minimal steps involved. It’s a great project for friends, date nights, or family get-togethers.
A Family Tradition Starter: Crafting these treats is more than just cooking; it’s a chance to create experiences and memories. Involve your kids or friends in the decorating process, and watch as their creativity shines through!
Ingredients
- 2.2 lbs strawberries, thoroughly dried
- 14 oz milk chocolate (I recommend Ghirardelli melting wafers for their smoothness)
- 12 oz orange candy melts (available at most craft stores and supermarkets)
- 2 oz white chocolate (good quality is key; use Ghirardelli or similar brands)
- 1 tsp orange zest
- Gold coarse sugar (for a touch of sparkle!)
- Decorator gel (for detailed designs)
- Sprinkles (choose a mix of fall colors)
- Leaf sprinkle mix (e.g., Wilton fall shapes)
- Fall nonpareils
- Fall jimmies
Ingredient Notes
- Make sure your strawberries are completely dry; any moisture can prevent the chocolate from adhering properly.
- Substitute the orange candy melts with dark chocolate for a richer taste, or use colored chocolate melts to fit your desired theme.
- If you have dietary restrictions, feel free to use dark chocolate or dairy-free options.
Prep Notes
- Use room temperature butter if you choose to incorporate it in any accompanying dessert.
- Ensure your ingredients are at room temperature for the best melting results.
Step-by-Step Instructions
Chill and Prepare: Line a baking sheet with parchment paper and place it in the freezer to chill while you prep. This will help the chocolate set faster. Ensure your strawberries are completely dry—this is crucial for a beautiful coating! Insert wooden skewers or toothpicks into the stem end of each strawberry.
Melt the Chocolates: Melt the milk chocolate and orange candy melts in separate heat-safe bowls over simmering water (this method is called a double boiler). Keep them warm and pourable.
Dip in Chocolate: Dip each strawberry into the milk chocolate, coating about two-thirds of the berry. Allow any excess to drip off, then place on the chilled pan. Chill for 5-10 minutes if necessary until set.
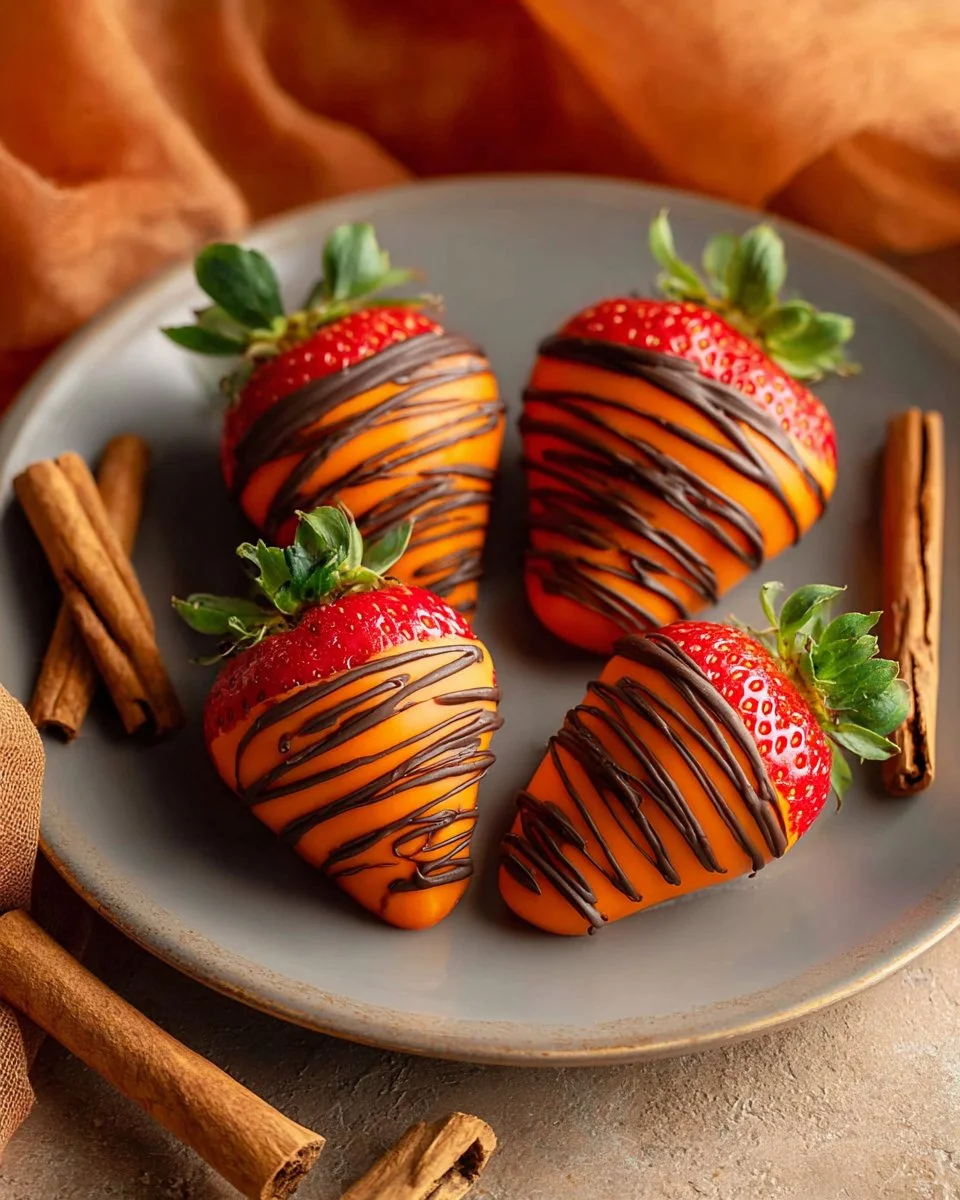
Add Color: Dip half of the strawberries into the orange candy melts for a pop of color. For those left in milk chocolate, drizzle contrasting chocolate or additional melted orange over them to create lovely patterns.
Finishing Touches: Melt the white chocolate and drizzle it artfully over some strawberries. Roll others in gold coarse sugar or your chosen fall-themed toppings for added flair.
Final Chill and Serve: Refrigerate for 15 minutes to set completely. Then, serve on a decorative platter or box them up for gifts!
Expert Tips & Tricks
- Storage: Keep the strawberries in an airtight container in the fridge for up to 3 days. They’re best enjoyed fresh but can last a little longer depending on your chocolate choice.
- Make-Ahead: These chocolates can be made a day in advance, just make sure to store them correctly to maintain freshness!
- Troubleshooting: If your chocolate isn’t melting smoothly, you may have added moisture or overheated it. Use a double boiler method and a gentle heat.
- Creative Designs: Use the decorator gel to add fun designs after your chocolate has set. This touch will delight kids and adults alike!
Serving Suggestions
These Fall Chocolate Covered Strawberries are perfect for any autumn occasion! Serve them alongside a warm cup of cider, as a sweet treat at Halloween parties, or as part of a dessert platter at Thanksgiving. To elevate your presentation, arrange strawberries on a rustic wooden board with pumpkins and autumn leaves for that cozy, festive feel.
Variations & Substitutions
- Flavor Combinations: Want to spice things up? Try adding crushed pecans or walnuts to your chocolate coating, or incorporate a dash of cinnamon for that spicy fall finish.
- Dietary Adaptations: For gluten-free options, ensure your decorative sprinkles are safe. Use dairy-free chocolates for a vegan version.
- Seasonal Variations: These strawberries can be adapted for different holidays by switching up the colors and decorations. Think red and green for Christmas or pastel colors for spring!
Nutrition & Storage Info
- Prep Time: 30 minutes
- Cook Time: 30 minutes
- Total Time: 1 hour
- Yield: Approximately 24 strawberries
- Estimated Calories: 120 calories per serving (2 strawberries)
- Storage Instructions:
- Room Temperature: Not recommended, will lose freshness.
- Refrigerator: Store in an airtight container, up to 3 days.
- Freezer: Can be frozen, but texture may change upon thawing.
FAQ Section
Can I use frozen strawberries?
- It’s not recommended as they tend to become mushy when thawed, which affects texture.
How do I get a smooth chocolate coating?
- Ensure strawberries are dry and use high-quality chocolate to prevent clumping.
What if my chocolate hardens before dipping?
- Gently remelt in a microwave or over a double boiler to restore fluidity.
Can I replace the fruit?
- Absolutely! Bananas and pretzels are great alternatives.
How do I keep my chocolates shiny?
- Use coating chocolates or temper your chocolate to enhance its glossiness.
What decorations work best?
- Fall-themed sprinkles, edible glitter, or crushed nuts work beautifully.
Can I use a microwave to melt chocolate?
- Yes, but be careful! Microwave in short intervals and stir frequently to prevent burning.
Why aren’t my chocolates setting?
- Moisture is the enemy here; ensure no water touches your chocolate during the melting process.
Can I make the chocolates in advance?
- Yes, make them a day before and store properly in the fridge!
Can kids help with this recipe?
- Definitely! It’s a fun project for all ages and a chance to get creative.
Conclusion
This recipe for Fall Chocolate Covered Strawberries is more than just a delicious treat; it’s a way to connect with the season, create lasting memories, and indulge in some quality time with loved ones. Whether you’re hosting a gathering or simply indulging yourself, I encourage you to give this recipe a try. Your taste buds will thank you! Have feedback or delicious stories to share? Drop me a comment below. And for more mouthwatering recipes, be sure to check out my blog’s collection!

Fall Chocolate Covered Strawberries
Ingredients
Method
- Line a baking sheet with parchment paper and place it in the freezer to chill.
- Ensure your strawberries are completely dry, and insert wooden skewers or toothpicks into the stem end of each strawberry.
- Melt the milk chocolate and orange candy melts in separate heat-safe bowls over simmering water.
- Dip each strawberry into the milk chocolate, coating about two-thirds. Allow any excess to drip off, then place on the chilled pan.
- Chill for 5-10 minutes if necessary until set.
- Dip half of the strawberries into the orange candy melts.
- Drizzle contrasting chocolate or additional melted orange over those left in milk chocolate.
- Melt the white chocolate and drizzle it over some strawberries.
- Roll others in gold coarse sugar or chosen fall-themed toppings for added flair.
- Refrigerate for 15 minutes to set completely, then serve on a decorative platter.