Table of Contents
Table of Contents
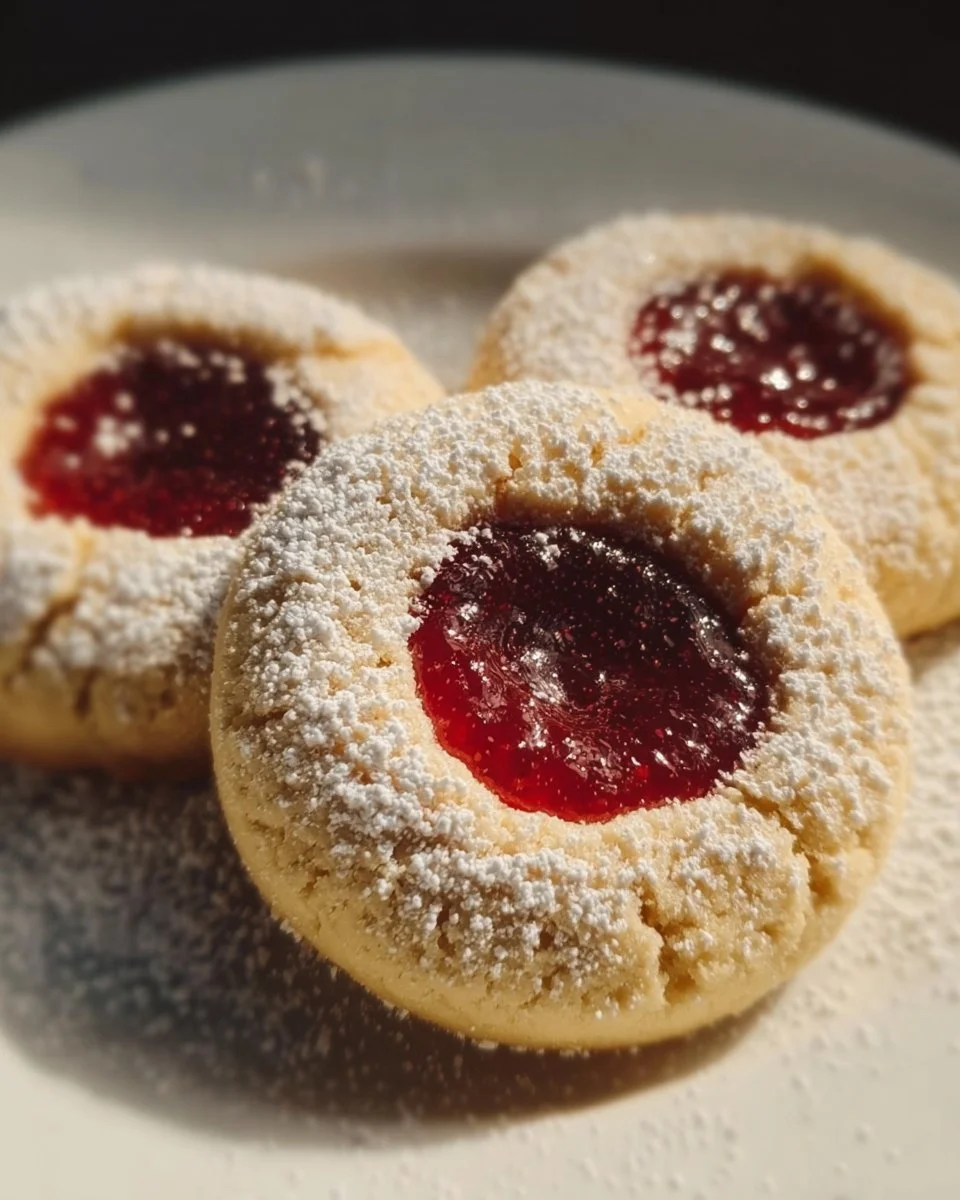
Growing up, my grandmother always had a batch of thumbprint cookies waiting for me whenever I visited her. The aroma of freshly baked cookies filled the air, mingled with the inviting scent of strawberry jam bubbling on the stove. Those Thumbprint Cookies with Strawberry Jam became an inseparable part of my childhood memories—each bite transporting me back to her quaint kitchen filled with laughter and love.
What sets my version of these classic cookies apart from others is the perfect balance of buttery dough and naturally sweet strawberry filling. Trust me; you won’t find a store-bought alternative that can compete with the warmth and love baked into these gems. The texture is soft with a slightly crisp edge, while the jam center adds that delicious fruity burst. Whether you’re baking for the holidays, a picnic, or just because, these cookies are sure to brighten anyone’s day.
In this post, I promise you’ll learn how to craft the perfect Thumbprint Cookies with Strawberry Jam—sharing both tips and heartfelt tradition along the way. So, let’s dive in and bake some memories together!
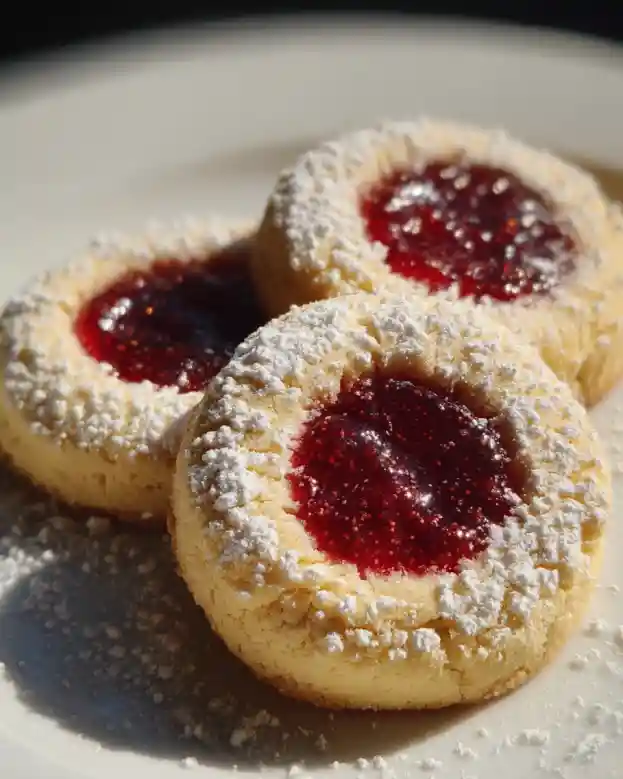
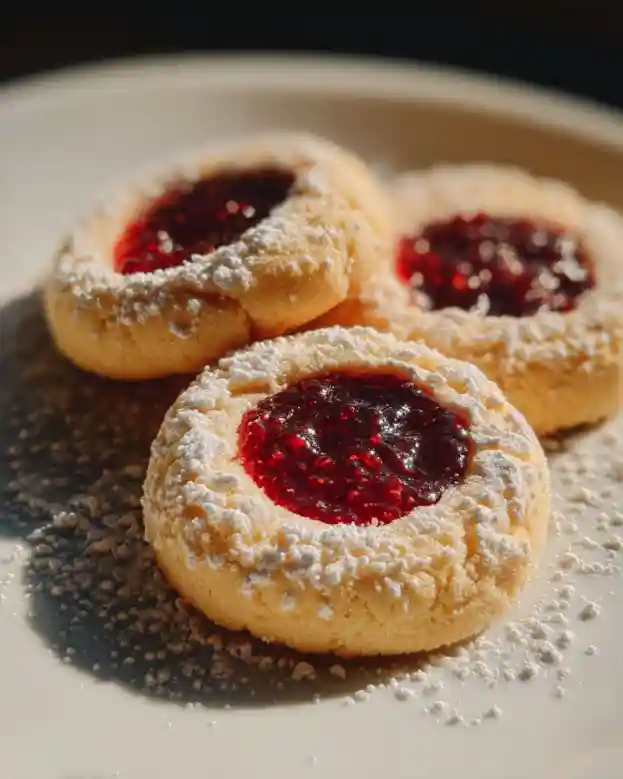
What Are Thumbprint Cookies with Strawberry Jam?
Thumbprint cookies have their roots in European baking, with variations found in many cultures. They originally emerged as “Biskuit” in Germany and have delighted taste buds across the world with their delightful practicality and comforting flavors.
These charming cookies boast a buttery shortbread base that crumbles and melts in your mouth, complemented by a luscious dollop of jam right in the center. The signature thumbprint creates an inviting little pool for all that sweet goodness, making each bite both visually appealing and delectable.
They’re the perfect cookie for any occasion—from holiday cookie exchanges to casual family gatherings. Bake a batch to share, and I promise you’ll create delightful connections with those you love.
Why You’ll Love This Recipe
1. The Unbeatable Homemade Taste
While store-bought cookies can be convenient, they often lack the authentic taste and heart that come from your own oven. This recipe captures that comforting homemade flavor that takes you straight to your childhood.
2. Budget-Friendly Delights
Making thumbprint cookies at home is a delicious way to save money without sacrificing quality. With pantry staples, you can whip up a whole batch for just a fraction of what you’d pay for a box of mediocre cookies!
3. Customizable Options
What I love most about this recipe is how you can easily customize it. Substitute strawberry jam with raspberry, apricot, or even chocolate for a delightful twist that suits any palate or occasion.
4. Easy and Fun to Make
Even if you’re new to baking, this recipe is straightforward with minimal fuss. Plus, involving kids (or friends!) in the thumbprint-making process adds a playful touch that’s sure to bring smiles.
5. Freezer-Friendly
Go ahead and make a double batch! The dough freezes well so you can bake fresh cookies whenever cravings hit, making impromptu gatherings or late-night snacks a breeze!
Ingredients Section
Here’s what you’ll need to create these delightful Thumbprint Cookies with Strawberry Jam:
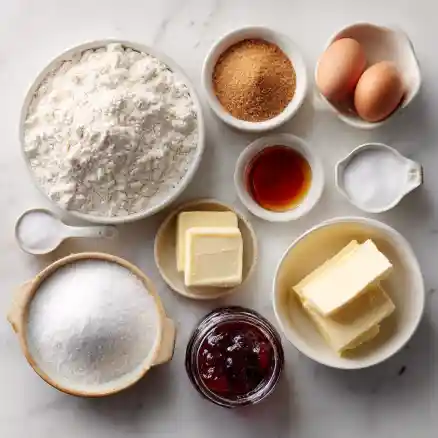
Ingredients List
- 2 cups all-purpose flour: For a tender cookie, spoon flour into the measuring cup and level off.
- 1/2 cup granulated sugar: Sweetness to balance the buttery flavor.
- 1/4 cup brown sugar: Adds a hint of caramel richness.
- 3/4 cups butter (softened): Use high-quality unsalted butter for the best flavor; I recommend brands like Kerrygold or Challenge.
- 1/2 tsp baking soda: To help the cookies rise slightly.
- 1/4 tsp salt: Balances sweetness.
- 1/2 tsp vanilla extract: Use pure vanilla extract for the best flavor.
- 1 egg: Adds richness and helps bind the ingredients.
- 1/4 cup strawberry jam: For that delightful center; opt for homemade or quality brands like Smucker’s.
- 1/4 cup powdered sugar: For that finishing touch of sweetness.
Prep Notes
- Room Temperature Butter: Ensure your butter is softened at room temperature (a little warmth makes mixing easier).
- Quality Ingredients: Higher-quality ingredients lead to a more delicious end product, so choose the best you can find.
Step-by-Step Instructions
Now, let’s get to the good part—baking! Follow these simple steps to create the perfect Thumbprint Cookies with Strawberry Jam:
- Cream the Butter and Sugars: In the bowl of your stand mixer, combine the softened butter, granulated sugar, and brown sugar. Beat on medium speed until light and fluffy (about 2-3 minutes).
- Add Egg and Vanilla: Scrape down the sides, then add the egg and vanilla extract to the mixture. Continue to mix until fully incorporated.
- Incorporate Dry Ingredients: Gradually add the flour, baking soda, and salt to the wet ingredients, mixing on low speed until just combined. Be careful not to overmix!
- Chill the Dough: Wrap your cookie dough in plastic wrap and refrigerate for 30-45 minutes. This helps the flavors meld and prevents the cookies from spreading too much during baking.
- Prep the Jam: While the dough chills, take the strawberry jam out of the fridge and let it come to room temperature. Whisk to loosen it up for easy filling.
- Preheat the Oven: Preheat your oven to 375°F (190°C).
- Form the Cookies: Line a baking sheet with parchment paper. Roll about 1.5 tablespoons of dough into a ball and place it on the baking sheet.
- Create the Thumbprint: Using your thumb or index finger, gently press the center of each dough ball to create an indentation (don’t go all the way through!).
- Fill with Jam: Spoon about 1/2 teaspoon of strawberry jam into each thumbprint.
- Bake Them: Bake the cookies at 375°F for 9-11 minutes, or until the edges are lightly golden. They should set and look a bit puffy but soft when pulled from the oven.
- Cooling Time: Transfer cookies to a cooling rack, letting them cool completely. Once cool, sprinkle with powdered sugar for that finishing touch!
Chef’s Tips
- Watch the Bake Time: Keep an eye on the cookies toward the end of baking; every oven varies, and you want them just golden.
- Avoid Overmixing: Too much mixing can lead to tough cookies—mix until just combined for tenderness.
Expert Tips & Tricks
Storage Recommendations: Thumbprint Cookies can be stored in an airtight container at room temperature for up to one week—or in the fridge for up to two weeks.
Make-Ahead Instructions: You can prepare the dough ahead of time. Just form the balls, freeze them on a baking sheet, and transfer them to a freezer bag after they’re frozen; they can last up to 3 months!
Common Problems Troubleshooting:
- If your cookies spread too much, chill the dough longer next time.
- If the jam is too thick, consider warming it briefly before filling.
Baking in Batches: If baking off multiple sheets, rotate between racks halfway through for even cooking.
Experiment with flavors: Feel free to try almond extract or other flavored jams.
Serving Suggestions
These Thumbprint Cookies with Strawberry Jam are perfect as a sweet snack or dessert! Pair them with a warm cup of tea or coffee for a delightful afternoon treat. For a special presentation, arrange them on a beautiful platter, sprinkle some fresh strawberries around, and perhaps add a dollop of whipped cream for a stunning touch.
Occasion Recommendations
- Holiday Festivities: These cookies make a delightful addition to any cookie plate during the festive season.
- Picnics and Gatherings: Perfect for a summery picnic or baked treats to share during family gatherings!
- Gifts: Package a few cookies in a decorative box as a thoughtful homemade gift for friends and family.
Variations & Substitutions
Feeling adventurous? Here are some delightful twists you can try:
- Flavor Combinations: Instead of strawberry jam, try raspberry, blueberry, or apricot. Each jam brings its own unique flavor!
- Allergen-Friendly Versions: Substitute gluten-free flour for a gluten-free option or use coconut sugar for a healthier, unrefined alternative.
- Seasonal Twists: Add spices like cinnamon or nutmeg for a cozy winter flavor or incorporate lemon zest for a bright summer treat.
Nutrition & Storage Info
- Prep Time: 30 minutes + chilling time
- Cook Time: 10 minutes
- Total Time: About 1 hour 15 minutes
- Yield: Approximately 24 cookies
- Estimated Calories per Serving: About 120 calories per cookie
- Storage Instructions: Store cookies at room temperature in an airtight container for up to one week. Unbaked dough can be stored in the freezer for up to three months.
FAQ Section
Can I use different types of jam?
Absolutely! Feel free to experiment with any flavors you love, including chocolate spreads!What can I do if my dough is too crumbly?
Try adding a teaspoon of milk to moisten the dough.Can these cookies be frozen?
Yes, both the baked cookies and the unbaked dough can be frozen.Can I make these vegan?
Substitute butter for vegan margarine and replace the egg with flax egg (1 tbsp flaxseed meal mixed with 2.5 tbsp water).What type of flour is best?
I recommend all-purpose flour for light, tender cookies, but you can try a gluten-free blend if needed.How thick should the jam be?
Use a jam that is spreadable; if it’s too thick, heat it slightly to thin it out before using.How do I make these cookies moist?
Be sure not to overbake them; check for a light golden color on the edges.Why did my cookies spread too much?
Ensure that your dough is well-chilled and that you’re using the right measurements.Can I add nuts to the cookies?
Certainly! Chopped nuts like pecans or walnuts can add delightful texture.What’s the best way to store leftover cookies?
Keep them in an airtight container to prevent them from drying out.
Conclusion
In conclusion, these Thumbprint Cookies with Strawberry Jam are not just a delight for your taste buds—they are a way to create lasting memories in the kitchen. From the moment you mix the dough to the moment you savor that sweet, buttery bite, every step is filled with love and tradition.
I encourage you to try this recipe and share your experiences in the comments! Do you have your own twist to add? And don’t forget to check out other delicious dessert recipes on my blog, perfect for any occasion.
- Almond Flour Thumbprint Cookies
- Raspberry Thumbprint Cookies
- Buttery Almond Thumbprint Cookies
- Red Velvet Thumbprint Cookies
Happy baking!

Thumbprint Cookies with Strawberry Jam
Ingredients
Method
- Cream the butter and sugars until light and fluffy (about 2-3 minutes).
- Add egg and vanilla extract to the mixture and mix until fully incorporated.
- Gradually add flour, baking soda, and salt, mixing on low until just combined.
- Wrap the cookie dough in plastic wrap and refrigerate for 30-45 minutes.
- Let the strawberry jam come to room temperature and whisk to loosen.
- Preheat your oven to 375°F (190°C).
- Roll about 1.5 tablespoons of dough into a ball and place on a lined baking sheet.
- Press your thumb into the center of each dough ball to create an indentation.
- Fill each thumbprint with about 1/2 teaspoon of strawberry jam.
- Bake at 375°F for 9-11 minutes, until edges are lightly golden.
- Transfer cookies to a cooling rack and sprinkle with powdered sugar once cool.