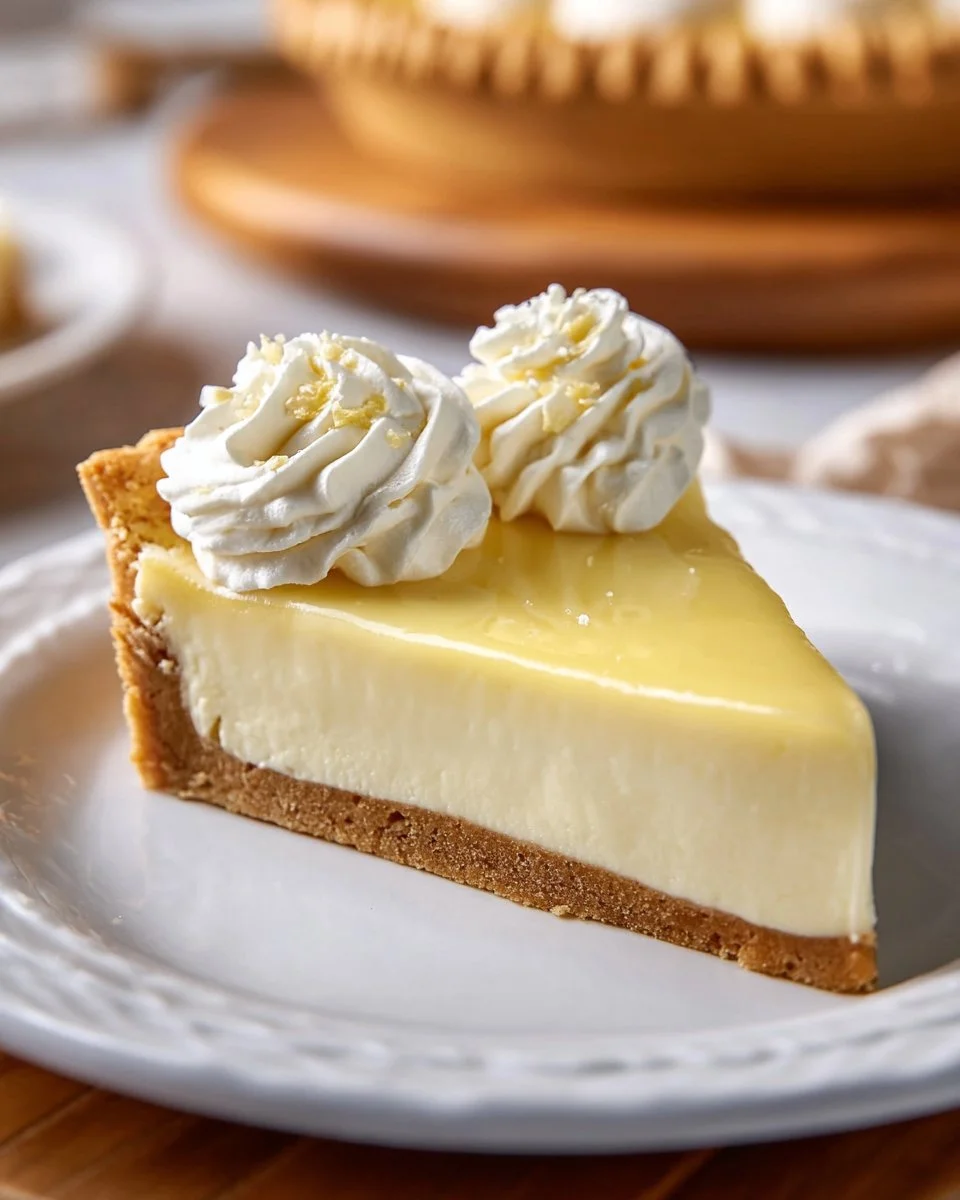
Heavenly Vanilla Cream Pie: The Ultimate Beginner-Friendly Dessert for Every Occasion
There’s something undeniably magical about vanilla cream pie—it’s like a warm hug on a plate. I still remember the very first time I tasted it at my grandmother’s house. She’d whip up this masterpiece for holidays, family gatherings, and even just a random Wednesday. The buttery, flaky crust, combined with the luscious vanilla custard and fluffy whipped cream was, to me, the epitome of comfort food.
This Vanilla Cream Pie: A Beginner-Friendly Dessert for Every Occasion isn’t just a recipe; it’s a way to create those sweet memories in your own home. Unlike other recipes that can be complicated and filled with specialty ingredients, this one emphasizes simplicity and love, making it accessible for any home baker. With indulgent creaminess and a delicate sweetness, it’s the pie that brings everyone to the table.
Join me on this delightful journey, and I promise you’ll learn the steps to making a homemade vanilla cream pie that will become the star of any event. It may look fancy, but trust me—it’s easier than it seems!
What is Vanilla Cream Pie: A Beginner-Friendly Dessert for Every Occasion?
Vanilla cream pie has a rich history, often said to have originated from the classic American custard pie recipes of the late 19th century. The simplicity of the ingredients belies its delightful combination of textures—a crispy crust, creamy custard, and light whipped topping. Each bite is an explosion of sweet vanilla flavor that dances across your palate.
The secret to its uniqueness lies in the quality of ingredients, particularly the vanilla. This isn’t just any vanilla; it’s the star ingredient that transforms a simple cream pie into something truly special. Whether you’re celebrating a birthday, hosting a dinner party, or just craving something sweet, this pie is an excellent choice. It embodies the celebration of togetherness and tradition—perfect for any occasion!
Why You’ll Love This Recipe
Simplicity: This recipe is written with beginners in mind. With easy-to-follow steps and minimal prep time, you’ll feel like a pro in no time.
Versatility: Need a crowd-pleaser for a potluck or a simple dessert for a cozy night in? This vanilla cream pie fits the bill for any event!
Cost-Effective: Ditch the expensive store-bought versions! By making this pie at home, you save money without compromising on quality. Plus, the ingredients are staples you likely already have in your pantry.
Customization: Feel free to get creative! Want to add fresh berries, chocolate shavings, or a swirl of peanut butter? This pie is the perfect canvas for your culinary imagination.
Quality Time: Making this pie is not just a baking project; it’s an experience. Gather your friends or family, roll up your sleeves, and create delicious memories together!
In comparison to store-bought pies, homemade vanilla cream pie allows you to control the quality of the ingredients. You’ll savor that buttery crust and decadent custard filling, knowing precisely what goes into it. Plus, it will make your kitchen smell like heaven during the process, and that alone is worth it!
Ingredients for Vanilla Cream Pie
To create this heavenly treat, you’ll need the following:
1 1/4 cups all-purpose flour: This is the foundation of your pie crust. Look for a high-quality brand like King Arthur Flour for the best results.
1/4 teaspoon salt: Important for balancing the flavors in the crust.
1/2 cup (1 stick) cold unsalted butter, cut into pieces: Use high-fat butter (like Land O’Lakes or Kerrygold) for a flaky crust. Make sure it’s cold!
3-4 tablespoons ice water: This helps bring the dough together without overworking it.
2 cups whole milk: The key to a creamy custard filling. Organic or local milk often tastes best!
1/2 cup heavy cream: This adds richness to the pie—don’t skimp!
1/2 cup granulated sugar: Sweetens the filling to perfection.
1/4 cup cornstarch: Essential for thickening the custard.
1/4 teaspoon salt: To enhance flavor.
4 large egg yolks: Adds richness and helps set the custard.
2 tablespoons unsalted butter: For a creamy finish—again, use good quality!
1 tablespoon vanilla extract or vanilla bean paste: My personal favorite is Madagascar vanilla for its rich flavor.
1 cup heavy cream: For the whipped topping—use high-quality cream for the best results.
2 tablespoons powdered sugar: Ensures a smooth texture for the whipped cream.
1/2 teaspoon vanilla extract: Ties all the flavors together.
Ingredient Quality Notes
- Always opt for fresh, high-quality ingredients whenever possible. They’ll make all the difference!
- Feel free to substitute the heavy cream with whipped topping for a lighter version, but it won’t be quite as indulgent.
Step-by-Step Instructions
The Crust
Prepare the Crust: In a food processor, combine the 1 1/4 cups of all-purpose flour and 1/4 teaspoon salt. Pulse a few times to mix. Add the cold butter cut into small pieces, and pulse until it resembles coarse crumbs, like gray sand with small butter chunks visible.
Add Ice Water: Gradually add 3 tablespoons of ice water, pulsing until the dough starts to come together. If it feels too dry, add the remaining tablespoon. You want the dough to be moist but not sticky.
Chill the Dough: Shape the dough into a disk, wrap it in plastic wrap, and refrigerate for at least 30 minutes. This helps the crust to be flaky!
Preheat the Oven: Set your oven to 375°F (190°C).
Roll Out Dough: On a floured surface, roll the dough into a 12-inch circle. Transfer it to a 9-inch pie plate and gently press it into the corners. Trim any excess dough and crimp the edges. Remember, perfection isn’t necessary—just make it yours!
Dock and Par-Bake the Crust: Prick the bottom of the crust with a fork, then line it with parchment paper filled with pie weights or dried beans. Bake for 20 minutes, remove the parchment and weights, then continue baking for another 10-15 minutes until golden brown. Allow it to cool completely.
The Filling
Make the Custard Filling: In a medium saucepan, whisk together the 2 cups whole milk, 1/2 cup heavy cream, 1/2 cup sugar, 1/4 cup cornstarch, and 1/4 teaspoon salt. Cook over medium heat, whisking constantly until it thickens and bubbles around the edges—about 5-7 minutes.
Temper the Egg Yolks: In a separate bowl, whisk the 4 large egg yolks until smooth. Gradually blend in 1 cup of the hot milk mixture to temper the eggs, whisking continuously. This prevents them from scrambling!
Combine and Thicken: Whisk the egg mixture back into the saucepan. Return to heat and cook for another 2 minutes until thick. Stir in the 2 tablespoons of unsalted butter and 1 tablespoon of vanilla extract. Pour the custard into your cooled crust and smooth the top. Cover with plastic wrap to prevent a skin from forming.
Chill: Refrigerate the pie for at least 4 hours or preferably overnight to set.
The Whipped Cream
Make the Whipped Topping: Just before serving, beat 1 cup heavy cream, 2 tablespoons powdered sugar, and 1/2 teaspoon vanilla extract using an electric mixer on medium-high speed. Whip until stiff peaks form—3-5 minutes max!
Decorate: Spread the whipped cream over the cooled pie, smoothing it out or creating decorative swirls. Serve chilled, and enjoy!
Chef’s Tips:
- Always chill your crust properly for maximum flakiness.
- If you find your custard too thick, gently whisk in a little extra milk once it cools.
- Use a rubber spatula to get every delicious drop of custard from the pan!
Expert Tips & Tricks
Ingredient Temperature Matters: Ensure your butter is cold for the best flaky crust.
Make-Ahead Magic: This pie is great as a make-ahead option. You can make the crust and filling the day before—just add the whipped cream topping before serving.
Storage Recommendations: Keep the pie covered in the refrigerator for up to 3 days. It rarely lasts that long at my house!
Troubleshooting: If your custard doesn’t thicken, ensure you’re cooking on medium heat and whisking constantly. Patience is key!
For Leftovers: I love using any leftover filling between graham crackers for a quick treat. It’s way too good to waste!
Serving Suggestions
Pair your vanilla cream pie with a scoop of vanilla or chocolate ice cream for an extra indulgent dessert. Or for a fancy touch, serve with fresh berries on the side and a sprig of mint for color and freshness. This pie shines at birthday parties, potlucks, and even fancy dinners.
Variations & Substitutions
Feeling adventurous? Here are some exciting variations:
- Fruit Variations: Top it with seasonal fruits like raspberries, strawberries, or blueberries for a fruity twist!
- Chocolate Modifications: Add cocoa powder to the custard for chocolate cream pie, or decorate with chocolate shavings.
- Dairy-Free Options: Substitute almond milk and coconut cream for a delightful dairy-free version—just ensure the other ingredients are also dairy-free.
Nutrition & Storage Info
- Prep Time: 30 minutes
- Cook Time: 50 minutes
- Total Time: 4 hours and 20 minutes (including chilling)
- Yield: 8 servings
- Estimated Calories: Approximately 320 calories per slice
Storage Instructions: Store any leftovers in the refrigerator for up to 3 days. I usually find it best to consume it within the first day or two for optimal freshness!
FAQ Section
Can I freeze Vanilla Cream Pie?
While freezing isn’t ideal due to the cream, the crust can be pre-baked and stored in the freezer for up to a month.How do I know when the custard is done?
It should coat the back of a spoon—if you run your finger through it, it should hold its shape.What can I use instead of heavy cream?
You could use coconut whipped cream for a dairy-free alternative that’s still light and fluffy!Can I use a pre-made crust?
Absolutely! A store-bought graham cracker or pastry crust is a great alternative when you’re short on time.Is it possible to make this pie without eggs?
You can substitute the eggs with a custard-style powder or use a vegan custard powder for egg-free versions.How should I transport this pie?
Keep it chilled in a pie carrier or covered tightly to maintain its freshness until you arrive!What kind of vanilla extract should I use?
Always opt for pure vanilla extract over imitation for the richest flavor.Can I use skim milk instead?
While you can, using whole milk yields a richer custard for the best flavor and creaminess.How can I prevent the filling from getting watery?
Make sure to allow the custard to set completely in the fridge, and avoid adding too much moisture.Can I make this pie gluten-free?
Yes! Just use a gluten-free all-purpose flour blend for the crust and follow the same steps.
Conclusion
This Vanilla Cream Pie: A Beginner-Friendly Dessert for Every Occasion is not just a recipe, but a cherished moment waiting to be shared. I encourage you to gather your loved ones, create this delightful dessert, and watch as they savor every bite. Your feedback is always welcome—what did your friends think? If you’re looking for another sweet adventure, be sure to check out my equally delicious recipes on the blog!
So, roll up your sleeves, and let’s get baking! ✨
Vanilla Cream Pie
Ingredients
Method
- In a food processor, combine the all-purpose flour and salt. Pulse a few times to mix.
- Add the cold butter cut into small pieces, and pulse until it resembles coarse crumbs.
- Gradually add ice water, pulsing until the dough starts to come together. Shape into a disk, wrap in plastic wrap, and refrigerate for at least 30 minutes.
- Preheat the oven to 375°F (190°C).
- Roll out dough into a 12-inch circle and transfer to a 9-inch pie plate. Trim and crimp edges.
- Prick the bottom of the crust, line with parchment paper, and fill with weights. Bake for 20 minutes, remove weights, and bake until golden brown for another 10-15 minutes. Allow to cool completely.
- In a medium saucepan, whisk together whole milk, heavy cream, sugar, cornstarch, and salt. Cook over medium heat, whisking constantly until thickened.
- In a separate bowl, whisk the egg yolks until smooth. Gradually blend in some hot milk mixture to temper eggs.
- Whisk the egg mixture back into the saucepan and cook for another 2 minutes until thick. Stir in unsalted butter and vanilla.
- Pour custard into the cooled crust and smooth the top. Cover with plastic wrap and refrigerate for at least 4 hours to set.
- Before serving, beat heavy cream, powdered sugar, and vanilla extract until stiff peaks form.
- Spread whipped cream over the cooled pie and create decorative swirls. Serve chilled.