Table of Contents
Table of Contents
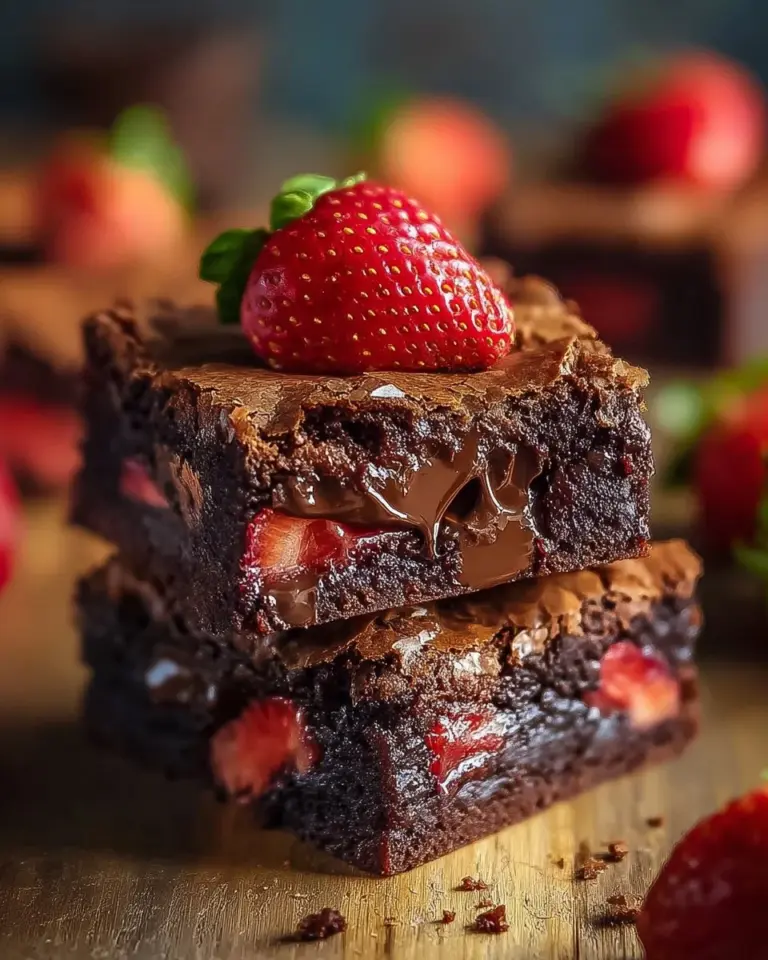
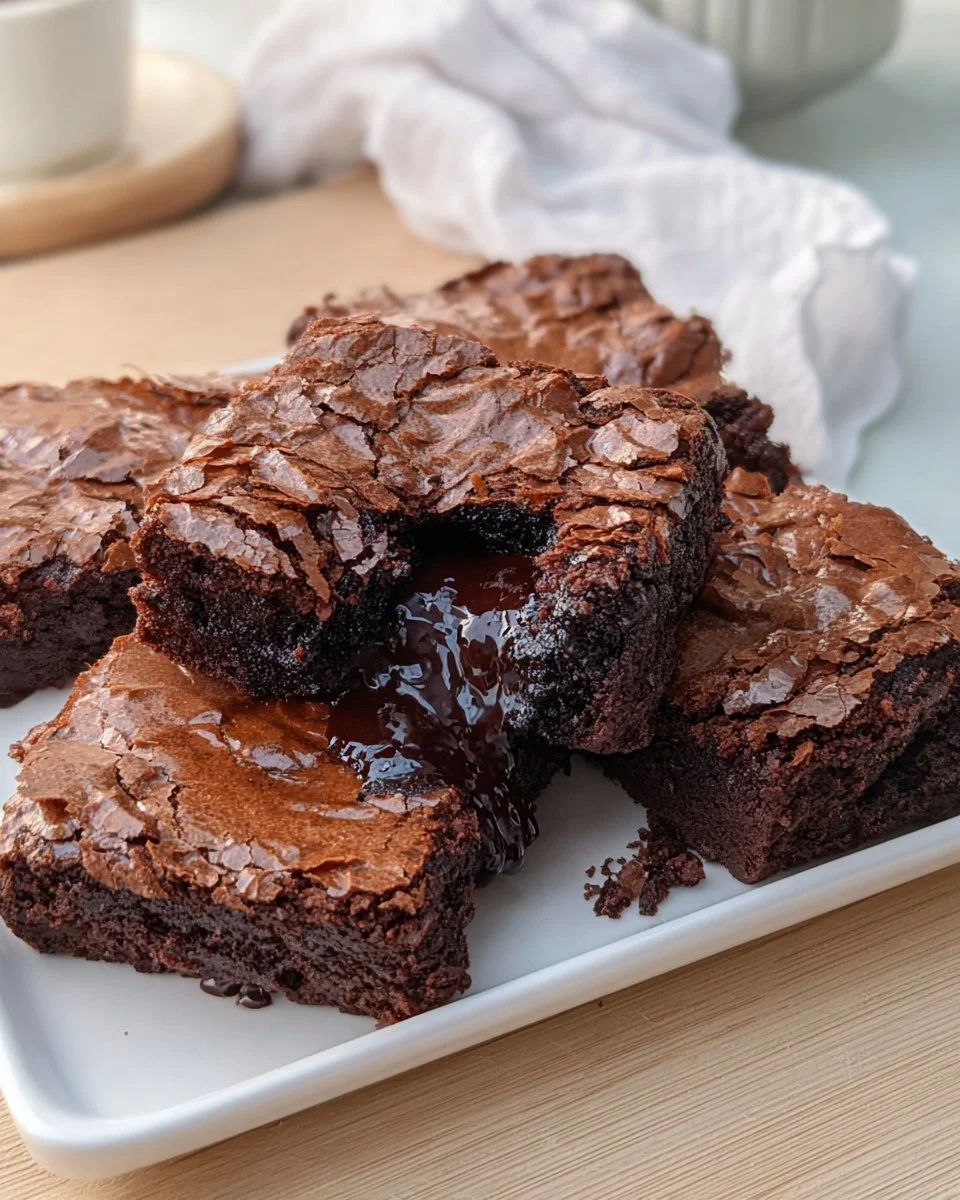
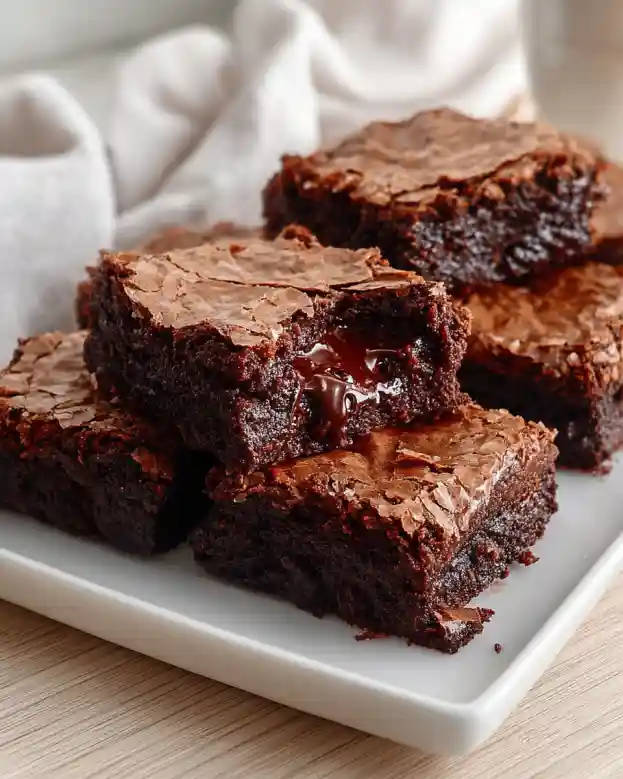
Nothing brings back the comforting rush of childhood memories quite like the aroma of freshly baked brownies wafting through the house. I’ll never forget the rainy afternoons spent with my mom, perched on the kitchen counter, eagerly waiting for the timer to ping. The sound itself felt like a symphony, calling us to dive into the gooey, rich, and chocolatey warmth awaiting us. Homemade Brownies not only reminisce those sweet moments; they transform ordinary days into celebrations.
This recipe is brimming with simple yet soul-satisfying ingredients that make them far superior to their store-bought counterparts. These brownies boast a deep, fudgy texture, thanks to the meticulous balance of butter and sugar—even the hardest of sweet critics won’t stand a chance once they take a bite! In this post, you’ll discover an easy recipe, packed with tips and tricks to elevate your baking game, and the emotional connections that arise from creating something truly special in your kitchen. So, let’s dive in!
What Are Homemade Brownies?
Homemade Brownies have a storied past that dates back to the late 19th century, believed to have originated in the United States. The rich, chocolatey treats gained popularity for their simple yet decadent blend of chocolate, sugar, and butter—a combination that marries sweet and savory perfectly. When made well, brownies have a delectable chewy crust that gives way to a soft, fudgy center that feels almost gooey in your mouth.
What sets them apart from other desserts is their versatility. They can be dressed up with toppings or enjoyed pure and simple. Whether you need an easy dessert for a birthday party or simply want a Netflix binge snack, Homemade Brownies can fit the bill perfectly. They’re a go-to comfort during tough times, a celebration of love, or even a shared laughter moment on a Friday night, reminding us why we bake in the first place.
Why You’ll Love This Recipe
Convenience & Simplicity: This is an easy recipe that even beginners can master. You don’t need to be a baking expert; just grab a bowl and mix!
Cost-Effective: With basic pantry staples like flour, sugar, and cocoa powder, the cost to make these brownies is a fraction of what you’d pay for premium store-bought options—savings that matter even more when chocolate cravings strike!
Customization Galore: Love nuts? Toss in some walnuts! Want something more indulgent? Swirl in some caramel! The possibilities are endless, allowing you to express your creativity and cater to different taste preferences.
Superior Flavor: Honestly, store-bought brownies can’t compare—these are rich, fudgy, and made with love! Unlike those mass-produced chewy bricks, you can taste the quality of your homemade ingredients with every bite.
Quick Bake Time: With only 20-25 minutes in the oven, fewer than 10 ingredients, and minimal cleanup, you’ll be enjoying your Homemade Brownies before you know it!
Ingredients Section
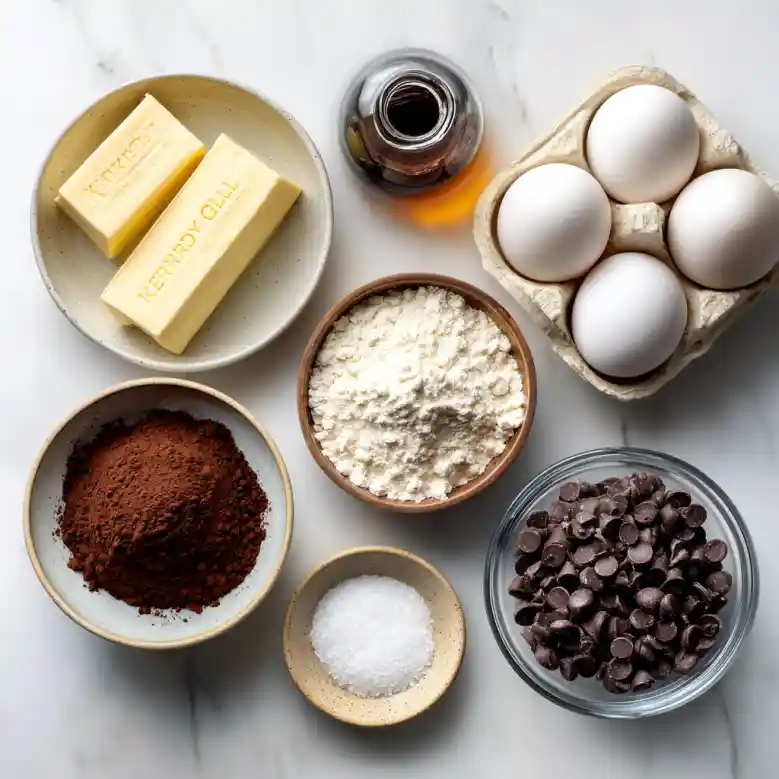
To create the perfect batch of Homemade Brownies, here’s your shopping list, organized by order of use:
- 1 cup unsalted butter: Make sure it’s at room temperature for easy mixing—Brands like Kerry Gold or Challenge Dairy work wonders!
- 2 cups sugar: Granulated sugar will do nicely; avoid powdered sugar for this recipe.
- 4 large eggs: Room temperature eggs emulsify better, bringing you that velvety texture.
- 1 teaspoon vanilla extract: Use pure vanilla for exceptional flavor. Brands like Nielsen-Massey provide quality results.
- 1 cup all-purpose flour: A staple for the structure of your brownies; feel free to substitute with gluten-free flour if needed.
- 1 cup cocoa powder: A key player for deep chocolate flavor; find high-quality cacao, like Valrhona, if you truly want to impress.
- 1/2 teaspoon salt: Enhances sweetness and rounds out the flavors remarkably.
- 1 cup chocolate chips (optional): Semi-sweet or dark chocolate chips can deepen the decadence; I always recommend Ghirardelli or Guittard for the ultimate rich flavor.
Step-by-Step Instructions
Let’s walk through the process of crafting these delectable Homemade Brownies.
Preheat your oven to 350°F (175°C) and generously grease a 9×13 inch baking dish with cooking spray or butter. You can also line it with parchment for easier brownie removal.
In a large bowl, melt the butter. You can do this in the microwave (about 30 seconds to a minute) or on the stovetop. Once melted, let it cool slightly before moving on to the next step to avoid cooking the eggs.
Add sugar: Stir the sugar into the melted butter until fully combined. You’re looking for a glossy mixture; this may take about 1-2 minutes of spirited mixing!
Beat in the eggs, one at a time, then stir in vanilla. Each egg should be fully incorporated before adding the next. The batter will thicken and become smooth, smelling heavenly!
In another bowl, mix together flour, cocoa powder, and salt. Whisk these ingredients together to ensure even distribution—this will lead to a better consistency.
Gradually add the dry ingredients to the wet ingredients, stirring until just combined. You want to avoid over-mixing; a few lumps are perfectly okay! If using, gently fold in the chocolate chips at this point for extra melty pockets.
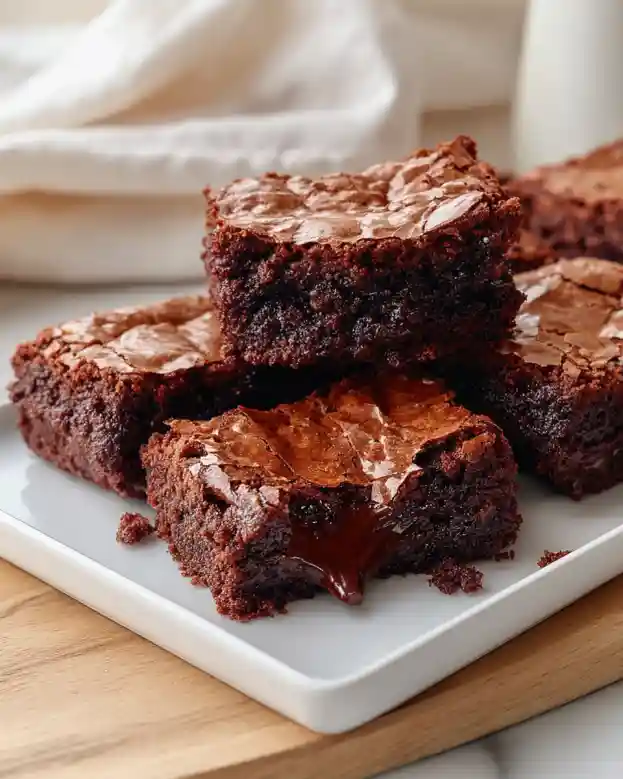
Pour the batter into the prepared baking dish and spread evenly with a spatula. Visualize that first bite with every scoop!
Bake for 20-25 minutes, or until a toothpick inserted into the center comes out with a few moist crumbs. Don’t overbake—trust me, gooey is the way to go!
Let cool before cutting into squares. The cooling step is essential for the perfect slice. You can use a sharp knife or a bench scraper for clean edges.
Chef’s Tip: If you’d like an extra touch of luxury, sprinkle a pinch of sea salt on top just out of the oven—the contrast with the sweetness is simply divine!
Expert Tips & Tricks
Use Quality Ingredients: The flavor of your brownies hinges on the quality of your ingredients. Look for high-quality chocolate and pure vanilla extract for the best results.
Don’t Over-mix: Stir just until combined. Over-mixing can lead to tough brownies. The batter should look glossy and slightly thick.
Check for Doneness Early: Ovens can vary drastically in temperature. Start checking for doneness at the 20-minute mark to avoid dry brownies.
Texture Checks: If you prefer fudge-like brownies, underbake slightly. If you enjoy chewy brownies, let them bake a minute longer.
Storage Recommendations: Store leftovers in an airtight container at room temperature for up to 3 days, or refrigerate for up to a week. These brownies also freeze beautifully for up to 3 months—just thaw at room temperature!
Serving Suggestions
What pairs perfectly with Homemade Brownies? A scoop of vanilla ice cream drizzled with caramel is an unbeatable combination! Alternatively, serve them with a dollop of freshly whipped cream and berries for a dessert that looks gourmet. These brownies are great for any occasion, whether it’s a casual family gathering, a birthday celebration, or simply a cozy movie night in.
Variations & Substitutions
Feeling adventurous? Here’s how you can spice things up with Homemade Brownies:
- Nutty Brownies: Toss in chopped pecans, walnuts, or almonds for a delightful crunch!
- Mint Chocolate Brownies: Substitute half the sugar with mint-flavored chocolate chips for a refreshing twist.
- Vegan Version: Swap out the eggs for flax eggs or applesauce and use coconut oil instead of butter. Note that baking times may vary slightly.
- Spicy Brownies: Add a dash of cayenne pepper or cinnamon for a hint of warmth!
Nutrition & Storage Info
- Prep Time: 10 minutes
- Cook Time: 20-25 minutes
- Total Time: 35-40 minutes
- Yield: 15-20 brownies (depending on size)
- Estimated Calories: Approximately 250 calories per brownie
- Storage Instructions: Store at room temperature for up to 3 days or refrigerate for up to a week. Freeze for up to 3 months!
FAQ Section
Can I use cocoa powder instead of chocolate?
Yes, cocoa powder is the perfect base for brownies, giving them a rich chocolate flavor.How do I prevent my brownies from sticking?
Grease your baking dish thoroughly or use parchment paper for easier removal.Can I freeze brownies?
Absolutely! Wrap them tightly in plastic wrap and place them in an airtight container. They can last for up to 3 months.Why are my brownies cake-like instead of fudgy?
This usually happens if they’re overbaked or if too much flour was added. Aim for the gooey center for that perfect fudgy texture!What’s the best way to cut brownies?
Use a sharp knife and clean the blade between cuts for sharp edges.Can I add frosting to these brownies?
Of course! Cream cheese or chocolate ganache makes for a rich and delightful topping.What can I use to replace eggs?
Flax eggs (1 tablespoon of ground flaxseed meal mixed with 3 tablespoons water per egg replacement) or applesauce (1/4 cup per egg) work wonderfully.Are there any low-sugar alternatives?
Yes! You can use sugar substitutes like erythritol or stevia in moderation to reduce sugar content.What’s the difference between fudge and regular brownies?
Fudge brownies contain more fat and less flour than cake-like brownies, resulting in that dense, moist texture.Can I use whole wheat flour instead of all-purpose flour?
Yes, but the texture will be slightly denser. You may want to try a mix of both for a healthier alternative!
Conclusion
There you have it—Homemade Brownies that are not just irresistible but also steeped in nostalgia and family memories. This recipe is easy to master and leaves plenty of room for creativity, making it truly special. I encourage you to give it a try and share your chocolate-covered moments in the comments below! If you loved this recipe, you might also enjoy my Easy-Peasy Oreo Dump Cake or the Decadent Molten Lava Cakes shared on the blog. Happy baking!
Homemade Brownies
Ingredients
Method
- Preheat your oven to 350°F (175°C) and generously grease a 9×13 inch baking dish.
- Melt the butter in a large bowl, and let it cool slightly.
- Stir the sugar into the melted butter until fully combined.
- Beat in the eggs, one at a time, then stir in vanilla.
- In another bowl, mix together flour, cocoa powder, and salt.
- Gradually add the dry ingredients to the wet ingredients, stirring until just combined.
- Pour the batter into the prepared baking dish and spread evenly.
- Bake for 20-25 minutes, or until a toothpick inserted comes out with a few moist crumbs.
- Let cool before cutting into squares.