Table of Contents
Table of Contents
Close your eyes for just a moment and imagine sitting around the dinner table with loved ones, the aroma of roasted garlic wafting through the air, and your favorite cheesy bread stealing the show. That’s the magic of Cheesy Garlic Pull-Apart Bread! My journey into the world of baking began when I wanted to recreate my grandmother’s cherished recipe, one that she made for every family gathering. It wasn’t just the taste—it was the comfort and love infused in every gooey bite that made it so special.
What sets this Cheesy Garlic Pull-Apart Bread apart from the rest? Well, let me tell you! It’s perfectly golden on the outside, soft and fluffy on the inside, with layers of melted mozzarella and savory Parmesan melting together in delicious harmony. This isn’t just another bread on your table; it’s an experience, a conversation starter, and a memory-maker.
When you give this recipe a try, I promise you’ll not only learn how to create crowd-pleasing bread but also discover the joy of bringing family and friends together over a shared love of food. Let’s dive in!
What Are Cheesy Garlic Pull-Apart Bread?
Cheesy Garlic Pull-Apart Bread is a delightful twist on classic bread that originated from the need for a fun, shareable snack. It’s like your favorite loaf of garlic bread had a delicious love affair with pizza! Each piece pulls apart effortlessly, showcasing layers of cheesy goodness and a garlicky flavor that’s utterly irresistible.
Imagine biting into a warm, fluffy piece, with a slight crunch on the outside and a gooey, cheesy center. The harmony of flavors—the richness of garlic, the comfort of melted cheese, and the softness of freshly baked bread—makes it a true standout. This bread is perfect for cozy family dinners, game day snacks, or even as a delectable appetizer for parties. Plus, it can easily be customized for any occasion!
Why You’ll Love This Recipe
Cost-Effective & Easy: Unlike store-bought options that can be pricey and filled with preservatives, this homemade version is as easy on the wallet as it is on the taste buds. You can whip it up with simple ingredients that you likely already have at home!
Customization Galore: One of the best things about this recipe is the endless possibilities for flavor combinations. Want to add herbs like rosemary or thyme? Go for it! Prefer a spice kick? Toss in some red pepper flakes. You can make it your own every single time!
Quick to Prepare: You don’t need professional baking skills to nail this one. With a manageable prep time and just a little patience for the dough to rise, you’ll be spoiling your family in no time!
Perfect for Any Gathering: Whether it’s a birthday party, a game day gathering, or a cozy family dinner, this Cheesy Garlic Pull-Apart Bread fits right in. Everyone will want to be the first to pull apart a piece!
Family Bonding & Memories: The joy of breaking bread with loved ones is timeless. Making this bread together can become a cherished family tradition, much like my grandmother did with me. Imagine the laughter and stories shared over a steaming basket of homemade bread!
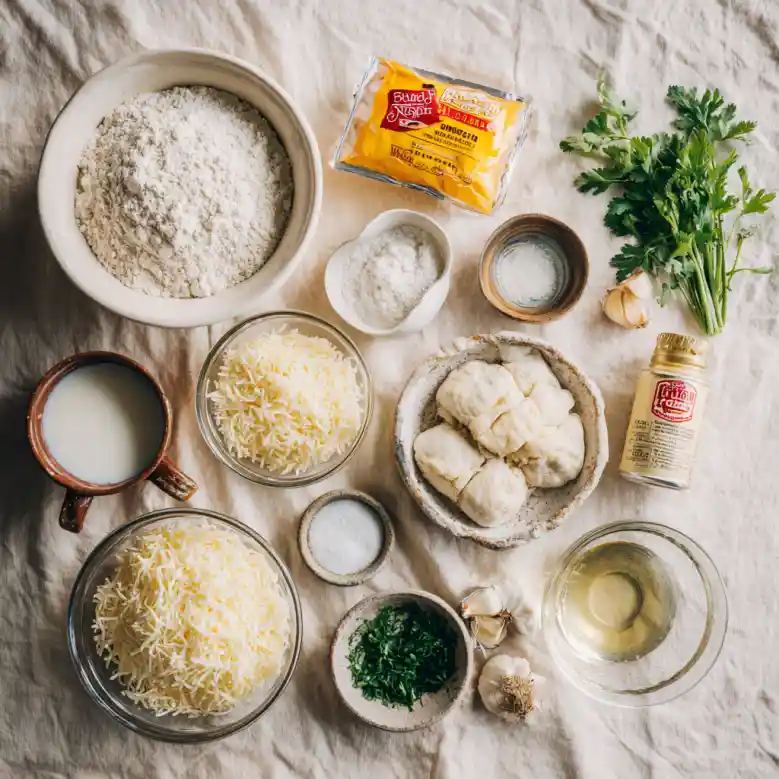
Ingredients
To create this fantastic Cheesy Garlic Pull-Apart Bread, gather the following ingredients:
- 2 1/4 cups all-purpose flour (Choose a high-quality brand like King Arthur for best results)
- 1 packet (2 1/4 tsp) active dry yeast (I recommend Red Star or Fleischmann’s)
- 1/2 cup warm water (about 110°F)
- 1/4 cup milk (Whole milk gives a richer flavor)
- 1/4 cup unsalted butter, melted (Use good-quality butter for the best taste)
- 1 tsp salt (Adjust to your preference)
- 1 tsp sugar (This helps activate the yeast)
- 4 cloves garlic, minced (Fresh is key for robust flavor)
- 1 cup shredded mozzarella cheese (I love using whole milk mozzarella for its creaminess)
- 1/2 cup grated Parmesan cheese (Freshly grated yields the best flavor)
- Fresh parsley, chopped (for garnish)
- Additional melted butter (for brushing)
- Salt (to taste)
Prep Notes
- Ensure your butter is at room temperature for easy mixing.
- If your house is cold, try placing the dough in a warm, draft-free area to help it rise.
Step-by-Step Instructions
Activate the Yeast: In a bowl, combine warm water, 1 tsp sugar, and yeast. Let it sit for about 5-10 minutes until foamy. This means your yeast is alive and kicking!
Mix the Dough: In a large mixing bowl, mix together flour, 1 tsp salt, melted butter, and milk. Once combined, add the yeast mixture and knead until a soft dough forms. This should take about 5-7 minutes.
First Rise: Cover the bowl with a clean kitchen towel and let the dough rise in a warm place until it’s doubled in size—around 1 hour. Pro Tip: Preheat your oven to the lowest setting, turn it off, and place the covered dough inside for optimal rising conditions!
Preheat Oven: Once risen, preheat the oven to 375°F (190°C).
Shape the Dough: Roll out the dough on a floured surface to about 1/2-inch thick and cut it into 2-inch squares.
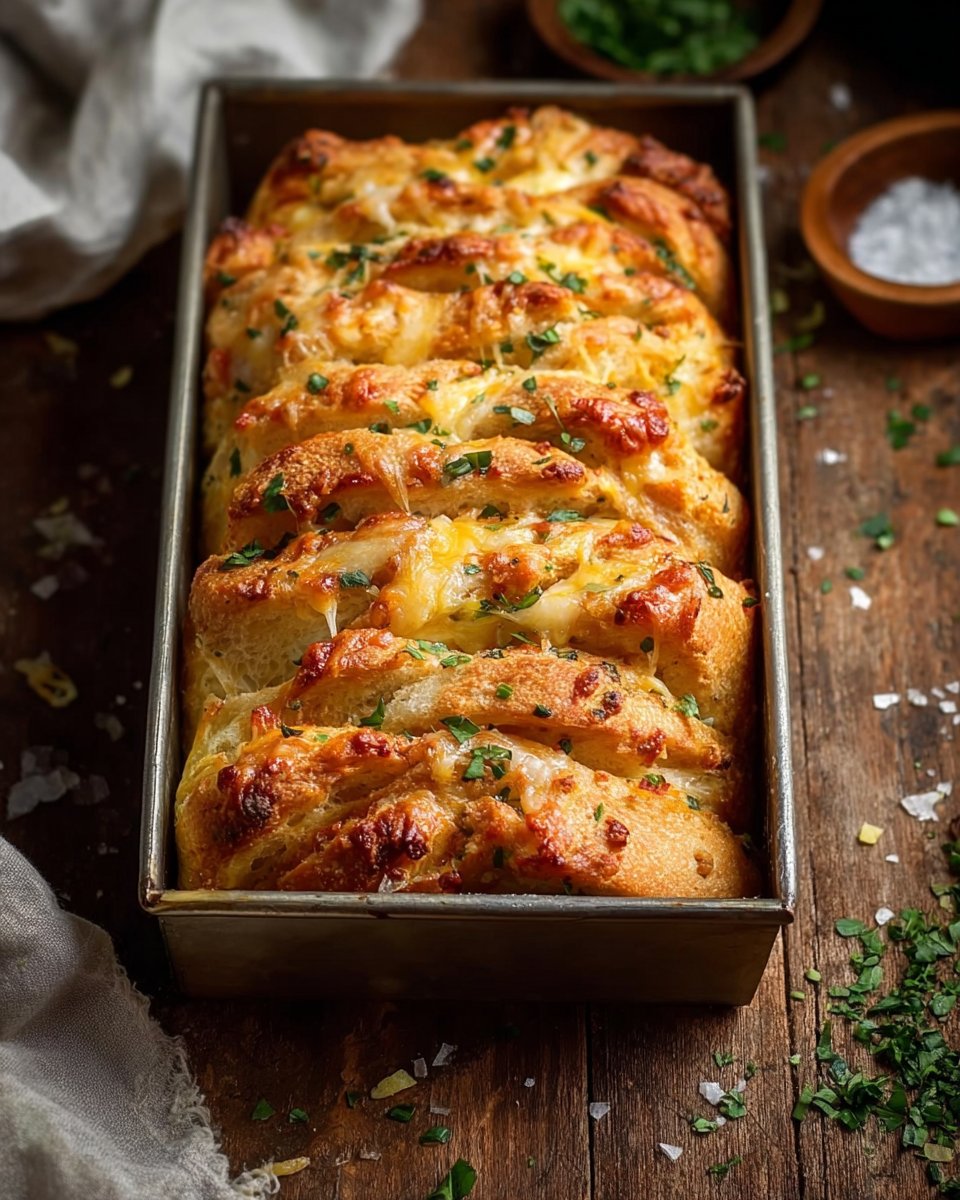
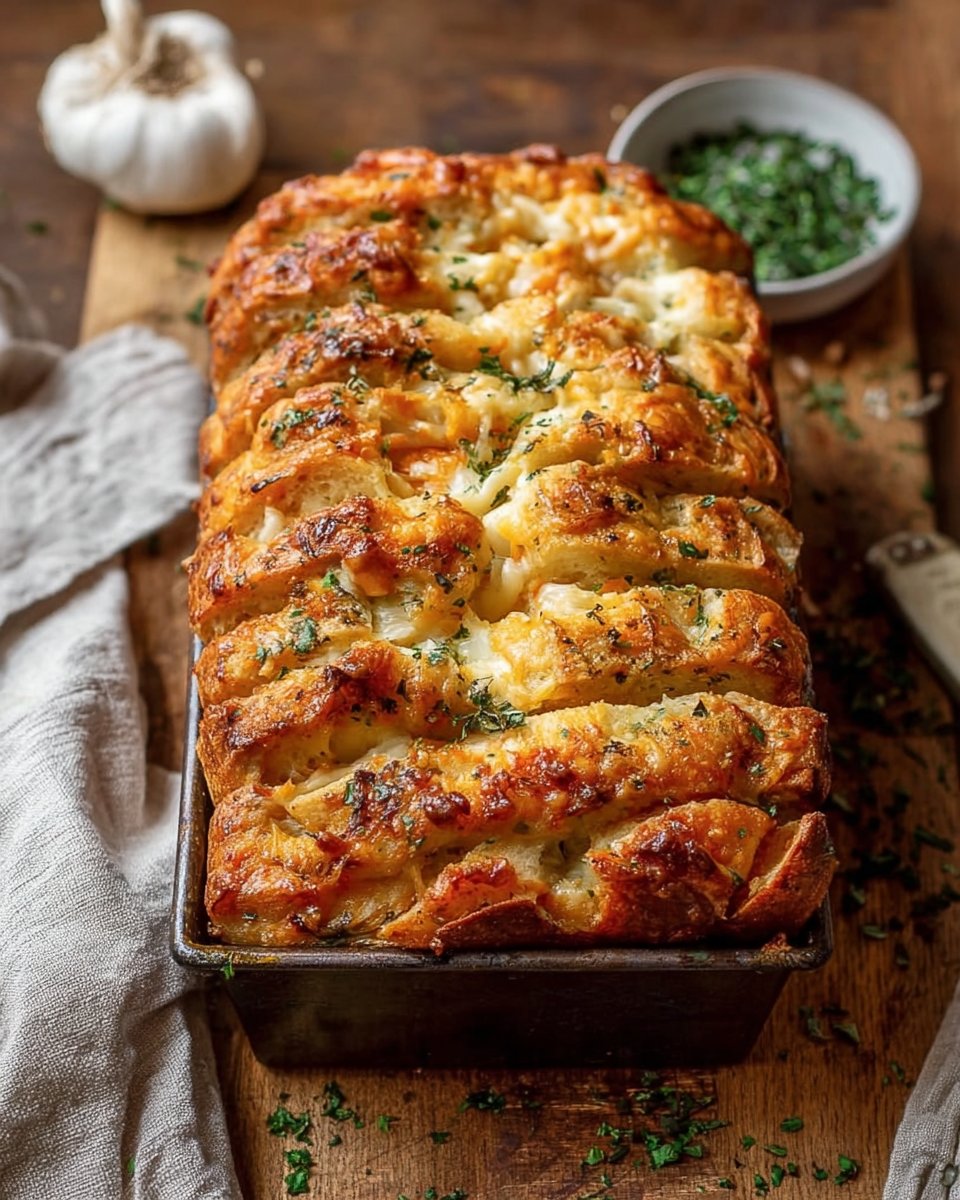
Layer Up: In each square, layer garlic, mozzarella, and Parmesan cheese. Be generous; this is where it gets good!
Stack & Place: Stack the pieces of dough in a greased baking dish, layering them upright. This makes it easy to pull apart once baked.
Brush with Butter: Brush the tops generously with additional melted butter and sprinkle a bit of salt.
Bake: Bake for 25-30 minutes or until golden brown. The smell will have you drooling!
Finishing Touches: Remove from the oven, brush with more melted butter, and sprinkle with fresh parsley for garnish. Dig in while it’s still warm!
Expert Tips & Tricks
Kneading Tip: Don’t over-knead your dough! Just enough until it’s smooth and elastic is perfect.
Storage: To keep your bread fresh, store it in an airtight container at room temperature for up to 2 days. For longer storage, freeze it in a sealed plastic bag.
Make-Ahead: You can prepare the dough ahead of time and let it rise overnight in the refrigerator. Just let it sit at room temperature for about 30 minutes before shaping.
Troubleshooting: If your dough doesn’t rise, it could be that your yeast is expired or the water was too hot. Always aim for a temperature that feels warm but not hot to the touch!
Serving Freshness: For the best texture and flavor, serve the bread warm out of the oven—your taste buds will thank you!
Serving Suggestions
This heavenly Cheesy Garlic Pull-Apart Bread pairs beautifully with:
- Soups: A warm bowl of tomato basil or creamy potato soup will complement the bread perfectly.
- Salads: Serve it alongside a crisp Caesar or garden salad for a delightful meal.
For presentation, serve it in the baking dish or transfer to a rustic wooden board for a charming, homey feel. This bread shines at casual gatherings and is sure to wow your guests!
Variations & Substitutions
- Herbal Infusion: Add chopped herbs like basil, oregano, or thyme between the layers for an aromatic twist.
- Spicy Kick: Include jalapeños or a sprinkle of chili flakes for a spicy version.
- Cheese Variety: Swap the mozzarella for Gouda or incorporate a mix of your favorites!
Adapting to dietary restrictions is also easy. You can use gluten-free flour for a gluten-free option or plant-based butter for a dairy-free alternative.
Nutrition & Storage Info
- Prep time: 15 minutes
- Cook time: 30 minutes
- Total time: 1 hour 45 minutes (including rising time)
- Yield: About 12 pull-apart pieces
- Estimated calories: Approximately 150 calories per serving
Storage Instructions:
- Room Temp: 1-2 days in an airtight container.
- Fridge: 3-4 days.
- Freezer: Up to 1 month. To reheat, just pop it in the oven at 350°F until warm.
FAQ Section
Can I use instant yeast instead of active dry yeast?
- Yes, you can! Just mix it into the flour without needing to activate it first.
What if my dough doesn’t rise?
- Ensure your yeast is fresh and the water is warm (not hot). If it still doesn’t rise, you may have a cold kitchen; try a warmer spot.
Can I make this bread ahead of time?
- Absolutely! Prepare the dough, let it rise, and then refrigerate it. Shape and bake when you’re ready.
What can I use for flour substitutes?
- You can use whole wheat flour, or a gluten-free blend, but the texture may vary.
How can I make it more garlicky?
- Add more minced garlic or a sprinkle of garlic powder into the dough for an extra flavor punch!
What do I do if the bottom of my bread is too brown?
- If this happens, place a baking sheet under the pan while baking to distribute heat more evenly.
How long can I keep leftovers?
- Leftovers can be stored in an airtight container for about 3-4 days.
Can I freeze the dough before baking?
- Yes! After shaping, freeze it in the dish. Just thaw in the fridge overnight before baking.
What if I don’t have fresh garlic?
- You can substitute with garlic powder; use about 1 teaspoon for each clove.
Can I add meat to the filling?
- Definitely! Cooked bacon, ham, or pepperoni can be great additions between the layers.
Conclusion
This Cheesy Garlic Pull-Apart Bread is not just a recipe; it’s a key to creating memories and sharing love with those around you. I encourage you to give it a try and witness the joy it brings to your table. Your family will appreciate the effort, and I can’t wait to hear your thoughts! Don’t forget to share your experiences in the comments below, and check out my other delicious recipes to keep the flavor train rolling.
Happy baking!

Cheesy Garlic Pull-Apart Bread
Ingredients
Method
- In a bowl, combine warm water, 1 tsp sugar, and yeast. Let it sit for about 5-10 minutes until foamy.
- In a large mixing bowl, mix together flour, 1 tsp salt, melted butter, and milk. Once combined, add the yeast mixture and knead until a soft dough forms (about 5-7 minutes).
- Cover the bowl with a clean kitchen towel and let the dough rise in a warm place until it’s doubled in size (around 1 hour).
- Preheat your oven to 375°F (190°C) once the dough has risen.
- Roll out the dough on a floured surface to about 1/2-inch thick and cut it into 2-inch squares.
- In each square, layer garlic, mozzarella, and Parmesan cheese.
- Stack the pieces of dough in a greased baking dish, layering them upright.
- Brush the tops generously with additional melted butter and sprinkle a bit of salt.
- Bake for 25-30 minutes or until golden brown.
- Remove from the oven, brush with more melted butter, and sprinkle with fresh parsley for garnish.