Table of Contents
Table of Contents
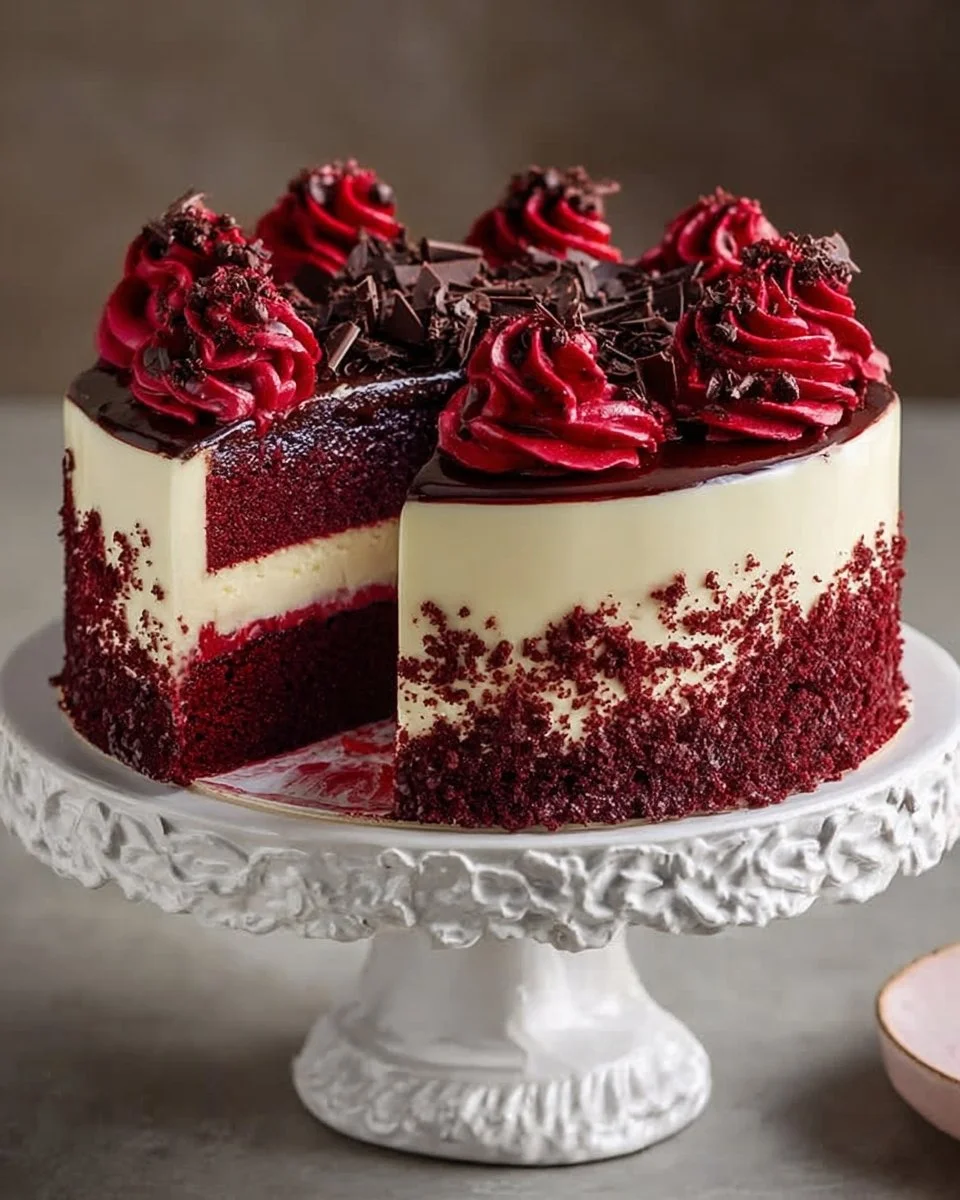
Decadent Red Velvet Cheesecake Layer Cake Recipe: The Ultimate Comfort Dessert
Let me take you back to a cozy family gathering where the aroma of freshly baked treats filled the air. My grandmother always made the most incredible desserts, but none could stand up to her stunning Red Velvet Cheesecake Layer Cake. Each dense, luscious bite was an explosion of velvety red goodness, sweetened by creamy cheesecake. This cake became the star of every festive occasion, leaving my family eagerly anticipating its return to the table each year.
What makes my version of the Red Velvet Cheesecake Layer Cake special? It’s not just about the beautiful layers or the rich flavors; it’s about reliving those sweet memories. With this recipe, you’ll learn to craft a showstopping dessert that’s perfect for birthdays, anniversaries, or simply those days when you want a little indulgence. This cake not only brings joy and comfort but offers the unique combination of flavors that will make it a family favorite, just like it is for mine.
Let’s get baking, and I promise, you’ll leave with the knowledge to create this beautiful cake and the memories it’ll help you build!
What are Red Velvet Cheesecake Layer Cakes?
The origins of red velvet cake can be traced back to the early 20th century, stemming from classic Southern U.S. cuisine. What began as a simple chocolate cake morphed into the eye-catching red velvet variety thanks to the addition of cocoa powder and the magical touch of red food coloring. Now, when we combine this iconic cake with creamy cheesecake layers, we create a stunning dessert that’s not just a feast for the eyes but a delight for the taste buds.
Each forkful brings a combination of moist, fluffy layers of rich red velvet cake, paired with velvety cheesecake that melts in your mouth. The balance of sweet, tangy cream cheese frosting against the deep cocoa notes of the cake creates a uniquely satisfying experience. This cake is perfect for celebrations or as a comforting treat – after all, who wouldn’t feel cared for when served a slice of this indulgence?
Why You’ll Love This Recipe
A Showstopper for Any Occasion: Imagine the look on your guest’s faces when you present this stunning cake. It’s a conversation starter and a centerpiece that brings everyone together.
Better Than Store-Bought: While there’s nothing wrong with grabbing a cake from your local bakery, nothing beats the freshness and homemade love that comes with this recipe. You’ll be saving money while delivering a superior flavor.
Customization Galore: Can’t handle gluten? Use gluten-free flour. Prefer a different frosting? Switch it up with chocolate or vanilla buttercream. The options are endless!
Easy to Make (with a few professional tips): Don’t let the layers intimidate you. This recipe is broken down step-by-step to ensure you can conquer any baking challenge.
Great for Batch Cooking: This cake is perfect for making ahead. Its flavors deepen over time, so you can even bake it the day before your event, allowing flavors to meld beautifully and making serving even easier.
Ingredients
For this Red Velvet Cheesecake Layer Cake, high-quality ingredients make all the difference! Here’s what you’ll need:
For the Crust:
- 2 cups (200 g) chocolate cookie crumbs (I prefer Oreos without the filling for a rich base)
- ½ cup (115 g) unsalted butter, melted
For the Red Velvet Cake:
- 2 ½ cups (315 g) all-purpose flour
- 1 ½ cups (300 g) sugar
- 2 tbsp cocoa powder
- 1 tsp baking soda
- 1 tsp baking powder
- 1 tsp salt
- 1 ½ cups (360 ml) buttermilk (or 1 ½ cups milk with 1 tbsp vinegar added)
- 1 cup (240 ml) vegetable oil
- 2 large eggs
- 2 tsp vanilla extract
- 1 tsp white vinegar
- 1–2 tbsp red gel food coloring
For the Cheesecake Layer:
- 16 oz (450 g) cream cheese, softened
- ½ cup (100 g) sugar
- 2 large eggs
- 1 tsp vanilla extract
- ½ cup (120 ml) sour cream or heavy cream
For the Cream Cheese Frosting:
- 1 cup (230 g) unsalted butter, softened
- 16 oz (450 g) cream cheese, softened
- 4 cups (480 g) powdered sugar
- 2 tsp vanilla extract
For the Glaze:
- ½ cup (120 ml) strawberry or raspberry jam
- 2 tbsp water
- 1 tsp lemon juice
For Garnish:
- Red velvet crumbs from trimming
- Dark chocolate chips
- Extra frosting for piping
Notes on Ingredients and Substitutions:
- Ensure your butter, cream cheese, and eggs are at room temperature for the best mixing results.
- If you don’t have buttermilk, you can make a substitute by adding 1 tablespoon of vinegar to the milk and letting it sit for about 5-10 minutes.
- Adjust the amount of red gel food coloring to get your desired shade of red.
- For the frosting, I recommend using full-fat cream cheese for a creamier texture.
Step-by-Step Instructions
Preparing the Crust:
- Preheat your oven to 350°F (175°C).
- Mix the chocolate cookie crumbs with the melted butter until it resembles wet sand.
- Press this mixture evenly into the bottom of a 9-inch springform pan. Bake for 10 minutes and allow it to cool completely.
Baking the Cake Layers:
- Increase the oven temperature to 350°F (175°C). Grease and line two 9-inch round cake pans.
- In a large bowl, whisk together the flour, cocoa powder, baking soda, baking powder, and salt.
- In another bowl, blend sugar, vegetable oil, eggs, buttermilk, vinegar, vanilla extract, and red gel food coloring until smooth.
- Gradually combine the wet ingredients with the dry ingredients, mixing until just combined.
- Divide the batter evenly between the two pans. Bake for 25-30 minutes or until a toothpick comes out clean. Let the layers cool completely.
Preparing the Cheesecake Layer:
- In a medium bowl, beat together the softened cream cheese and sugar until smooth.
- Add eggs one at a time, beating well after each addition. Mix in vanilla extract and sour cream until fully incorporated.
- Pour the cheesecake batter over the cooled cookie crust. Bake at 325°F (160°C) for 40-45 minutes, just until set but still slightly jiggly in the center. Cool completely before chilling in the refrigerator.
Assembling the Cake:
- Place one red velvet cake layer on your serving plate. Spread a thin layer of cream cheese frosting on top.
- Carefully place the chilled cheesecake layer on top, adding a light layer of frosting to help it stick.
- Top with the second red velvet cake layer. Frost the entire cake with the remaining cream cheese frosting, smoothing the sides and top.
Glazing:
- Warm the strawberry or raspberry jam with water and lemon juice over low heat until pourable. Let it cool slightly before pouring it over the top of the cake, letting it drizzle down the sides.
- Decorate with piped frosting, red velvet cake crumbs, and dark chocolate chips for an added touch of elegance!
Expert Tips & Tricks
- Room Temperature Ingredients: For the best results, always use room temperature eggs and cream cheese to avoid lumps and create a smooth batter.
- Cheesecake Troubleshooting: If your cheesecake cracks, it’s usually due to the oven being too hot—keep it at a lower temp and bake slowly for the best texture.
- Make Ahead: You can bake the cake layers and cheesecake a day before, storing them in fridge until you’re ready to assemble.
- Storage: Store leftovers in an airtight container in the fridge for up to 5 days. This cake is so rich, it’s likely to last you awhile!
- Freeze for Later: This cake can be frozen for up to three months. Just ensure it’s well-wrapped to avoid freezer burn.
Serving Suggestions
This stunning Red Velvet Cheesecake Layer Cake pairs beautifully with a scoop of vanilla ice cream or a dollop of whipped cream. Want to take it to the next level? Serve it with a cup of rich coffee or a glass of sparkling wine for a decadent ending to any meal.
It’s perfect for birthdays, anniversaries, or simply an indulgent night in. And as a fun idea, serve slices on decorative plates surrounded by fresh berries for a pop of color!
Variations & Substitutions
- Flavor Twists: Swap the red velvet out for chocolate or traditional vanilla cake, and consider adding chocolate ganache between layers instead of cheesecake for a different flavor profile.
- Seasonal Additions: For a festive touch, add crushed peppermint to the frosting in winter or top with fresh peach preserves in the summer.
- Dietary Adaptations: For a gluten-free option, replace all-purpose flour with a gluten-free blend, and ensure all packaged ingredients are certified gluten-free.
Nutrition & Storage Info
Prep Time: 30 minutes
Cook Time: 1 hour (includes baking time for both cakes and cheesecake)
Total Time: About 1 hour 30 minutes (plus chilling)
Yield: 12 servings
Estimated Calories: Approximately 500 calories per slice (varies by ingredients used)
Storage Instructions:
- At room temp: Can be left out for a few hours for a gathering, but should be refrigerated after serving.
- In the fridge: Store in an airtight container for up to 5 days.
- In the freezer: Wrap tightly and freeze for up to 3 months. Allow to thaw overnight in the fridge.
FAQ Section
Can I use store-bought cake mix to make this easier?
- Absolutely! If you’re pressed for time, a boxed red velvet cake mix can be an excellent shortcut. Just follow the instructions on the box for baking.
Why does my cheesecake crack?
- Cracking usually indicates that your cheesecake has been baked too quickly or at too high of a temperature. A lower temperature allows for an even bake.
Can I substitute cream cheese with something else?
- Yes! You can use mascarpone cheese or a non-dairy cream substitute for a lighter option, though the taste will vary slightly.
Is it possible to make smaller cake layers?
- Definitely! You can divide the batter into three 8-inch cake pans for thinner layers, but you may need to adjust the baking time.
Can I make this without buttermilk?
- Yes! Just mix 1 tablespoon of vinegar with regular milk and let it sit for about 10 minutes to sour.
How long does it take to bake the cheesecake layer?
- The cheesecake typically bakes for 40-45 minutes at 325°F (160°C), but keep an eye out; you want it set with a slight jiggle in the center.
How can I decorate this cake?
- Use dollops of extra frosting, fresh fruit, chocolate shavings, or even edible flowers for a delicate touch.
What can I make with leftover cake trimmings?
- Combine them to make cake pops or parfaits with whipped cream and fruit – no waste necessary!
Can I use different food coloring?
- Yes! You can use any food coloring but be aware that the shade may differ.
Does the cake need to be refrigerated?
- Yes, the cheesecake layer needs refrigeration. Store in the fridge to maintain its structure and freshness.
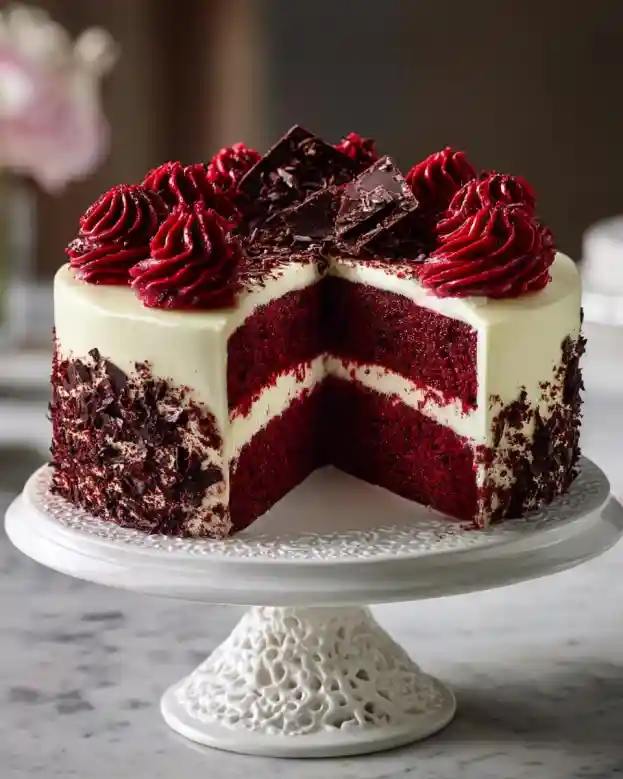
![image_2]
Conclusion
This Red Velvet Cheesecake Layer Cake is not just a dessert; it’s a memory-maker! Perfect for any occasion, it’s a beautiful blend of flavors that will impress your guests while bringing a touch of warmth to your heart. So, I encourage you to try this recipe, and I can’t wait to hear how it turns out! Feel free to drop your feedback in the comments and check out other delightful recipes on the blog – you’ll find plenty more treats waiting for you! Happy baking!
Graving More Recipes?
- Christmas Red Velvet Cheesecake
- No-Bake Cheesecake
- Biscoff Cheesecake
- Best 10 Cheesecake Recipes That Will Delight Every Sweet Tooth
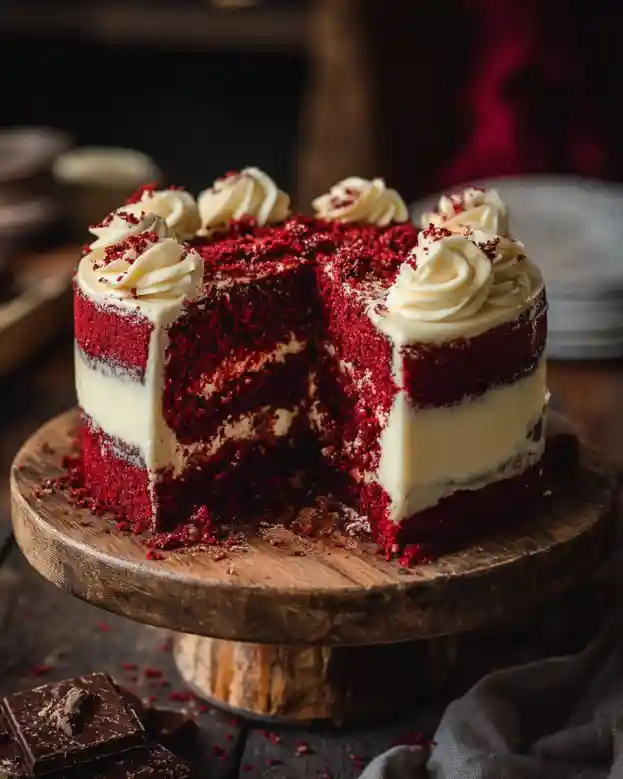
Red Velvet Cheesecake Layer Cake
Ingredients
Method
- Preheat your oven to 350°F (175°C).
- Mix the chocolate cookie crumbs with the melted butter until it resembles wet sand.
- Press this mixture evenly into the bottom of a 9-inch springform pan. Bake for 10 minutes and allow it to cool completely.
- Increase the oven temperature to 350°F (175°C). Grease and line two 9-inch round cake pans.
- In a large bowl, whisk together the flour, cocoa powder, baking soda, baking powder, and salt.
- In another bowl, blend sugar, vegetable oil, eggs, buttermilk, vinegar, vanilla extract, and red gel food coloring until smooth.
- Gradually combine the wet ingredients with the dry ingredients, mixing until just combined.
- Divide the batter evenly between the two pans. Bake for 25-30 minutes or until a toothpick comes out clean. Let the layers cool completely.
- In a medium bowl, beat together the softened cream cheese and sugar until smooth.
- Add eggs one at a time, beating well after each addition. Mix in vanilla extract and sour cream until fully incorporated.
- Pour the cheesecake batter over the cooled cookie crust. Bake at 325°F (160°C) for 40-45 minutes, just until set but still slightly jiggly in the center. Cool completely before chilling in the refrigerator.
- Place one red velvet cake layer on your serving plate. Spread a thin layer of cream cheese frosting on top.
- Carefully place the chilled cheesecake layer on top, adding a light layer of frosting to help it stick.
- Top with the second red velvet cake layer. Frost the entire cake with the remaining cream cheese frosting, smoothing the sides and top.
- Warm the strawberry or raspberry jam with water and lemon juice over low heat until pourable. Let it cool slightly before pouring it over the top of the cake, letting it drizzle down the sides.
- Decorate with piped frosting, red velvet cake crumbs, and dark chocolate chips for an added touch of elegance!