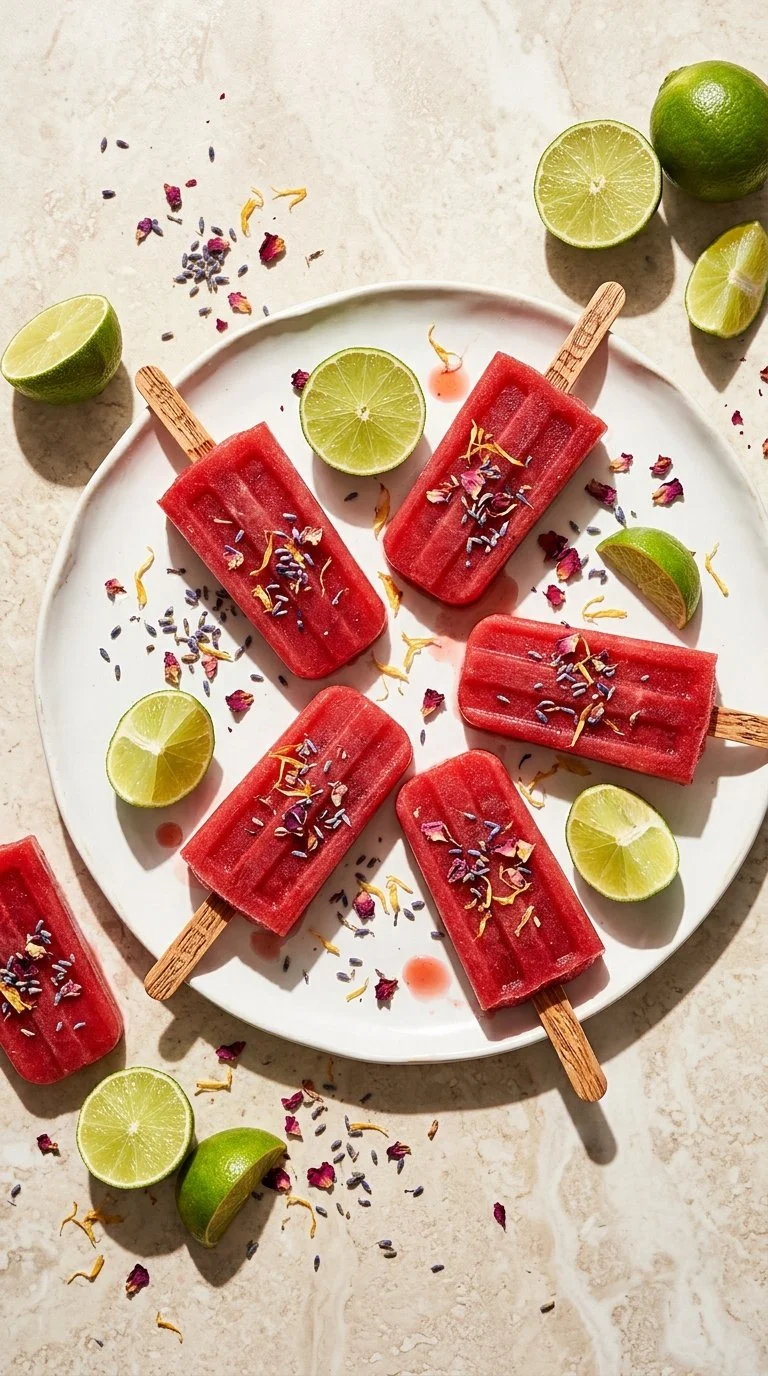
Healthy Strawberry Popsicles with Yogurt: A Delightful Summer Treat
Introduction
As the summer sun beat down last year, my family and I sought refuge from the heat with something cold and delicious! Between splashes in the kiddie pool and lazy afternoons in the garden, I found myself blending a delightful concoction that would become a cherished staple: Healthy Strawberry Popsicles with Yogurt. This simple yet refreshing treat is bursting with fruity flavors, giving those pre-packaged, sugar-laden versions a serious run for their money.
What makes these popsicles extra special? It’s not just the vibrant color or the creamy texture, but the sweet nostalgia they carry. Each bite takes me back to summers spent at my grandmother’s house, sharing stories and laughter over homemade snacks in the shade of her porch. Trust me, there’s nothing like enjoying a sweet treat that not only tastes good but is packed with good-for-you ingredients!
In this post, I’ll guide you through the steps of making your own Healthy Strawberry Popsicles with Yogurt, loaded with wholesome ingredients that you can feel good about serving to your family. Get ready to cool down and share some smiles!
What Are Healthy Strawberry Popsicles with Yogurt?
Healthy Strawberry Popsicles with Yogurt are a revamp of the traditional popsicle—perfect for indulging your sweet tooth without the guilt. Originating from my quest to create playful, healthy snacks, these popsicles combine the sweetness of strawberries and pineapple with the creaminess of coconut yogurt. Imagine taking a bite—smooth, refreshing, and bursting with fruity goodness!
They’re unique not only for their beautiful color but also for being packed with nutrients, thanks to the addition of cooked beets which enhance the vibrant pink hue and add vitamins without altering the delightful flavor. These popsicles are perfect for any occasion—be it a summer barbecue, a playful pool party, or simply a sweet treat at the end of a long day.
Why You’ll Love This Recipe
Health-Conscious Ingredients: Unlike store-bought pops, these popsicles skip artificial flavors and sweeteners. The use of fresh fruits and coconut yogurt means you’re treating your body right while indulging your taste buds.
Cost-Effective: One of the best parts? Making these popsicles at home is significantly cheaper than buying gourmet frozen treats! With just a handful of ingredients, you save money while enjoying healthier snacking options.
Customizable to Your Taste: The base recipe allows for endless variations; swap out ingredients based on your pantry staples. Craving a tropical bliss? Try mango instead of strawberries!
Effortlessly Easy: This recipe is a breeze, even for beginner bakers! With only 5 simple steps, you can whip up a batch in no time. Plus, the most challenging part is the waiting—eight hours of freezing!
Perfect for the Whole Family: These popsicles are a great way to sneak extra nutrition into your kids’ diets. They’ll love the sweet taste, and you’ll love knowing they’re getting fruity goodness instead of artificial sugar.
Ingredients

- 10 oz Frozen Strawberries: Choose organic if possible for best flavor.
- 10 oz Frozen Pineapple: Adds a tropical flair! Fresh is also an option if you feel adventurous.
- 3 Small Cooked Beets, Cubed: This enhances both the color and nutrition; the flavor is very subtle.
- 1/2 Cup Coconut Yogurt: Opt for unsweetened coconut yogurt or any dairy-free alternative if desired.
- 1/3 Cup Coconut Milk: Full-fat for creaminess, or low-fat for a lighter version.
- 1 Tablespoon Lime Juice: Freshly squeezed is best; it really brightens the other flavors.
- 1 Tablespoon Raw Honey (optional): Use this if you like a little extra sweetness. You can even substitute with maple syrup.
- Pinch of Salt: Balances the flavors beautifully.
Step-by-Step Instructions
Blend: Start by throwing all the popsicle ingredients into your high-powered blender. Blend on high until smooth and creamy, about 1-2 minutes.
Chef’s Tip: Make sure to pause and scrape down the sides of your blender if any stubborn chunks are sticking!
Pour: Carefully pour the mixture into a silicone popsicle mold. I love silicone molds—they make it so easy to pop the popsicles out later!
Insert Sticks: Place the popsicle sticks into the molds. If you find they’re not standing up straight, you can freeze them for about 30 minutes first before inserting the sticks.
Freeze: Pop the molds into the freezer and let them freeze for at least 8 hours, or overnight for the best firmness.
Unmold: Once set, run warm water over the outside of the molds for a few seconds if needed, then gently pull the popsicles out. Enjoy immediately or store in the freezer!
Mistake to Avoid: Avoid leaving them in the molds for too long or they can stick!

Expert Tips & Troubleshooting
Storage Recommendations: These popsicles can be kept frozen for up to 2 months. Just wrap them in parchment paper or store in an airtight container to prevent freezer burn.
Make-Ahead Instructions: These are perfect for meal prep! Make a batch on Sunday and you’ll have healthy treats ready for the week.
Troubleshooting Common Problems: If your popsicles are too hard, try reducing the coconut milk slightly. If they’re too soft, consider adding more fruit to the mixture!
Consider Substitutions: You can swap the coconut yogurt for almond or Greek yogurt based on your preference.
Serving Suggestions
Serve these delightful popsicles with a drizzle of honey, or even a sprinkle of toasted coconut for added crunch. They make for a charming birthday party treat or a refreshing accompaniment to a light summer dinner. Pair them with fresh fruit salad or granola for a more complete snack!
Variations & Substitutions
Fruity Mix-Ups: Think berry blends! Substitute strawberries with blueberries, raspberries, or cherries for a mix of flavors.
Dairy-Free/Lower Calorie: You can easily make it dairy-free by using almond or cashew yogurt. Use Stevia or another alternative sweetener for a lower-calorie option.
Seasonal/Multi-Flavor Pops: Feel free to grab whatever fruits are in season! During fall, why not experiment with apple and cinnamon pops?
Nutrition & Storage Info
- Prep Time: 15 minutes
- Total Time: 8+ hours (mostly freezing)
- Yield: Approximately 8 popsicles
- Estimated Calories per Serving: ~80 calories per popsicle
- Storage Instructions: Freezer is ideal; lasts up to 2 months.
FAQ Section
Can I use fresh strawberries instead of frozen?
Yes, but they may need more blending time, and your pops might not be as thick.How do I make them less sweet?
Simply reduce or omit the honey. The fruit will provide natural sweetness!What can I use instead of coconut yogurt?
Greek yogurt works well, or any dairy-free yogurt of your choice.Can I add supplements like protein powder?
Absolutely! Just make sure to balance the liquid accordingly if you add more powder.Why are my popsicles too hard to remove from the mold?
Running warm water over them should help! If they seem too stuck, try letting them sit for a minute before trying again.Can I make these without beets?
Yes! You’ll lose the deep pink color, but they will still taste great.Are these popsicles safe for kids?
Yes, they are made entirely from fruit and yogurt—perfect for little ones!How long do these last in the freezer?
Around 2 months if stored properly!Can I add other veggies?
Sure! Spinach blends well and will add nutrition without affecting the taste.What should I do if I don’t have popsicle molds?
You can use paper cups and stick a spoon in them! Just remove the popsicle after freezing.
Conclusion
These Healthy Strawberry Popsicles with Yogurt are not just a treat; they carry nostalgia, joy, and a promise of refreshing bliss on hot summer days. I wholeheartedly encourage you to whip up a batch and taste the difference for yourself. Please try this recipe and let me know how it goes! Leave your thoughts in the comments, and don’t forget to check out my other fruity treats on the blog that are perfect for summer!

Healthy Strawberry Popsicles with Yogurt
Ingredients
Method
- Start by throwing all the popsicle ingredients into your high-powered blender. Blend on high until smooth and creamy, about 1-2 minutes.
- Chef's Tip: Make sure to pause and scrape down the sides of your blender if any stubborn chunks are sticking!
- Carefully pour the mixture into a silicone popsicle mold.
- Insert popsicle sticks into the molds. If they’re not standing up straight, freeze them for about 30 minutes first before inserting the sticks.
- Pop the molds into the freezer and let them freeze for at least 8 hours, or overnight for the best firmness.
- Once set, run warm water over the outside of the molds for a few seconds if needed, then gently pull the popsicles out. Enjoy immediately or store in the freezer!
- Mistake to Avoid: Avoid leaving them in the molds for too long or they can stick!