Table of Contents
Table of Contents
There’s something magical about an Oreo milkshake that takes me straight back to my childhood. Vivid memories flood back of sultry summer days spent basking in the sun with my family, homemade treats in hand. We’d whip up our favorite ice cream creations, but nothing quite compared to that delightful, creamy goodness blended with crunchy Oreo cookies—a perfect harmony of flavors that ignited joy in every sip. Every time I blend together rich vanilla ice cream with my beloved Oreos, I’m reminded of those carefree moments, and that’s why I believe this Oreo milkshake is not just a beverage, but a heartfelt experience.
What sets my recipe apart from the myriad of other milkshakes out there? It’s got a velvety texture and an explosion of flavor thanks to freshly crushed cookies. Plus, I’ve perfected the balance between ice cream and milk for that dreamy consistency. You’ll learn how to create your own Oreo milkshakes that rival anything you could find at a trendy cafe—with a few personal twists that will make them unforgettable. So, grab your blender, and let’s create a delicious treat bursting with nostalgia!
What Are Oreo Milkshakes?
Oreo milkshakes have become a beloved classic since they first appeared in diners and cafes across America. The origin of this indulgent treat can be traced back to the mid-20th century, when ice cream parlors began experimenting with combining cookies and ice cream into sweet beverages. Today, they represent a delightful fusion of textures and flavors; each sip offers a rich creaminess paired with a satisfying crunch from crushed Oreo cookies.
The indulgence of this milkshake strikes the perfect balance between sweet and slightly chocolaty, with a smooth and creamy backdrop. Imagine the first sip: your taste buds are met with frosty vanilla ice cream, laced with the familiar attributes of Oreo’s signature filling and crumbly cookie. It’s the ultimate treat for any occasion—whether you’re celebrating a special moment or simply craving comfort food.
When should you whip up an Oreo milkshake? Anytime you feel the urge for some sweetness, of course! These shakes are perfect for movie nights, summer BBQs, or as a post-dinner treat to make an ordinary day extraordinary.
Why You’ll Love This Recipe
Here’s why you’re going to adore this Oreo milkshake recipe!
Rich Flavor: Unlike many store-bought versions that can be overly sweet or artificial tasting, my homemade concoction uses fresh ingredients, ensuring a burst of genuine flavor in every sip.
Cost-Effective: A trip to your local cafe can cost you upwards of $5 for a single milkshake. With my recipe, you’ll achieve the same luscious taste at a fraction of the price—less than $2 per serving!
Customization: Want more chocolate? Add a scoop of chocolate ice cream or some chocolate drizzle. Prefer a minty flavor? Just a drop of peppermint extract can change everything. The possibilities are endless, and you get to choose your own flavor adventure.
Quick to Make: Don’t be daunted by a long recipe—this dairy delight comes together within 10 minutes! That means more time to enjoy and indulge.
Family-Friendly Fun: This is a recipe you can make together with your little ones. Crushing the Oreos and blending ingredients becomes a fun activity that ends with a delicious reward for everyone.
Trust me, once you try making this at home, you’ll be shaking your head at the thought of store-bought milkshakes forever.
Ingredients Section
Here’s what you’ll need for your tantalizing Oreo milkshake:
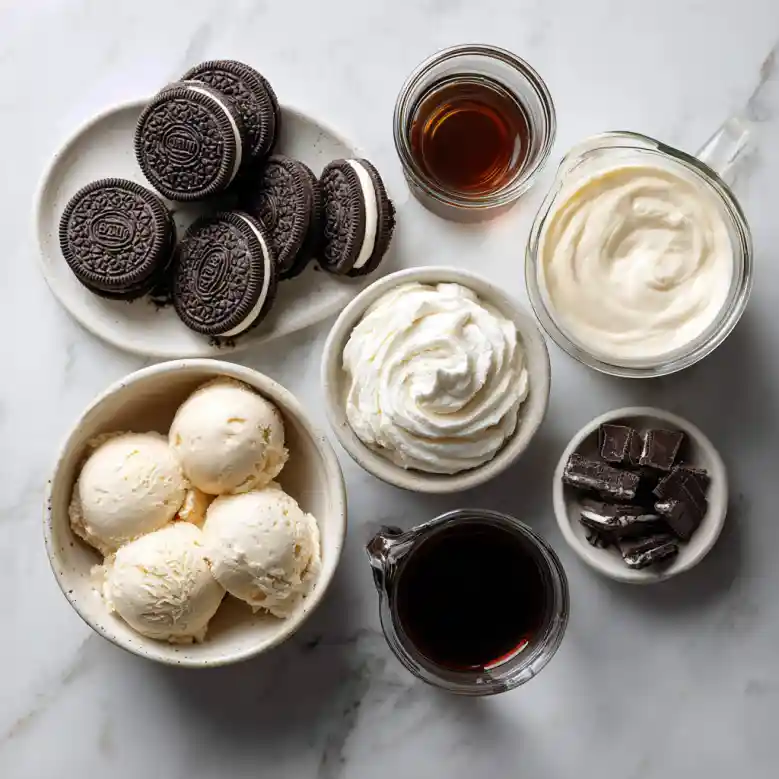
- 8 Oreo cookies: Regular classic Oreos work best for authenticity. You can experiment with different flavors, but classics are hard to beat!
- 2 cups of vanilla ice cream: Go for a high-quality brand like Haagen-Dazs or Breyers for that creamy richness.
- 1 cup whole milk: Whole milk adds the perfect creaminess. You can substitute with almond milk or oat milk if you’d prefer a dairy-free option.
- 1/2 teaspoon vanilla extract: Use pure vanilla extract for deeper flavor—your milkshake will thank you!
- Whipped cream: The perfect topping to give your shake some extra flair. Store-bought is fine, but homemade is divine.
- Chocolate syrup: For drizzling over the top; store-bought works just great!
- Extra Oreo cookies for garnish: Because who doesn’t love an extra cookie or two?
Chef’s Notes: Make sure your ice cream is partially thawed for easier blending, and feel free to use low-fat milk if you’re looking to save a few calories.
Step-By-Step Instructions
Crush the Oreos (2 minutes):
- Place the 8 Oreo cookies into a thick freezer bag. Gently pound with a rolling pin until they’re crushed into small bits—this should take about a minute. You want a mix of fine crumbs and larger chunks for some texture.
Blend the Base (2 minutes):
- Add 1 cup of whole milk to your blender, followed by the 2 cups of vanilla ice cream and the crushed Oreo cookies.
- Pulse a few times to combine, then blend on high until the mixture is smooth and creamy. This should take between 30-60 seconds.
Add Flavor (1 minute):
- If you’re using, add the 1/2 teaspoon vanilla extract to the mixture. Blend it again for about 10 seconds to mix everything beautifully.
Adjust Consistency (1 minute):
- Check your shake’s consistency. If it’s too thick, add more whole milk, a little at a time, and blend again until you reach your desired texture.
Serve (2 minutes):
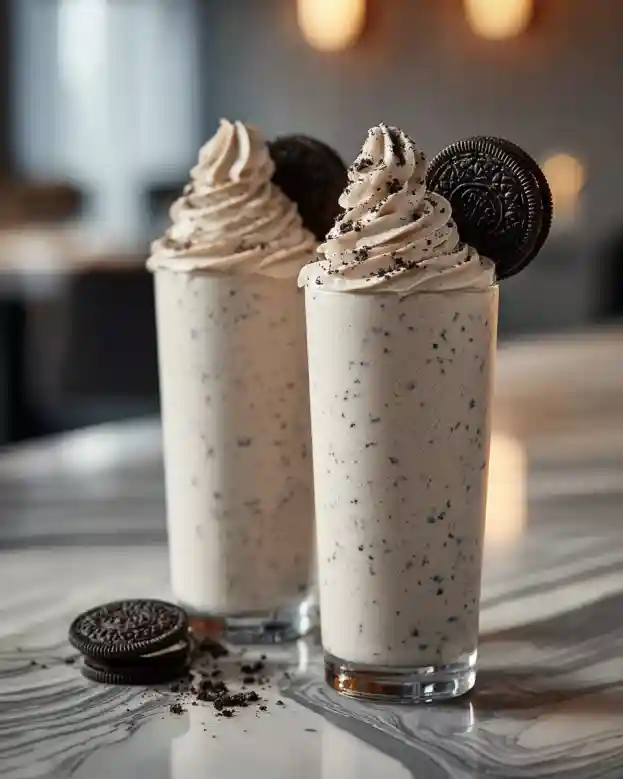
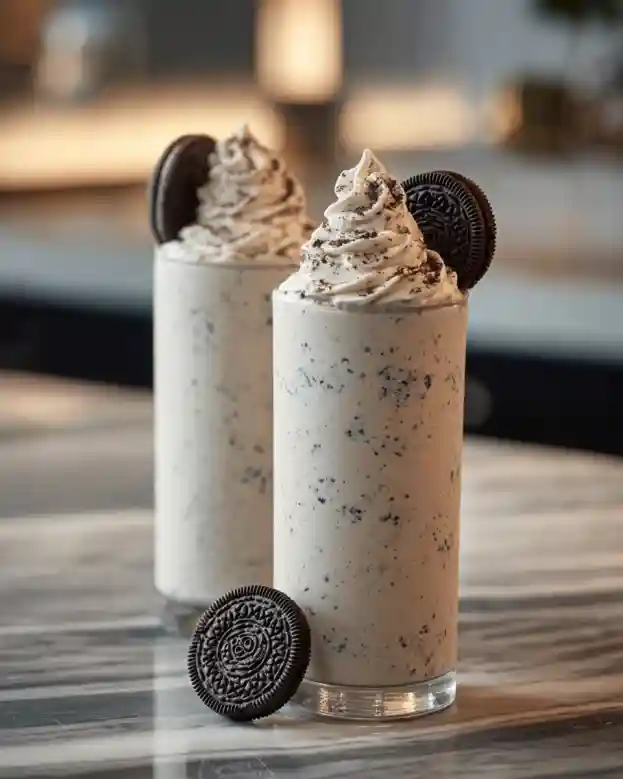
- Pour the milkshake into two glasses, leaving some room for toppings. Don’t forget to top with a generous dollop of whipped cream. Drizzle chocolate syrup over the whipped cream, and place a whole Oreo casually on top for that final touch.
Enjoy! (Immediate):
- Serve immediately with a straw and a spoon. If you don’t indulge right away, the shake will start losing its chill.
Chef’s Tips: To avoid a grainy texture, ensure your cookies are finely crushed. And don’t be afraid to experiment—this shake is as much about your preferences as it is about the recipe!
Expert Tips & Tricks
- Storage Recommendations: If you have leftovers (though highly unlikely!), store in a sealed container in the freezer for up to 2 days. Let it thaw a little before consuming.
- Make-Ahead Instructions: You can prepare the Oreo crumbs a day in advance. Store them in an airtight container, and just blend with the other ingredients when you’re ready to indulge.
- Troubleshooting: If your shake is too thick, add more milk gradually. If it’s too thin, add a scoop of ice cream to thicken it up!
- Sweetness Adjustment: Taste before serving! If you find it’s not sweet enough for your liking, a little sugar or another drizzle of chocolate syrup can elevate it.
- Blend it Smooth: For an extra smooth milkshake, let your ice cream sit out for about 10 minutes before blending.
Serving Suggestions
What pairs beautifully with an Oreo milkshake? Why not serve it alongside warm, gooey brownies or delicious chocolate chip cookies? For a themed movie night, popcorn sprinkled with chocolate or caramel would be a delightful addition. Present the milkshake in tall glasses with colorful straws to make it Instagram-worthy and enhance those visual cues for everyone to enjoy as they dive into this chocolate dream.
Variations & Substitutions
- Different Flavor Combinations: Try using mint-flavored Oreos for a refreshing twist or even golden Oreos for a lighter flavor. Thinking of exploring? Add a spoonful of peanut butter or Nutella for an even richer experience.
- Dietary Restrictions: For a dairy-free option, substitute almond or coconut milk for whole milk and use a dairy-free ice cream.
- Seasonal Variations: Spice things up for the holidays by adding a dash of cinnamon or a splash of eggnog in winter. In the fall, crushed pumpkin spice Oreos can add a festive vibe!
Nutrition & Storage Info
- Prep Time: 5 minutes
- Cook Time: 5 minutes
- Total Time: 10 minutes
- Yield: 2 servings
- Estimated Calories per Serving: Approximately 400 calories (depending on ingredients used)
Storage Instructions: Store leftovers in a sealed container in the freezer for up to 2 days. For best enjoyment, consume immediately.
FAQ
Can I use low-fat milk instead of whole milk?
- Yes, but this may slightly alter the creaminess.
How do I thicken my milkshake?
- Add extra ice cream or less milk.
Can I make this milkshake with different cookies?
- Absolutely! You can explore flavors like Mint Oreos or even use chocolate chip cookies for a delightful spin.
Is there a dairy-free version?
- Yes! Use almond or oat milk and dairy-free ice cream.
How long will leftovers last?
- They’re best consumed immediately but can last up to 2 days in the freezer.
Can I prepare Oreos ahead of time?
- Certainly! Crush them beforehand and keep in an airtight container.
Is this recipe kid-friendly?
- Yes, kids will love making and enjoying their Oreos milkshakes!
What is the best type of blender to use?
- A high-powered blender works best, but a standard one will suffice if you pulse carefully.
How can I increase the cookie flavor?
- Simply add more Oreos!
Can I make this a chocolate Oreo milkshake?
- Indeed! Substitute half the vanilla ice cream with chocolate ice cream.
Conclusion
In conclusion, this Oreo milkshake isn’t just a drink; it’s a heartwarming reminder of childhood joy and the simple pleasures of life. Each sip is packed with nostalgia, creamy flavors, and a delightful crunch, making it the ultimate comfort food.
I invite you to try this recipe and experience the transformable magic yourself. I’d love to hear your thoughts and any special twists you add! Don’t forget to check out my other dessert recipes on the blog for further sweet inspiration. Cheers to delicious milkshakes and happy memories!
Graving More Recipes?

Oreo Milkshake
Ingredients
Method
- Place the 8 Oreo cookies into a thick freezer bag. Gently pound with a rolling pin until they’re crushed into small bits—this should take about a minute.
- Add 1 cup of whole milk, followed by 2 cups of vanilla ice cream and the crushed Oreo cookies to a blender.
- Pulse a few times to combine, then blend on high until smooth and creamy, about 30-60 seconds.
- If using, add 1/2 teaspoon vanilla extract and blend for about 10 seconds.
- Check consistency; if too thick, add more whole milk gradually until desired texture is reached.
- Pour the milkshake into two glasses, topping with whipped cream, chocolate syrup, and an extra Oreo.